ssh 跨系统共享 vims 剪切板的最佳解决方案
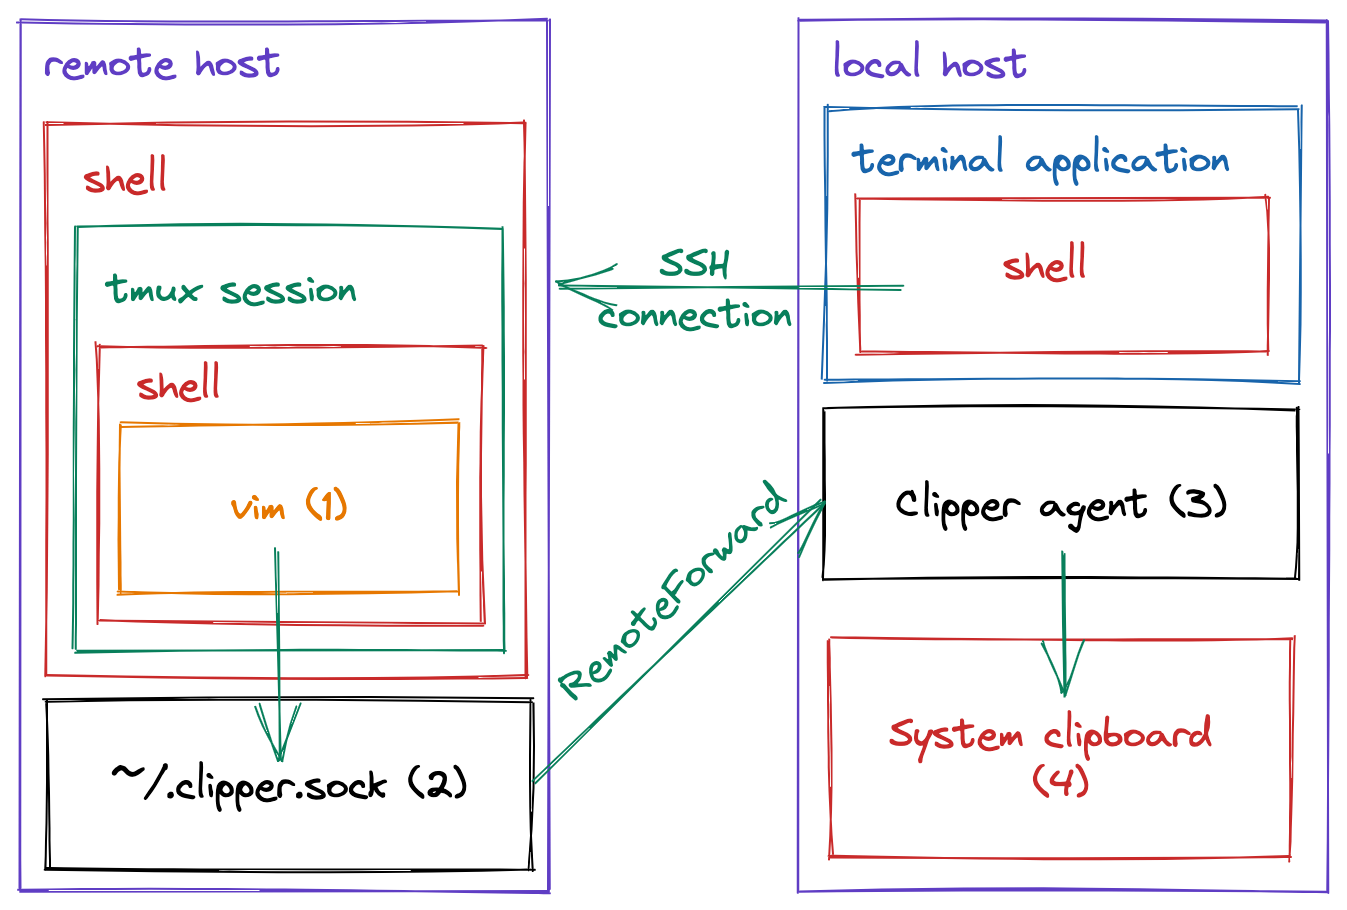
本篇文章详细地记录整理了如何跨系统共享VIM剪切板的问题,具体地说来,就是如何在 ssh 的 vim (in or not in tmux)里快捷地复制到本地系统剪切板,主要用到了 X11 共享剪切板的特性,以及基于 socket 实现地传输。

- 0. before you start
- 1. ensure the installed vim supports
X11 - 2. enable
X11on remote ubuntu via ssh - 3. enable access to clipboard on remote ubuntu at local (part 1: basic)
- 4. enable access to clipboard on remote ubuntu at local (part 2: socket)
- 5. enable vim copy to registry
- 6. enable vim copy to local clipboard
- 7. enable tmux copy to local clipboard
- core reference
0. before you start
- premise your socket port for sharing clipboard is
19988 - premise your server connected to is
$YOUR_SERVER - I just implemented from MacOS(local) to Ubuntu(remote), and the logic is no different on other platforms.
markis my nickname
1. ensure the installed vim supports X11
ensure +X11 (instead of -X11) in vim --version
if not, install another version of vim, otherwise the * | + registries would not work (with a sound of beam for warning):
# ref: sudo apt install vim-gtk3
sudo apt install vim-gtk3
2. enable X11 on remote ubuntu via ssh
to fix Error: Can't open display: (null) when using echo "xx" | xclip on remote ubuntu, I found we should config ForwardX11 yes in both local and remote ssh config, see: https://askubuntu.com/a/305681/1629991
1. config
## -- local ---
# /etc/ssh/ssh_config
Host *
    ForwardX11 yes

## -- remote ---
# /etc/ssh/sshd_config
X11Forwarding yes
2. connect on client
# the `-X` is to enable the `X11-forward` feature
ssh -X mark$YOUR_SERVER
3. test on remote
➜  ~ echo 'clip on air' | xclip
➜  ~ xclip -o
clip on air
➜  ~ xclip -selection clipboard -o
zzz2
➜  ~ echo 'clip on clipboard' | xclip -selection clipboard
➜  ~ xclip -o
clip on air
➜  ~ xclip -selection clipboard -o
clip on clipboard
➜  ~ xclip -sel clipboard -o
clip on clipboard
➜  ~ xclip -sel clip -o
clip on clipboard
3. enable access to clipboard on remote ubuntu at local (part 1: basic)
首先可以看一下这篇Forward your clipboard via SSH reverse tunnels,它给出了最简单的基于无限循环监听端口(nc -l)并复制(pbcopy)的方案。
1. enable listen on one shell
while (true); do nc -l 19988 | pbcopy; done
2. connect using reverse tunnelling
solution 1
ssh mark@$YOUR_SERVER -R 19988:localhost:19988
solution 2
- config on local
# ~/.ssh/config
RemoteForward 19988 localhost:19988
- (possibly necessary) reload ssh
sudo launchctl unload /System/Library/LaunchDaemons/ssh.plist
sudo launchctl load -w /System/Library/LaunchDaemons/ssh.plist
- connect without
-R
ssh mark@$YOUR_SERVER
3. test on remote
echo "test 1" | nc -q0 localhost 19988
then we can access the test 1 in the local clipboard.
4. enable access to clipboard on remote ubuntu at local (part 2: socket)
1. config plist
PLIST_PBCOPY_SSH=`~/.pbcopy_ssh.plist`
<?xml version="1.0" encoding="UTF-8"?>
<!DOCTYPE plist PUBLIC "-//Apple//DTD PLIST 1.0//EN" "http://www.apple.com/DTDs/PropertyList-1.0.dtd">
<plist version="1.0">
<dict>
    <key>Label</key>
    <string>pbcopy-ssh</string>

    <key>UserName</key>
    <string>mark</string>

    <key>Program</key>
    <string>/usr/bin/pbcopy</string>

    <key>Sockets</key>
    <dict>
        <key>Listeners</key>
        <dict>
            <key>SockNodeName</key>
            <string>localhost</string>
            <key>SockServiceName</key>
            <string>19988</string>
        </dict>
    </dict>
    <key>inetdCompatibility</key>
    <dict>
        <key>Wait</key>
        <false/>
    </dict>
</dict>
</plist>
2. chmod (necessary)
chmod 755 $PLIST_PBCOPY_SSH
see https://developer.apple.com/forums/thread/665661?answerId=695171022#695171022, otherwise would have the following error if we load or unload the plist file:
Load failed: 5: Input/output error
Try running `launchctl bootstrap` as root for richer errors.
3. start plist
launchctl load $PLIST_PBCOPY_SSH
launchctl start pbcopy-ssh
we can also check the running state of plist via launchctl print gui/501/pbcopy-ssh | grep state to only get state = not running, but it have worked actually.
4. test plist
ssh mark@$YOUR_SERVER -R 19988:localhost:19988

echo 'test 2' | nc -q0 localhost 19988
then we can access the test 2 in the local clipboard.
TODO: 5. auto-start plist after login
5. enable vim copy to registry
see more at: How to copy to clipboard in Vim? - Stack Overflow
1. map Y to copy selected content into register +
vnoremap Y "+y
2. usage
shift + Vto switch toVisual Modeand select the current line, then use the Arrow key ofUP | DOWNto select more lines.- press
Yto copy the selected lines into the clipboard
6. enable vim copy to local clipboard
see more at: [ssh - How to use X11 forwarding to copy from vim to local machine - Stack Overflow](https://stackoverflow.com/questions/47822357/how-to-use-x11-forwarding-to-copy-fro m-vim-to-local-machine)
Based on section of 4. enable vim copy to registry, we can manually run a system command that send the registered content into system clipboard (local via xclip or pbcopy or remote via nc and xclip or pbcopy).
For example, we can use : call system('nc -q0 localhost 19988', @+) to send the content in register + to the local port at 19988.
we should add -q0 for nc if necessary, otherwise I found that the command just won't stop input (since it would has verbose output).
So, for convenience, we can directly use the following vim script to map the sequences into one key of Y:
" -- enable Y to copy to clipboard, ref: https://stackoverflow.com/a/67890119/9422455
" how to map two commands with only one key, ref: https://vi.stackexchange.com/a/3886
" what's the meaning of <CR> (which can be omitted in bottom command), ref: https://stackoverflow.com/a/22143208/9422455

vnoremap Y "+y :call system('nc -q0 localhost 19988', @+)<CR>
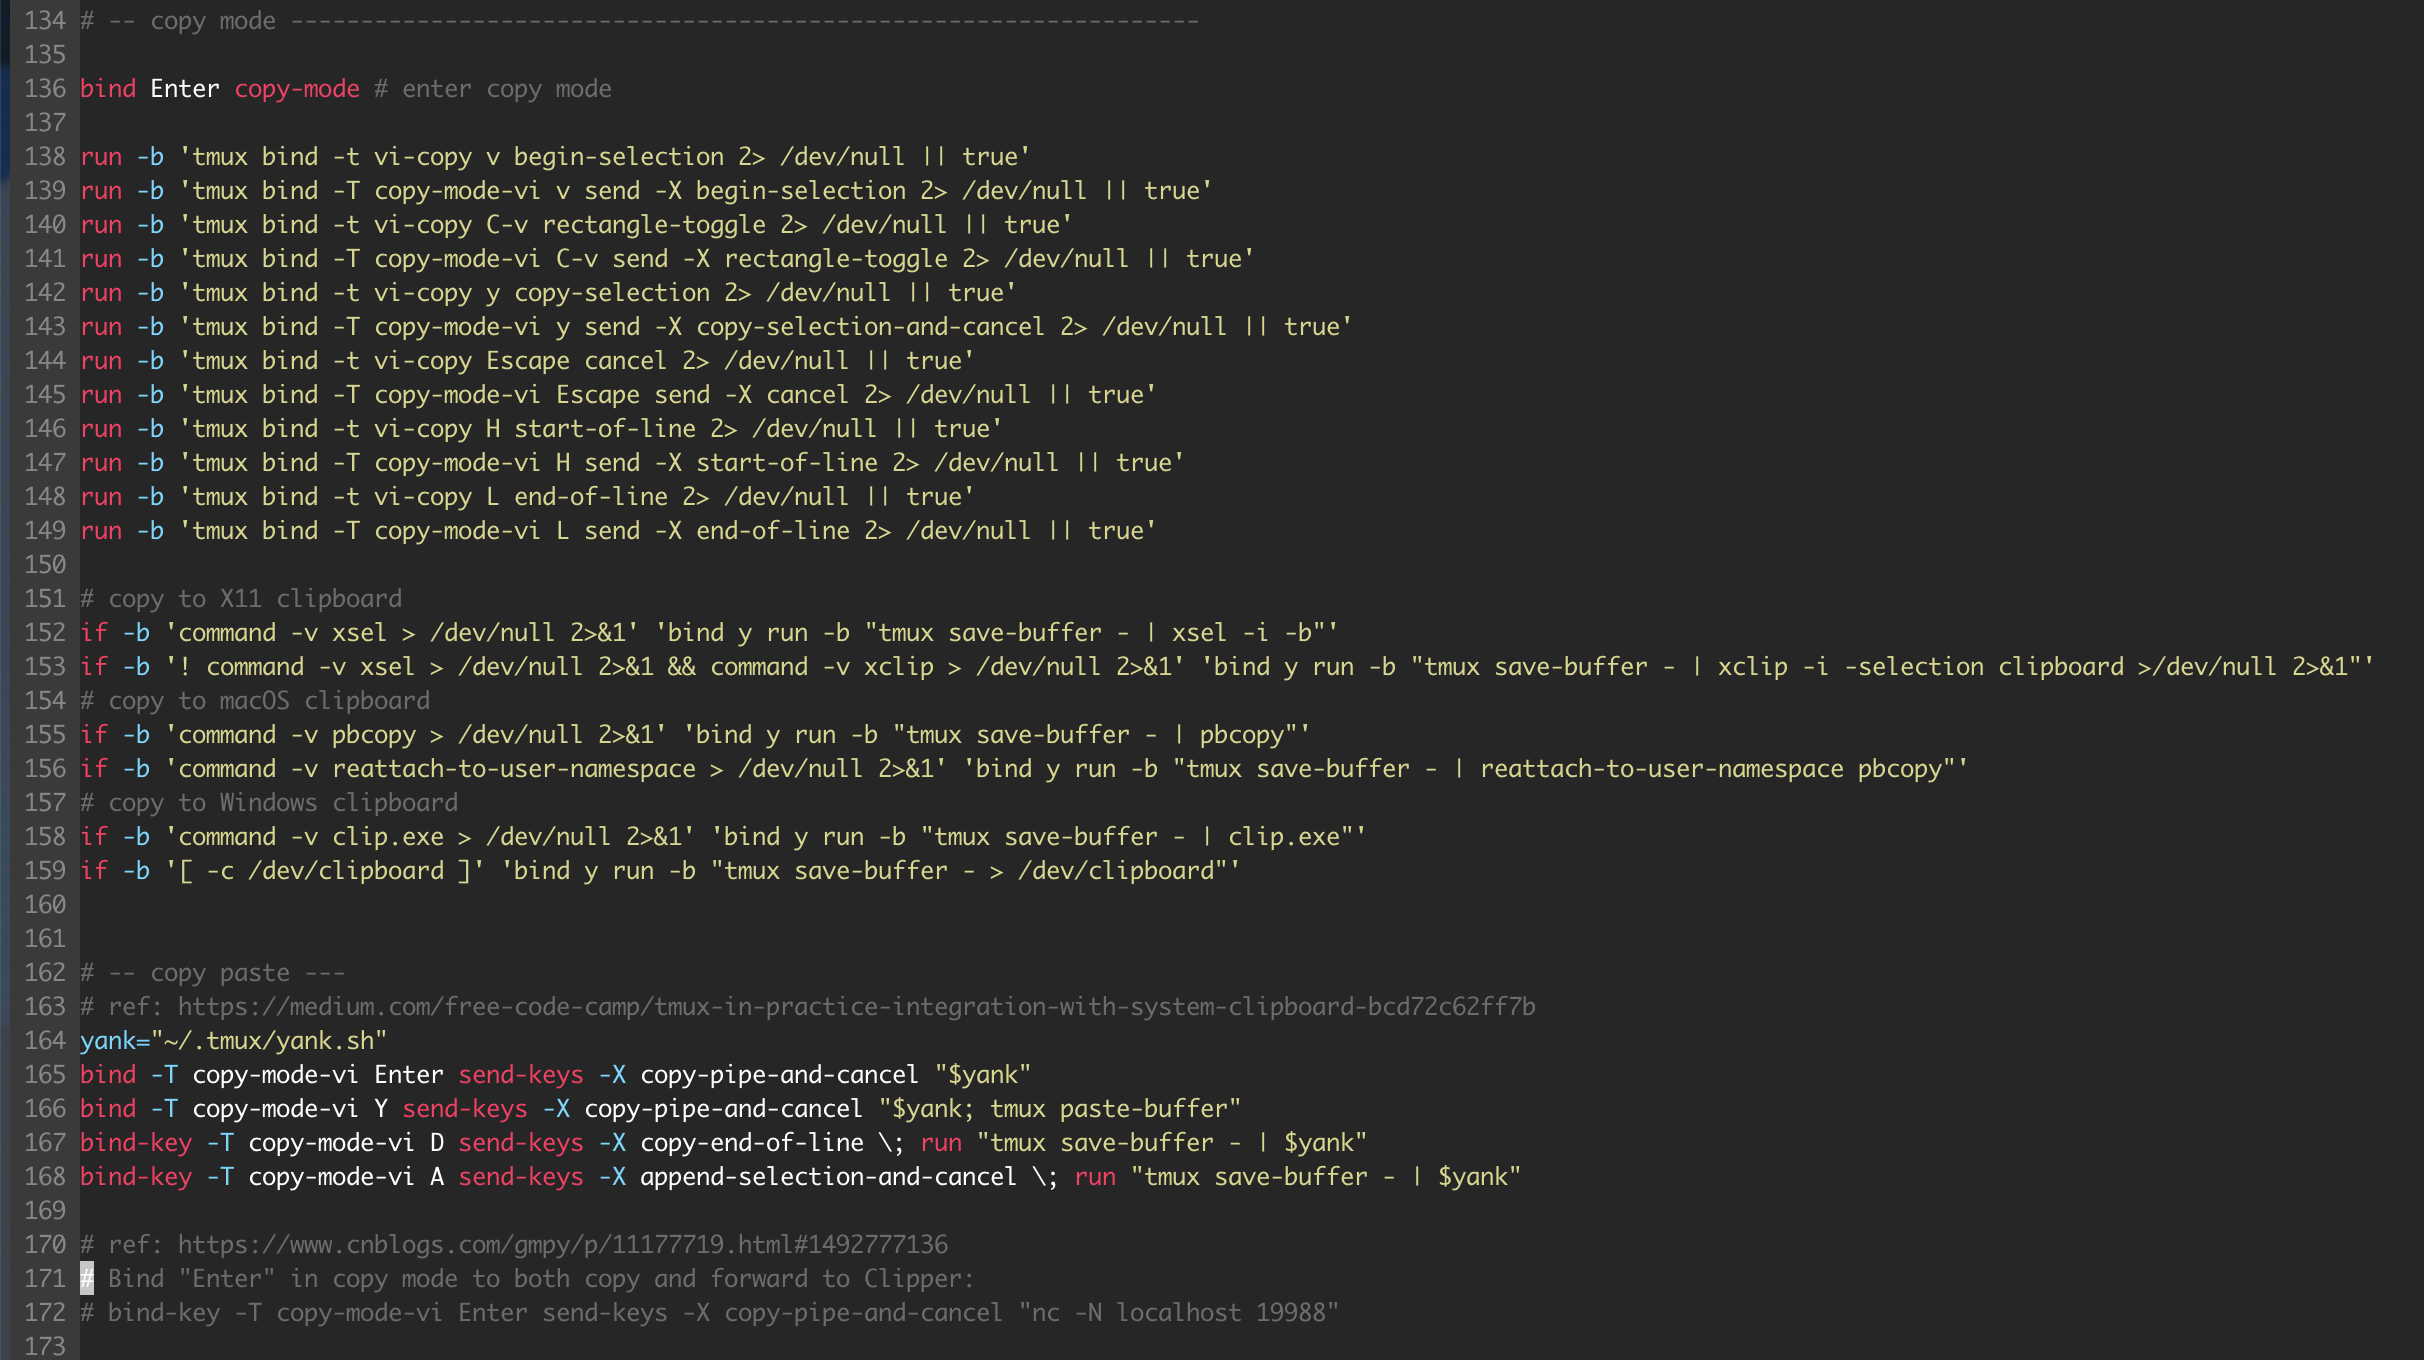
7. enable tmux copy to local clipboard
see more at: vim与系统剪切板之间的复制粘贴 - 广漠飘羽 - 博客园
after vim configured, the tmux copy paste would runs well if we use the oh-my-tmux config at https://github.com/gpakosz/.tmux

core reference
- Forward your clipboard via SSH reverse tunnels
- vim与系统剪切板之间的复制粘贴 - 广漠飘羽 - 博客园
- tmux in practice: integration with the system clipboard | by Alexey Samoshkin | We’ve moved to freeCodeCamp.org/news | Medium
- tmux in practice: copy text from remote session using SSH remote tunnel and systemd service | by Alexey Samoshkin | HackerNoon.com | Medium
- gpakosz/.tmux: 🇫🇷 Oh my tmux! My self-contained, pretty & versatile tmux configuration made with ❤️