centos init manual
shell relative
enable navigation between history commands using arrows
# `\e[A` is for arrow-up, and `\e[B` is for arrow-down
echo '"\e[A": history-search-backward
"\e[B": history-search-forward' >> ~/.inputrc

# reload inputrc
bind -f ~/.inputrc
vim relative
show chinese
modify ~/.vimrcvim:show-chinese-characters
set encoding=utf-8
set termencoding=utf-8

set fileencodings=ucs-bom,utf-8,cp936,gb18030,big5,euc-jp,euc-kr
set fileencoding=utf-8
user relative
list users
less /etc/passwd
create user
USER=mark
PSWD=123456

# 创建user
sudo useradd $USER
# 修改user的密码
sudo passwd $USER
# 加入wheel组, todo: 这是啥,有啥用
sudo usermod -a -G wheel,root $USER
check user permission
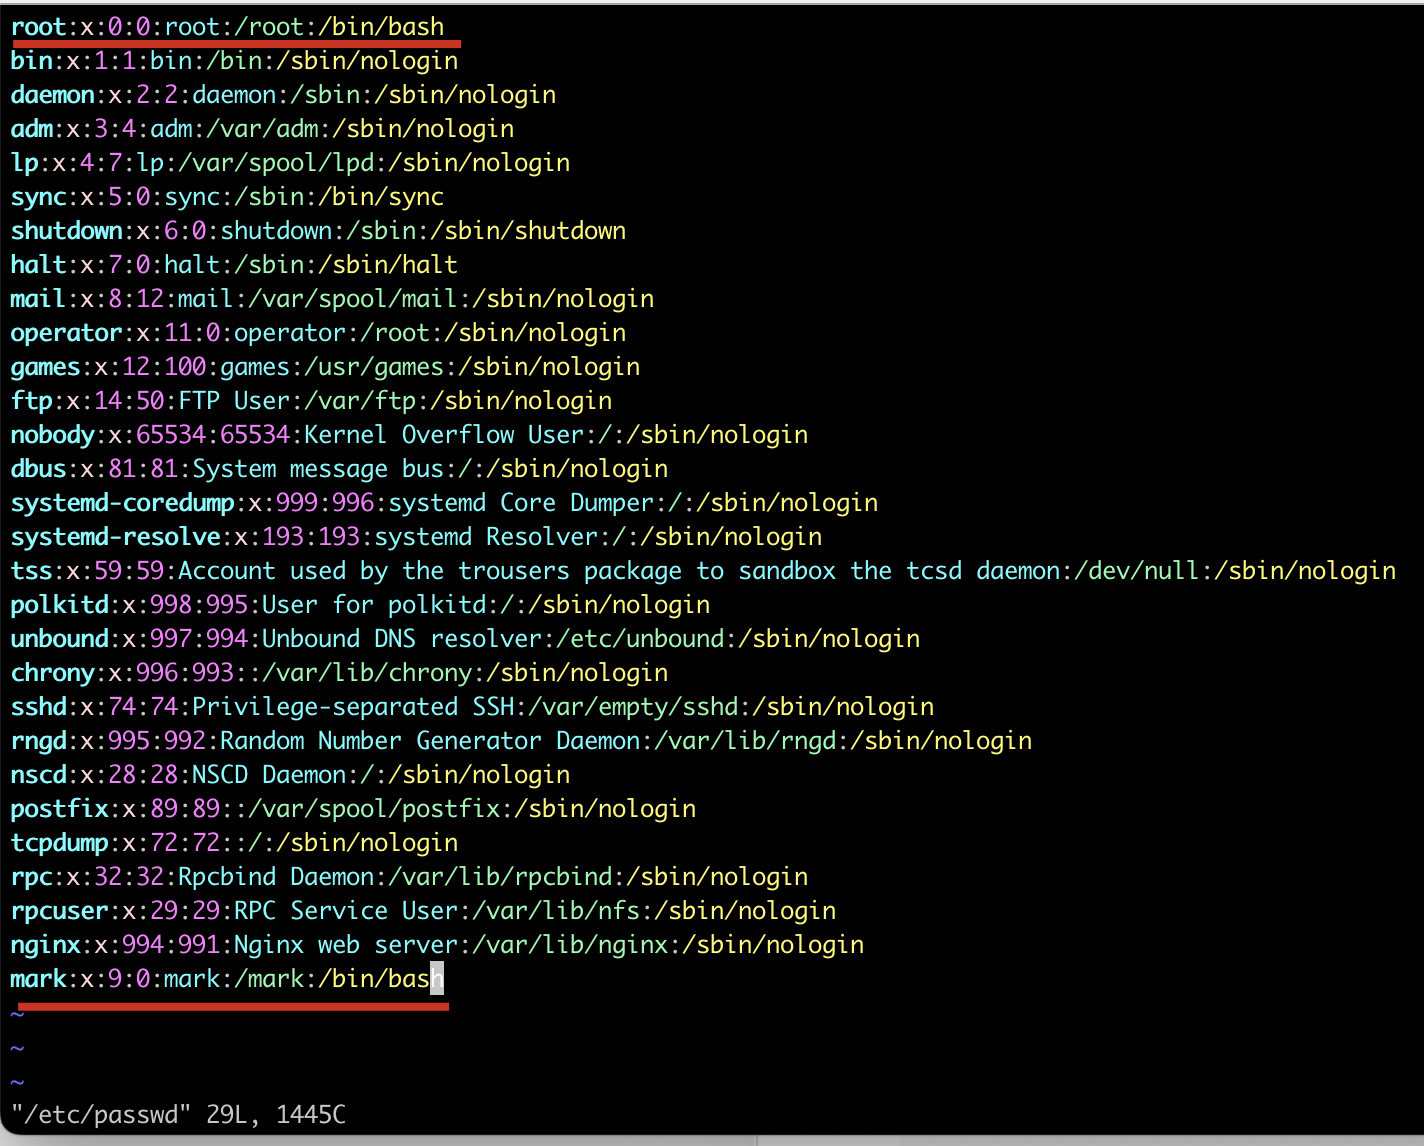
/etc/passwd:

看最后一行 mark,其中我们要关注:
- 第一个 mark 就是用户名,这个不必多说
- 第二个 mark 我也不知道是啥意思
- 第三个 mark,是用户的文件夹,默认是
/hom/$USER,但是我改成了根目录(需要手动创建文件夹) - 9 是 id,如果我改成了 0,那么我用 root 身份登录的时候就会变成 mark(覆盖)了,所以要用一个和前面都不同的数字
- 0 大概是权限级别或者进程级别吧?我也不太清楚,保持和 root 一样为 0 即可
- 其他保持默认
ssh relative
enable ssh password authentication
enable ssh password authenticationenable-ssh-password-authentication, otherwise we cannot simply login using password
!!! tip the 0,/xxx is for sed to replace the first occurrencesed-replace-first-occurrence, and the s// is for reusing the previous identifier
# enable ssh password authentication option in config
sudo sed -i '0,/PasswordAuthentication\s\+no/s//PasswordAuthentication yes/' /etc/ssh/sshd_config

# restart ssh (`service` is indeed redirected to `/bin/systemctl`)
service sshd restart
ssh login via PRIVATE KEY
SSH_KEY_FILE=~/.ssh/luci2
USER=root
IP=47.97.2.207
- 将秘钥文件存放于客户机
~/.ssh/下 - 修改秘钥文件的读写权限,不能太开放否则 ssh 会被拒绝,这里直接给一个读权限即可:
chmod 400 $SSH_KEY_FILE - 指定秘钥文件进行登录:
ssh $USER@$IP -i $SSH_KEY_FILE
python relative
set mirror
# check pip3
which pip3

# set pip3 (>=10.0), ref: https://mirrors.tuna.tsinghua.edu.cn/help/pypi/
pip3 config set global.index-url https://pypi.tuna.tsinghua.edu.cn/simple
install python
# config
PY_VERSION="3.9.0"
PY_FILENAME=Python-$PY_VERSION.tgz

# official url
PY_URL=https://www.python.org/ftp/python/$PY_VERSION/$PY_FILENAME
# domestic url
PY_URL=https://registry.npmmirror.com/-/binary/python/$PY_VERSION/$PY_FILENAME

# download
wget $PY_URL
tar zxvf $PY_FILENAME
cd $PY_FILENAME
./configure --enable-optimizations

sudo apt install zlib1g-dev
sudo make altinstall
check python
# show version
python3.9 -V

# upgrade pip
pip3.9 install -U pip
use virtualenv
# install
pip3.9 install virtualenv

# create
sudo apt-get install libssl-dev

virtualenv venv

# activate
source venv/bin/activate
run project
!!! question mitmdump相较于mitmproxy既可以使用--set intercept="XXX"的形式,也可以直接使用 XXX,更加方便一些,不知道mitmproxy和mitmdump为什么会有这样不一致的 api 表现;
TODO: `mitmproxy`的api为啥不能设计的像`mitmdump`那样更加友好
# install dependencies
pip install -r requirements.txt

# run via mitmproxy
mitmproxy -s src/main.py -p 8899 --set block_global=false --set intercept='~u "beijing.gov.cn"'

# run via mitmdump
mitmdump -s src/main.py -p 8899 --set block_global=false ~u "beijing.gov.cn"

# run via pm2
pm2 start jb.sh
npm relative
use npm
!!!warning 1. 千万不要用 sudo yum 去装 npm 相关的东西,否则后续将会导致连锁的权限问题,直接用yum就可以了! 2. 在安装全局包时,要用 root 用户身份装,否则会有各种权限问题!
# npm需要用root身份去安装!很重要 (change back: `su mark`)
sudo -i

# 它会连带安装`nodejs`,因为nodejs(11M)是npm(40M)的依赖
yum install npm

# 装一下咱中国人最适合用的镜像源(根据经验,有些国外的库由于写死了包地址拼接方法,将导致基于非官方`registry`配置的项目初始化失败,这个需要注意,那种情况下,最好的办法是开vpn,然后用官方registry
npm i -g mirror-config-china --registry=https://registry.npm.taobao.org

# check npm config, pay attention to the `registry` especially
npm config list
use pm2
npm i -g pm2

# check pm2 services
pm2 list

# clear all the logs
pm2 flush

# start pm2 service, once started, we can use `pm2 start 0` later
pm2 start jb.sh

# restart pm2 service
- pm2 restart jb.sh
- pm2 restart 0

# stop pm2 service
- pm2 stop jb.sh
- pm2 stop 0

# stop and flush
pm2 stop 0 && pm2 flush

# restart and flush and log, todo: flush specific pm2 service
pm2 stop 0 && pm2 flush && pm2 start 0 && pm2 log 0

