linux-howto
linux init manual
see: centos init manual
linux connection (ssh)
ssh without password
# ref: https://superuser.com/a/400720/1365851
cat ~/.ssh/id_ed25519.pub | ssh root@47.113.227.53 -T "cat - >> ~/.ssh/authorized_keys"
ssh keep connection alive
the simplest way is to force the client to keep sending [a null] message(packet) to the server, in case that the server closed the connection beyond the time limitation, and what you need to do is just to modify 2 lines in your /etc/ssh/ssh_config file.
sudo vim /etc/ssh/ssh_config
change into these:
HOST: *
    ServerAliveInterval 60
finally, maybe you should restart your client. If you use the mac, you can:
# restart-ssh, reference: https://gist.github.com/influx6/46c39709a67f09908cc7542ca444fca2
sudo launchctl stop com.openssh.sshd
sudo launchctl start com.openssh.sshd
DEPRECIATED: scp no secret/password
It's easy that if only you generate a id_rsa.pub and to your ~/.ssh/authorization_keys then things all done.
# username="xxx"
# server="xxxxx"
# file="id_rsa.pub"

# scp ~/.ssh/$file $username@$server:
# ssh $username@$server
# cat $file >> ~/.ssh/authorized_keys
# rm $file
ref:
linux env management
how to change apt source
ref:
resolution 1: manual change from the App of Softwares & Updates
resolution 2: modify the configuration manually from the terminal
CONCLUSION
MIRROR_FROM="us.archive.ubuntu.com"
MIRROR_TO="mirrors.tuna.tsinghua.edu.cn"
APT_FILE="/etc/apt/sources.list"
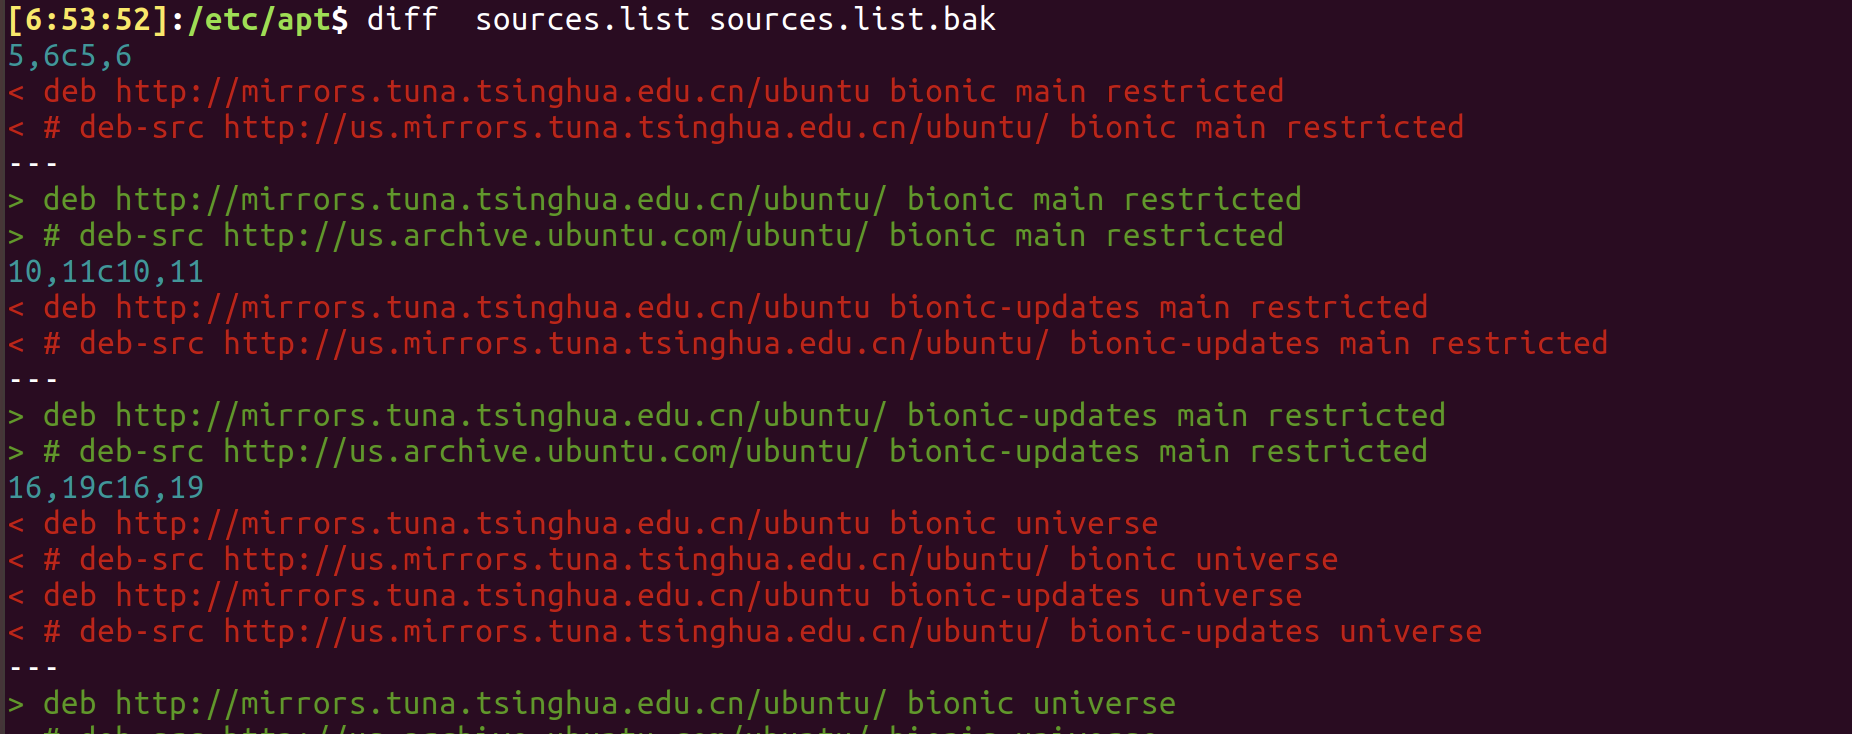
sudo sed -i "s|${MIRROR_FROM}|${MIRROR_TO}|g" ${APT_FILE}
DETAIL
There are a few mirror servers can be used in China:
- mirrors.tuna.tsinghua.edu.cn
- ftp.sjtu.edu.cn
- mirrors.aliyun.com
- mirrors.huaweicloud.com
- mirrors.yun-idc.com
- ...
The format of these mirrors may be as http://${MIRROR_URL}/ubuntu/
And the default configuration of ubuntu servers are at /etc/apt/sources.list, with a copy of backup at /etc/apt/sources.list.save.
Here is what the save contents are:
// /etc/apt/sources.list.save
#deb cdrom:[Ubuntu 18.04.6 LTS _Bionic Beaver_ - Release amd64 (20210915)]/ bionic main restricted

# See http://help.ubuntu.com/community/UpgradeNotes for how to upgrade to
# newer versions of the distribution.
deb http://us.archive.ubuntu.com/ubuntu/ bionic main restricted
# deb-src http://us.archive.ubuntu.com/ubuntu/ bionic main restricted

## Major bug fix updates produced after the final release of the
## distribution.
deb http://us.archive.ubuntu.com/ubuntu/ bionic-updates main restricted
# deb-src http://us.archive.ubuntu.com/ubuntu/ bionic-updates main restricted

## N.B. software from this repository is ENTIRELY UNSUPPORTED by the Ubuntu
## team. Also, please note that software in universe WILL NOT receive any
## review or updates from the Ubuntu security team.
deb http://us.archive.ubuntu.com/ubuntu/ bionic universe
# deb-src http://us.archive.ubuntu.com/ubuntu/ bionic universe
deb http://us.archive.ubuntu.com/ubuntu/ bionic-updates universe
# deb-src http://us.archive.ubuntu.com/ubuntu/ bionic-updates universe

## N.B. software from this repository is ENTIRELY UNSUPPORTED by the Ubuntu
## team, and may not be under a free licence. Please satisfy yourself as to
## your rights to use the software. Also, please note that software in
## multiverse WILL NOT receive any review or updates from the Ubuntu
## security team.
deb http://us.archive.ubuntu.com/ubuntu/ bionic multiverse
# deb-src http://us.archive.ubuntu.com/ubuntu/ bionic multiverse
deb http://us.archive.ubuntu.com/ubuntu/ bionic-updates multiverse
# deb-src http://us.archive.ubuntu.com/ubuntu/ bionic-updates multiverse

## N.B. software from this repository may not have been tested as
## extensively as that contained in the main release, although it includes
## newer versions of some applications which may provide useful features.
## Also, please note that software in backports WILL NOT receive any review
## or updates from the Ubuntu security team.
deb http://us.archive.ubuntu.com/ubuntu/ bionic-backports main restricted universe multiverse
# deb-src http://us.archive.ubuntu.com/ubuntu/ bionic-backports main restricted universe multiverse

## Uncomment the following two lines to add software from Canonical's
## 'partner' repository.
## This software is not part of Ubuntu, but is offered by Canonical and the
## respective vendors as a service to Ubuntu users.
# deb http://archive.canonical.com/ubuntu bionic partner
# deb-src http://archive.canonical.com/ubuntu bionic partner

deb http://security.ubuntu.com/ubuntu bionic-security main restricted
# deb-src http://security.ubuntu.com/ubuntu bionic-security main restricted
deb http://security.ubuntu.com/ubuntu bionic-security universe
# deb-src http://security.ubuntu.com/ubuntu bionic-security universe
deb http://security.ubuntu.com/ubuntu bionic-security multiverse
# deb-src http://security.ubuntu.com/ubuntu bionic-security multiverse
how to know what's the os platform
# mac: Darwin
uname

# if platform is mac
if [[ $(uname) == Darwin ]];
then XXX;
else YYY;
fi;
ref:
how to configure python environment
- install the python on the server, the version of which would better correspond with the one of the local in case of unexpected error caused by version difference
- use
virtualenvto create an env based on this python version namedvenv_pyunder this working directory - activate this env
- use
pipto install therequirements.txt - run!
PY_VERSION=python3.9

# install the target python version based on its version number
# if you don't use these two lines, then you would suffer from `wget blablabla...` when you checked what the hell the python repo url is
sudo apt install software-properties-common -y
sudo add-apt-repository ppa:deadsnakes/ppa
sudo apt install ${PY_VERSION}

# use `virtualenv` to create and activate a new python env fast~
sudo apt install virtualenv
virtualenv -p ${PY_VERSION} venv_py
source venv_py/bin/activate

# install all the requirements
# if you need to dump all the requirements of a python project used, you can use `pip freeze > requirements.txt` so that a file named of `requirements.txt` would be generated under the current directory
pip install -r requirements.txt

# run our backend of `fastapi`
python main.py
✅ cannot use sudo apt-get install xxx to install packages
cd /var/lib/dpkg/updates
rm -rf ./*

sudo apt-get update

sudo apt-get disk-upgrade # it may cost a little of time
ref:
I changed the suggestion in this article from rm -r to rm -rf, otherwise not successful.
This discussion seems wonderful but didn't get my problem solved.
linux file system management
mkdir if not exist
mkdir -p DIR
ref:
ls and delete files
ls | grep STR | xargs rm -f
WARNING! Since the operation pipeline is silent, you are likely to remove files that you did not intend to remove.
Hence, you'd better use ls | grep STR first to check whether all the files to remove meet your expectation.
fastest delete file
Don't bother checking if the file exists, just try to remove it.
rm -f PATH

brew install dialog
# or
rm PATH 2> /dev/null

find . -name 'test'

if [ "$BLEG" != xxx ]; then command; fi
print("hello")
interface Test {
  name: string;
}
ref:
DEPRECIATED: how to show absolute path of file from relative
I cannot use brew install realpath like their apt install realpath, but I can use realpath, which may be pre-built-in.
Plus, later I saw that maybe realpath is a submodule of mac package, which is named as findutils.
realpath FILE
ref:
UPDATE-2022-02-05: how to show absolute path of file from relative
brew install coreutils
realpath FILE

ref
how to copy file into clipboard
core ref: https://apple.stackexchange.com/a/15327
it's easy to copy a text file
# copy
pbcopy < FILE

# paste to command line
pbpaste

# paste to a new file
pbpaste > FILE2
But attention, the pbpaste would cause corruption when deals with binary file.
but it cannot be done for a binary file
Since the traditional command + c | command + v is just copy the reference of file into clipboard, instead of the content itself, we had no way to use pbcopy to copy a file, and then use command + v to paste at another place.
A solution is to use osascript.
#!/usr/bin/osascript
on run args
  set abs_path to do shell script "/usr/local/bin/greadlink -f -- " & (first item of args)
  set the clipboard to POSIX file abs_path
end
ref:
how to show file size
# -l show detail
# -h show 'human readable size
ls -lh FILE/DIR
ref:
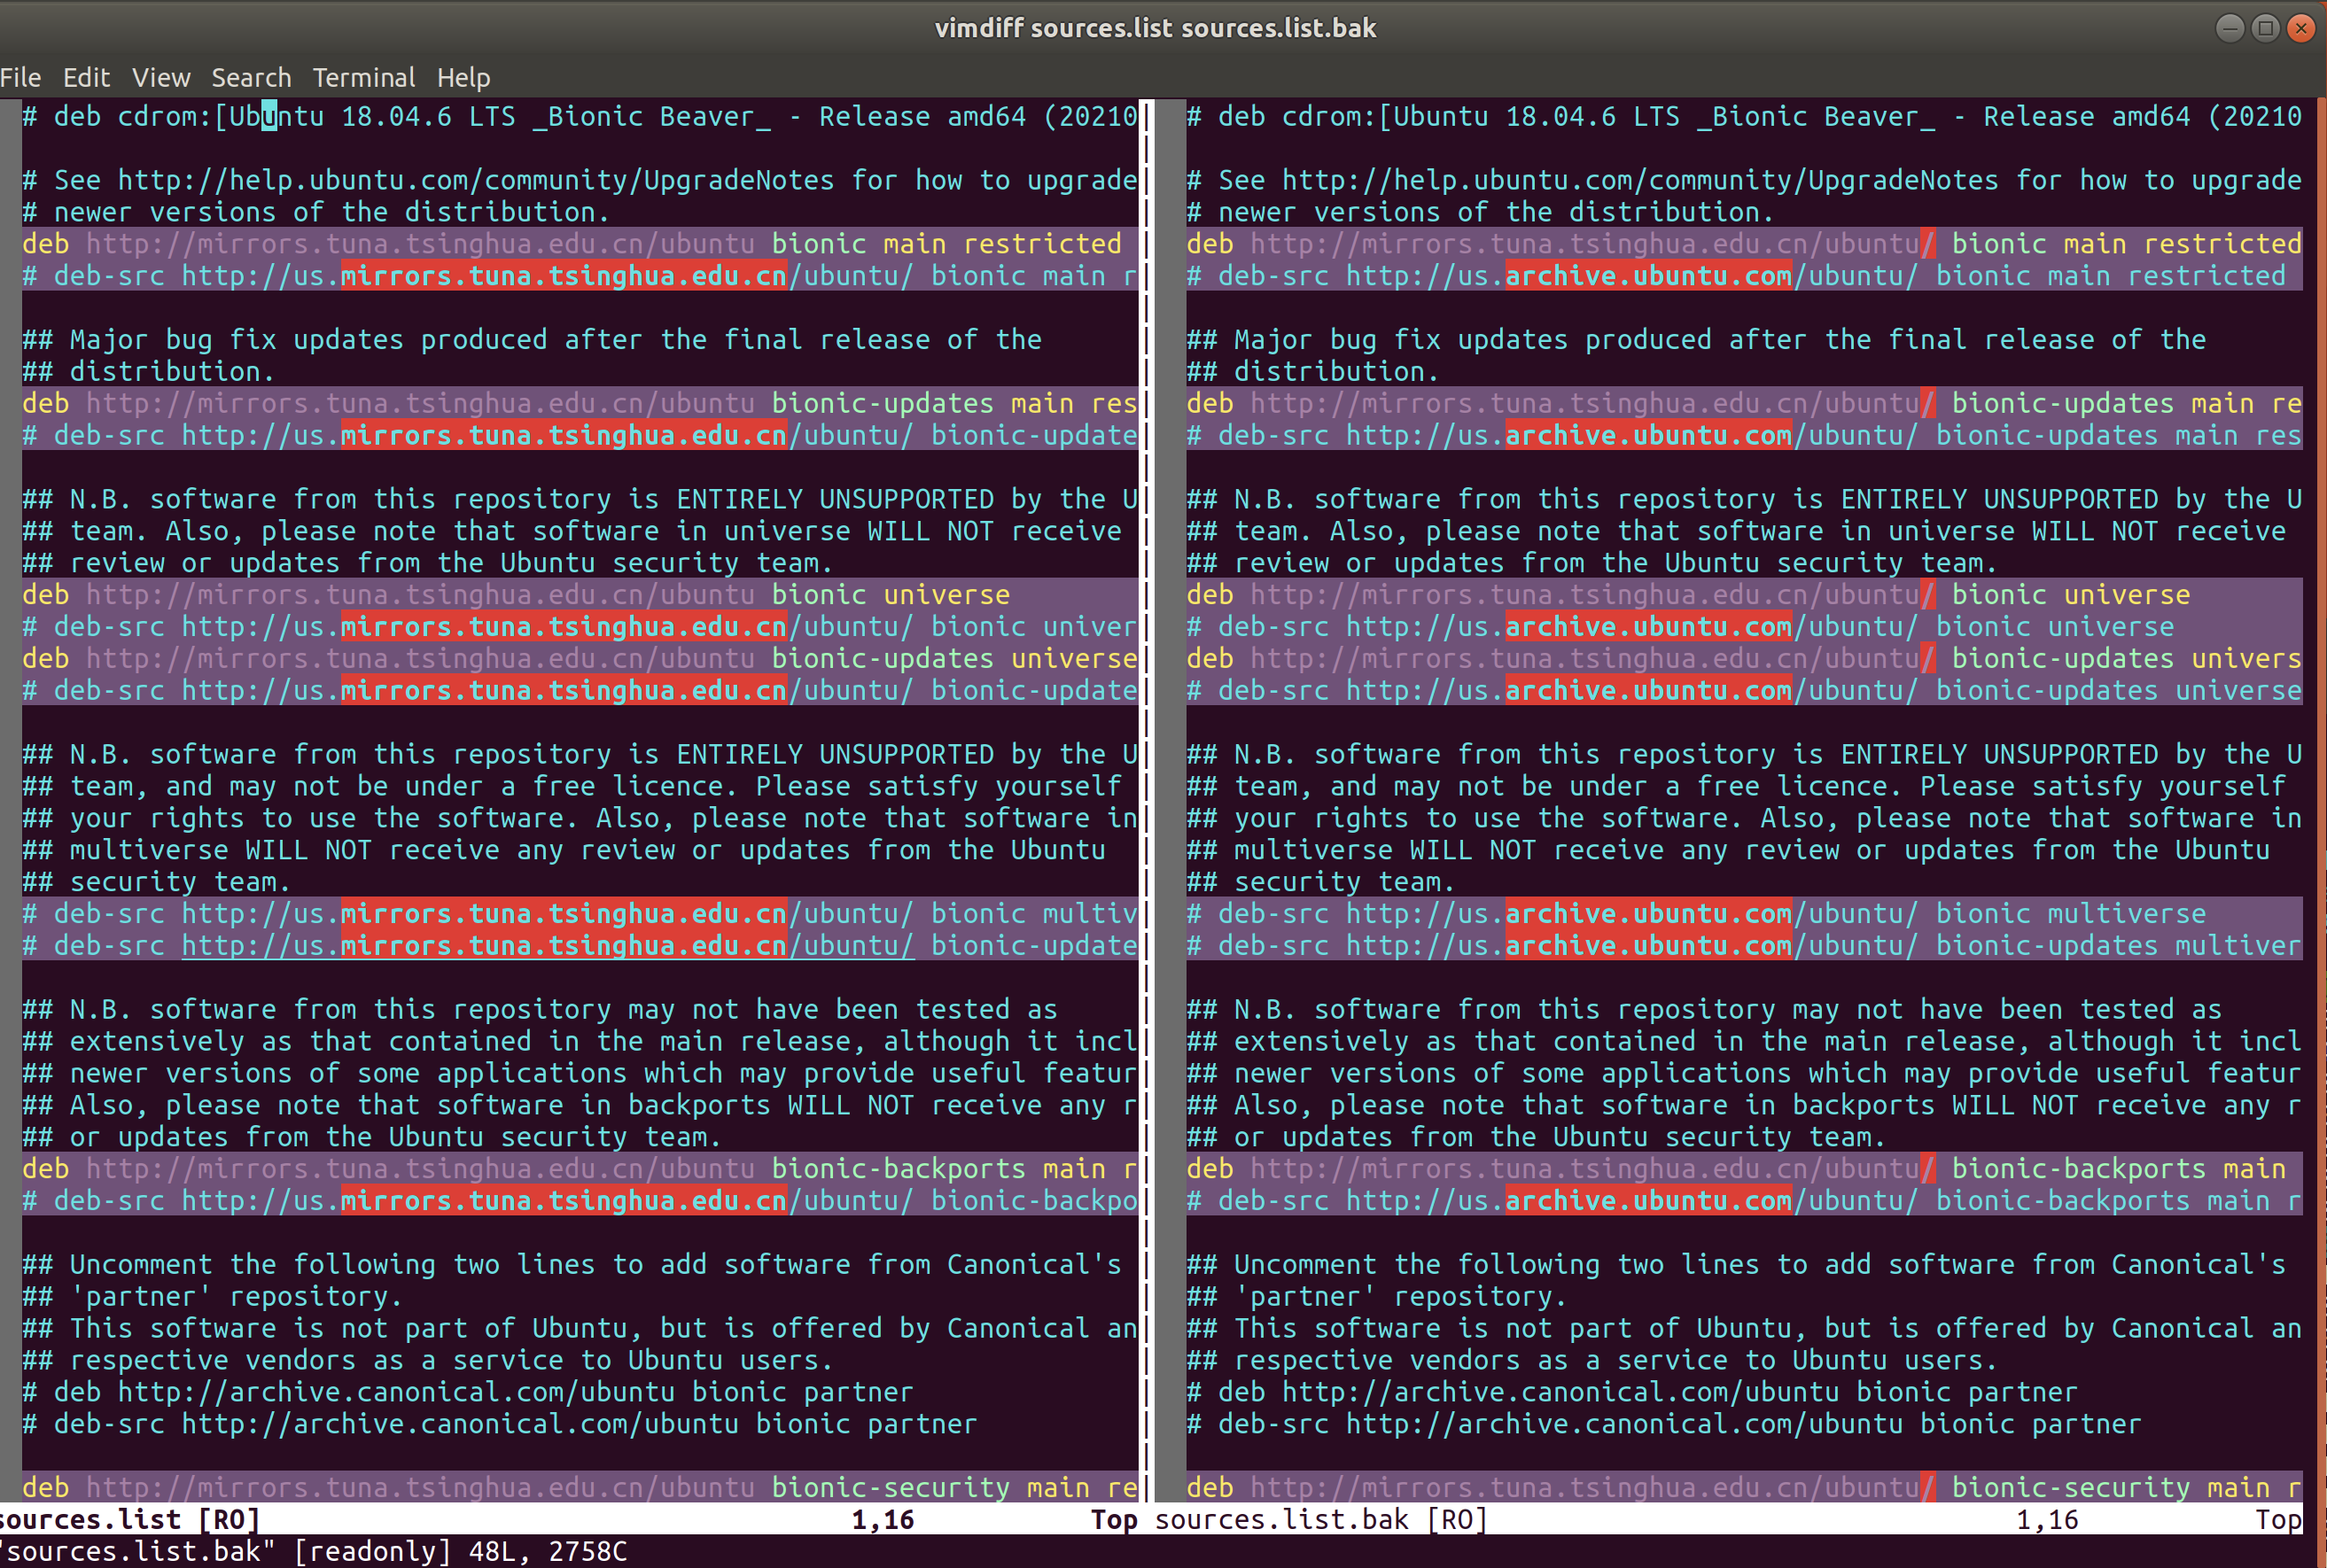
how to compare between files (diff & vimdiff)
There is a few of diff commands for us to choose.
resolution 1: diff F1 F2
resolution 2: diff -y F1 F2 or sdiff F1 F2

resolution 3: vimdiff F1 F2
It's awesome! Isn't it?
TODO: resolution 4: git diff
FIXME: how to copy/move directory files correctly to soft links under target directory without affecting git?
example:
When I zipped one modified frameworks/native directory to be e.g. RAW, and then reset the frameworks/native to be the init.
Then I move all the files under RAW to frameworks/native with the command:
cp -r RAW/* TARGET/frameworks/native/
The error arose up since there are soft links under frameworks/native, such as libs/ui which is indeed libs/ui -> XXX/ui.
However, in my zipped file of RAW, the links seemingly have turned to be the real files/dirs, which introduced the problem directory --> non-directory.
The wanted effect is copying/moving all the files under conflicted directory to where they should be.
However, the git marked those files as TypeChange...
ref:
linux disk management
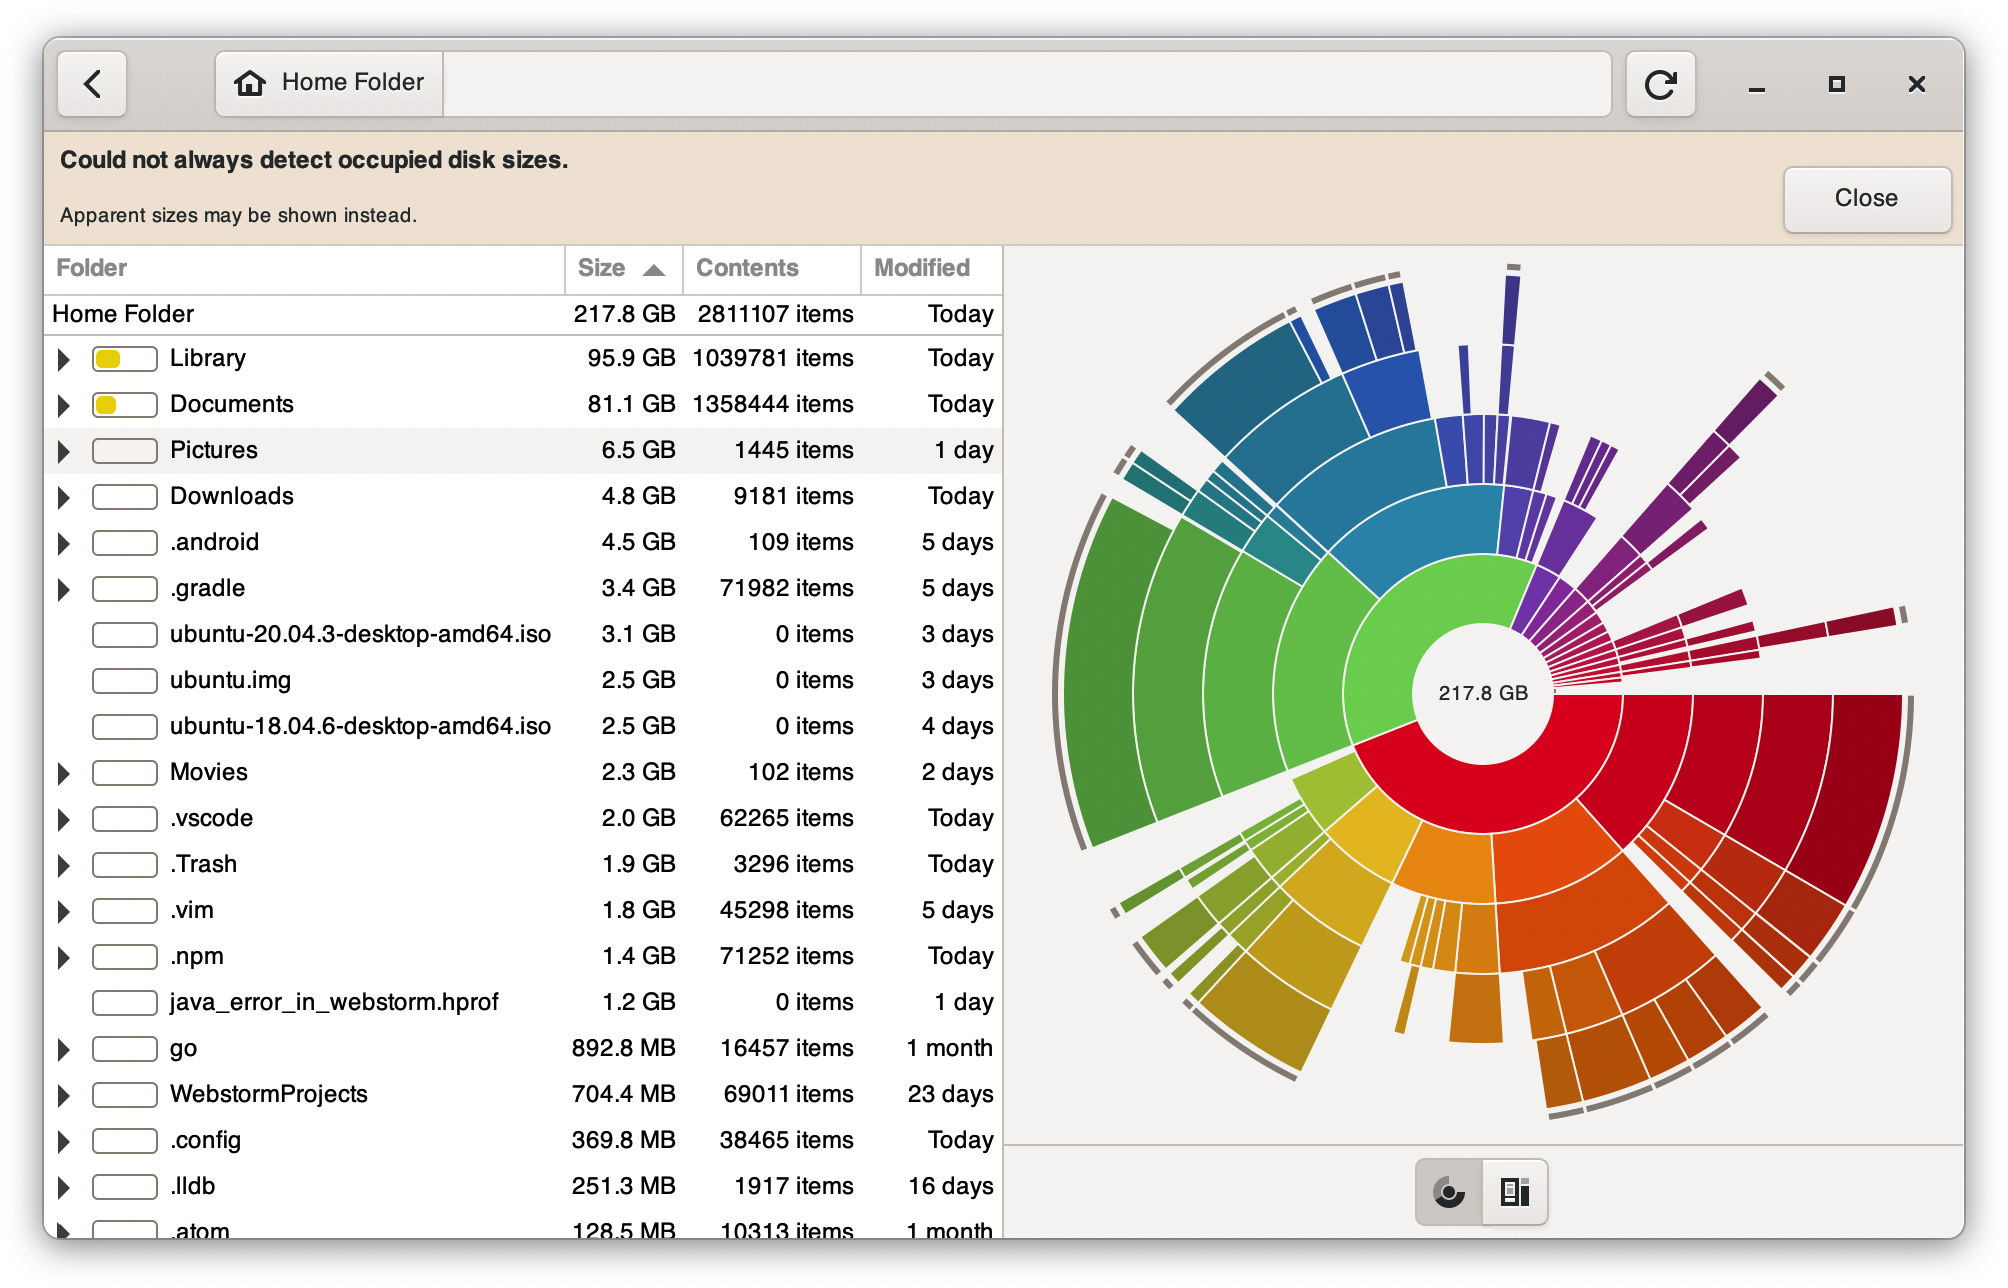
ncdu, disk space tui
baobab, disk space gui
ref:
install problem
When installing ncdu, error ocurred: No such file or directory @ rb_sysopen ruby - Stack Overflow
The reason is that some dependency is missing, we can first install it and then install the target.
brew install librsvg
brew install baobab
effects
linux shells management
ref:
this article is enough and recommended:
How to find list of available shells by command-line? - Unix & Linux Stack Exchange
How do I find out what shell I am using on Linux/Unix? - nixCraft
redirect stdin/stderr
ECHO_PREFIX="[init]"
exec > >(
  trap "" INT TERM
  sed 's/^/'"$ECHO_PREFIX"' /'
)
exec 2> >(
  trap "" INT TERM
  sed 's/^/'"$ECHO_PREFIX"'(stderr) /' >&2
)
exec > /dev/tty
exec 2> /dev/tty
FIXED: bash navigate to directory without cd
!!!tip 一定要搜的准!否则大概率搜不到!搜这个也花了十几分钟的……
add this line to your ~/.bashrc:
shopt -s autocd
ref:
Switch To A Directory Without Using Cd Command in Linux - OSTechNix
(1 条消息) 【Linux】一步一步学 Linux——shopt 命令(214)_嵌入式开发工程师---欢迎大家一起交流-CSDN 博客
shell common aliases
!!!tip cd - is very useful for switching back and forth
# Easier directory navigation.
alias ~="cd ~"
alias .="cd .."
alias ..="cd ../.."
alias ...="cd ../../.."
alias ....="cd ../../../.."
alias cd..="cd .." # Typo addressed.
ref:
list all the shells
$ cat /etc/shells # list valid login shells
/bin/sh
/bin/bash
/bin/rbash
/bin/dash
/bin/zsh
/usr/bin/zsh
background: sh is different with bash
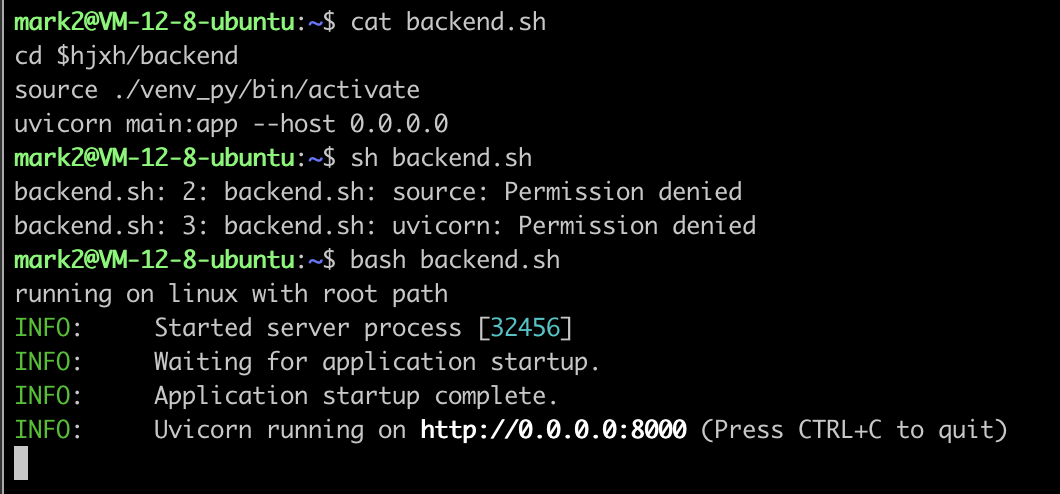
When I write source in shell script, and run by sh xx.sh, then it failed with no permission.
However, when I use bash xx.sh, then everything runs well.
Thus, the sh definitely doesn't equal as bash, and it seems that function of sh is the subset of bash.
If so, why I still need to use sh? Just for short?
ref: https://stackoverflow.com/a/48785960/9422455
see what's the current Shell
[1:42:41]:~$ echo $SHELL
/usr/bin/zsh
[1:43:25]:~$ echo $0
/usr/bin/zsh
[1:43:29]:~$ ps -p $$
   PID TTY          TIME CMD
 29657 pts/2    00:00:00 zsh
switch shell
You can change your default shell using the chsh (“change shell” ) command as follows.
The syntax is:
# usage
chsh
chsh -s {shell-name-here}
chsh -s {shell-name-here} {user-name-here}

# samples
chsh -s /bin/bash
chsh -s /bin/bash $USER
set zsh as default shell
see: zsh-howto
how to prefix any output in a bash script?
see: How to prefix any output in a bash script? - Unix & Linux Stack Exchange
resolution 1. use function: easiest but side effect
function echo() { /bin/echo $PREFIX$*; }
But this would affect the echo XXX >> FILE, since we doesn't want to change the content to write into file.
RECOMMENDED: resolution 2. redirect stdin/err
exec > >(trap "" INT TERM; sed 's/^/foo: /')
exec 2> >(trap "" INT TERM; sed 's/^/foo: (stderr) /' >&2)
This is my recommended resolution since it only affects the stdin/err.
result


✅ the terminal cannot up down after editing
This is a problem confused me for a long time.
Today, I finally knows what's the hell at: linux - How to scroll up and down in sliced "screen" terminal - Stack Overflow
Anyway, terminal is hard to learn, I just know control + a can help me exit the so-called copy mode.
TODO: bind option + arrow to jump word in zsh on ubuntu vmware on MacOS
ref
- ✨ Useful keyboard shortcuts
- zsh jump word - Google Search
- keyboard shortcuts - ALT+arrow moving between words in zsh and iTerm2 - Super User
- Keyboard shortcuts in Terminal on Mac - Apple Support (HK)
- key binding - How to bind command key in zsh? - Super User
- Zsh — Mac OS option key for bindkey
- what key i'm pressing - Google Search
- "Key-Test" - keyboard test online
- zsh - Ctrl + left/right arrow keys issue - Unix & Linux Stack Exchange
- shell - Looking for ALT+LeftArrowKey solution in zsh - Stack Overflow
- keyboard shortcuts - How can I delete a word backward at the command line (bash and zsh)? - Unix & Linux Stack Exchange
- command line - How to delete words in the terminal with Ctrl-Backspace like in the rest of Ubuntu? - Ask Ubuntu
- 12.04 - Why does ctrl + left arrow not skip words? - Ask Ubuntu
how to clear broken soft links
# TODO: [UNDERSTAND] remove all broken soft links in the current directory
find -L . -name . -o -type d -prune -o -type l -exec rm {} +
result

ref
linux commands management
⚠️
- be careful to use ``` in terminal / shell since it's would be treated as executable commands:
see: (20 条消息) shell 基础知识-echo 及单引号、反引号和双引号详解_Luckiers 的博客-CSDN 博客_echo 单引号和双引号

how to check file/project size
- using
find
function checkFileSizesOfType() {
    find . -not -path "./.history/*" -not -path "**/node_modules/*" -name "*.$1" -type f -exec ls -al {} \; | sort -k5 -rn | sed 's/ \+/\t/g' | cut -f 9
}
using
ncduusing
baobab
linux quotes
非常经典的文章:
逆天的五引号:
pip uninstall multi packages
scenario:

requirements:
uninstall all the packages of name starting with pyobjc.
solution:
grep pyobj requirements.txt | gsed 's/==.*//g' | xargs pip uninstall --yes
ref:
xargs: linux - Using grep and sed to find and replace a string - Stack Overflow
auto yes: linux - How to run pip in non-interactive mode? - Super User
Ternary operator (三元运算符)、短路运算符(a=${VAR:-DEFAULT})
| , ||, &, &&, ;
A | B   # 管道!
A & B   # 并行

A && B  # 当A成功后继续运行B
A || B  # 当A失败后继续运行B
A; B;   # 无论A是否成功,之后继续运行B
ref:
&& and ;

ref
alias vs variable
aliasis used for executable command, while variable is a variable, so if we want to use alias as a variable, we should first define a variable of the same name.
auto-translate
!!!warning Don't use ~ as the user dir, since it can't be auto translated as the sub variable. e.g.
```sh
export a10=~/android
export n10=$a10/xxx
```

The first `ls $a10`, and enter `TAB` is ok; while the `ls $n10` and enter `TAB` not, since it would translate to be `\~/android` which has an extra `\` before.

sample

see: - bash - Alias substitution for a string to use it in a terminal command - Ask Ubuntu
bugfix: alias in script file can't use in the outer shell
!!!warning We should use source xx.sh rather than sh xx.sh in order to make variables/aliases work in the outer shell since sh would create a sub shell while source not.
see:
incremental variable
var=$((var+1))

((var=var+1))

((var+=1))

((var++))
var=0

while true
do echo "seconds $((++var))"
sleep 1
done

ref:
conditions
see: ✨✨✨ very good article: Bash If Statements and Scripting - Linux Cheat Sheet | A Cloud Guru
# simple executing commands:
if [ $foo -ge 3 ]; then     # resolution 1
if test $foo -ge 3; then    # resolution 2

# check file existed
if [ -f regular-file ]; then

# check file readable
if [ -r readable-file]; then
sample of testing file readable and read
if [ -r somefile ];  then
    content=$(cat somefile)
elif [ -f somefile ]; then
    echo "The file 'somefile' exists but is not readable to the script."
else
    echo "The file 'somefile' does not exist."
fi
在条件中执行某些语句要用 (( CONDITION ))
how to auto input in command
auto input password for sudo commands
sparkles: Use
sudo -Sto read input from stdin.
# no password / no secret for sudo
echo "$USER ALL=(ALL:ALL) NOPASSWD: ALL" | sudo tee -a /etc/sudoers.d/$USER
ref:
auto yes for some command (yes | )
# usage
yes | COMMAND

# example
yes | sh ./install.sh # e.g. install oh-my-zsh
ref:
auto yes for apt installing packages (-y)
Just add a -y in the command.
Example:
sudo apt install -y htop
ref:
how to search commands by prefix (history-search-backward/forward)
# ~/.inputrc

# Respect default shortcuts.
$include /etc/inputrc

# choice 1: recommended
"\e[A": history-search-backward     # arrow up      --> backward
"\e[B": history-search-forward      # arrow down    --> forward

# choice 2: if prefer to the page up/down
"\e[5~": history-search-backward    # page up       --> backward
"\e[6~": history-search-forward     # page down     --> forward
;warning: you should Close and re-open all terminals for the new behavior to become effective.
ref:
how to repeat command
#  only show the last result
watch -n X command # X: X seconds; command may need quotes

# show all the result history
while true; do command; sleep X; done; # command may need quotes
ref:
how to use variable as multi args
# when there's only one arg as a variable, it's ok to directly use it, and the following two methods are equal
PACKAGE_TO_INSTALL="vim"
PACKAGE_TO_INSTALL=vim
sudo apt install -y $PACKAGE_TO_INSTALL

# However, if there are multi args as a variable, we need to use [`echo`](https://stackoverflow.com/a/30061925/9422455) to escape the 'hidden quotes' if I didn't understand wrongly. And also, the quotes can't be omitted, or use slashes.
PACKAGES_TO_INSTALL="vim git htop zsh terminator"
PACKAGES_TO_INSTALL=vim\ git\ htop\ zsh\ terminator
sudo apt install -y $(echo $INSTALLED_PACKAGES)

# Since the `echo` is not safe, another way is to use [`xargs`](https://stackoverflow.com/a/51242645/9422455), which seems more professional
PACKAGES_TO_INSTALL="vim git htop zsh terminator"
echo $PACKAGE_TO_INSTALL | xargs sudo apt install -y
ref:
string - Shell script - remove first and last quote (") from a variable - Stack Overflow
bash send string argument as multiple arguments - Stack Overflow
shell - Escaping quotes inside a quoted string - Unix & Linux Stack Exchange
Variable containing multiple args with quotes in Bash - Stack Overflow
how to set an alias
resolution 1: in terminal
⚠️ this solution only works upon the next command, which can work immediately when executed in shell script file
# don't add any other characters after alias in order to catch bug
alias sed=gsed
resolution 2: write into ~/.bash_aliases
# ~/.bash_aliases
alias update='sudo yum update'
⚠️ this solution needs to ensure the
.bash_aliasesenabled in.bashrc

✨ resolution 3: use .bash_aliases with zsh
Just add one line in ~/.zshrc:
# ~/.zshrc
source ~/.bash_aliases
ref:
unalias
# sample
unalias logout
ref:
how to compare between outputs from two commands
diff <(ls old) <(ls new)
ref:
how to check if a string contains another string
see:
How to Check if a String Contains a Substring in Bash | Linuxize
How to check if a string contains a substring in Bash - Stack Overflow
using ==
# resolution 1. using "=="
[[ $a == z* ]]   # True if $a starts with a "z" (wildcard matching).
[[ $a == "z*" ]] # True if $a is equal to z* (literal matching).

# resolution 2. using "==" when has spaces
[[ $a == "z a"* ]] # True if $a starts with a "z a"
ref
✨ using grep
e.g. if we want to match '-gen-index' as a pattern.
The == resolution may be as easy as: [ $0 == -gen-index ]
However, in grep, things came a little tricky.
# resolution 1. using regex with escape
grep '\-gen-index' <<< '-gen-index-xxx'

# resolution 2. using fixed string with forcing recognizing the following string as a pattern
grep -F -e '-gen-index' <<< '-gen-index-xxx'

# if we missed the `-e`, then it would cause error, since it supposes the `-g...` is args

ref
linux accounts management
how to create user
# create user with a home directory
sudo useradd -m {USERNAME}
ls -la /home/{USERNAME}


# create user [under root]
sudo useradd USERNAME

# create passwd [under root]
sudo passwd USERNAME
how to log out
resolution 1 (11.10 and above)
gnome-session-quit
resolution 2
sudo pkill -u $USER
ref:
set a shorter password for ubuntu
sudo passwd <USER>

linux net management
how to know my public ip address
- resolution 1:
# https://apple.stackexchange.com/questions/20547/how-do-i-find-my-ip-address-from-the-command-line
curl ifconfig.me
- resolution 2:
# https://www.digitalocean.com/community/tutorials/how-to-configure-remote-access-for-mongodb-on-ubuntu-20-04#:~:text=curl%20%2D4%20icanhazip.com
curl -4 icanhazip.com
how to monitor network traffic
sudo apt install nethogs

sudo nethogs
ref:
FIXME: check proxy
In Ubuntu 18.04.6 LTS (Bionic Beaver), it introduced two methods to see what/which proxies are we using:
## approach 1
echo $http_proxy

## approach 2
env | grep -i proxy
However, when I configured the proxies in Manual Proxy, I am surprised to find nothing using either commands in the above, while the ping to google.com does work so that I use it as the measure then.
ping google.com
And another wield thing is before the system was restarted, the env | grep -i proxy even shows duplicated results and the change in Manual Proxy doesn't work, which is quite confusing.
Maybe we can do more tests later.
linux date/time management
how to format date
⚠️
- the space in formatter should be using
\or anything other waysdate是一个函数,不是变量,变量采用$XX或者${XX}的形式,但是函数要用$(XX),并且不能在字符串中
# directly output date
date +%Y-%m-%d\ %H:%M:%S

# output date into variable
T='the date is '$(date +%Y-%m-%d\ %H:%M:%S)
ref:
how to change timezone (and time)
resolution 1 (conclusion): directly export
echo "export TZ='Asia/Shanghai'\n" >> ~/.profile

sudo pkill -u $USER --force
resolution 2 (detail): choose following directions
# check current time, as well as timezone
date -R

# if the ending is `+0800`, then it's ok, otherwise you need to change (e.g. `-0800`)

# change timezone (just choose as directed)
tzselect
And finally you will get a command suggestion to write into profile file, that is #solution-1-directly-export
linux system management
FIXED: apt-get /var/lib/dpkg/lock-frontend
solution 01:
sudo rm /var/lib/dpkg/lock-frontend
sudo rm /var/lib/dpkg/lock
sudo rm /var/cache/apt/archives/lock
solution 02:
sudo lsof /var/lib/dpkg/lock-frontend
kill -9 XXX
ref:
✅ A stop job is running for Session c2 of user ... (1min 30s)
resolution
- restart system
journalctl -p5- search
timed out. Killing - analyze the target process of
Killing process 1234 (jack_thru) with signal SIGKILL.
⚠️ 注意,也有其他几种解决方案,比如装
watchdog和缩短timeout时间的,这些都侵入性太高了,并且不是治本之策,所以还是得从 log 来分析原因找对应政策。尤其是装watchdog的方案,我简单看了一下,大致是每分钟检查一下系统的情况,但问题是,为什么很久以前系统就没有这种问题呢?那个时候也没装watchdog啊,所以对于这个问题,我们不能偷懒!
.
result
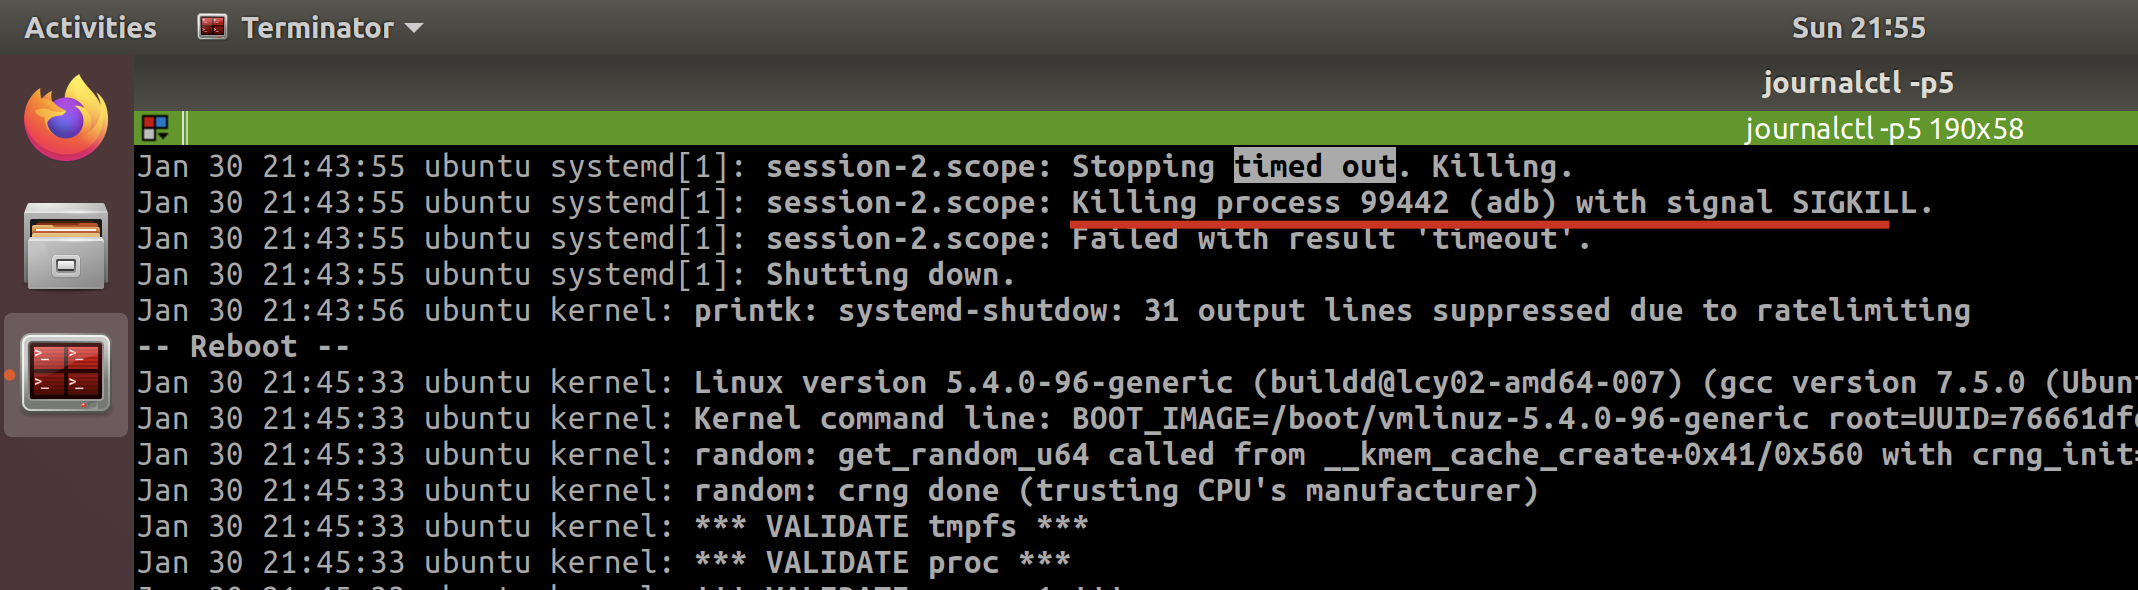
It tells me the last one is because of adb, since I do open the adb and not responding then.
And I also checked the last few times when timed out, but to find they are different.
So I confirmed the timeout error is temporary, since now I am not going to run any adb.
I tried to restart again, and the system does well which identified what I think.
ref
systemd - A stop job is running for Session c2 of user - Unix & Linux Stack Exchange
systemd stop job for Session 2 on shutdown / Newbie Corner / Arch Linux Forums
Linux commands
see linux-commands
Linux Is Awesome
awesome discussions
awesome design philosophy
cd ., when directory re-createdperl/sed sX..X..X, arbitrary splitter, easy to handle especially multi-lines problem