vim-howto
- init/config vim
- diff2html
- copy selected lines to clipboard
- how to delete from current position to the end of line
- how to force tab to be spaces (so that the git diff won't have errors)
- how to filter matched lines
- how to resize height and width
- how to highlight line or column
- mouse mode
- vimdiff
- bookmarks
- files relative
- how to update
vim - multi-line insert under
visual mode - Copy-Paste in Vim
- how to insert datetime
- column selection
- undo changes after file saved
- search for selected text
- fold(collapse) and unfold(expand)
- Plugin Manager
- bugfix:
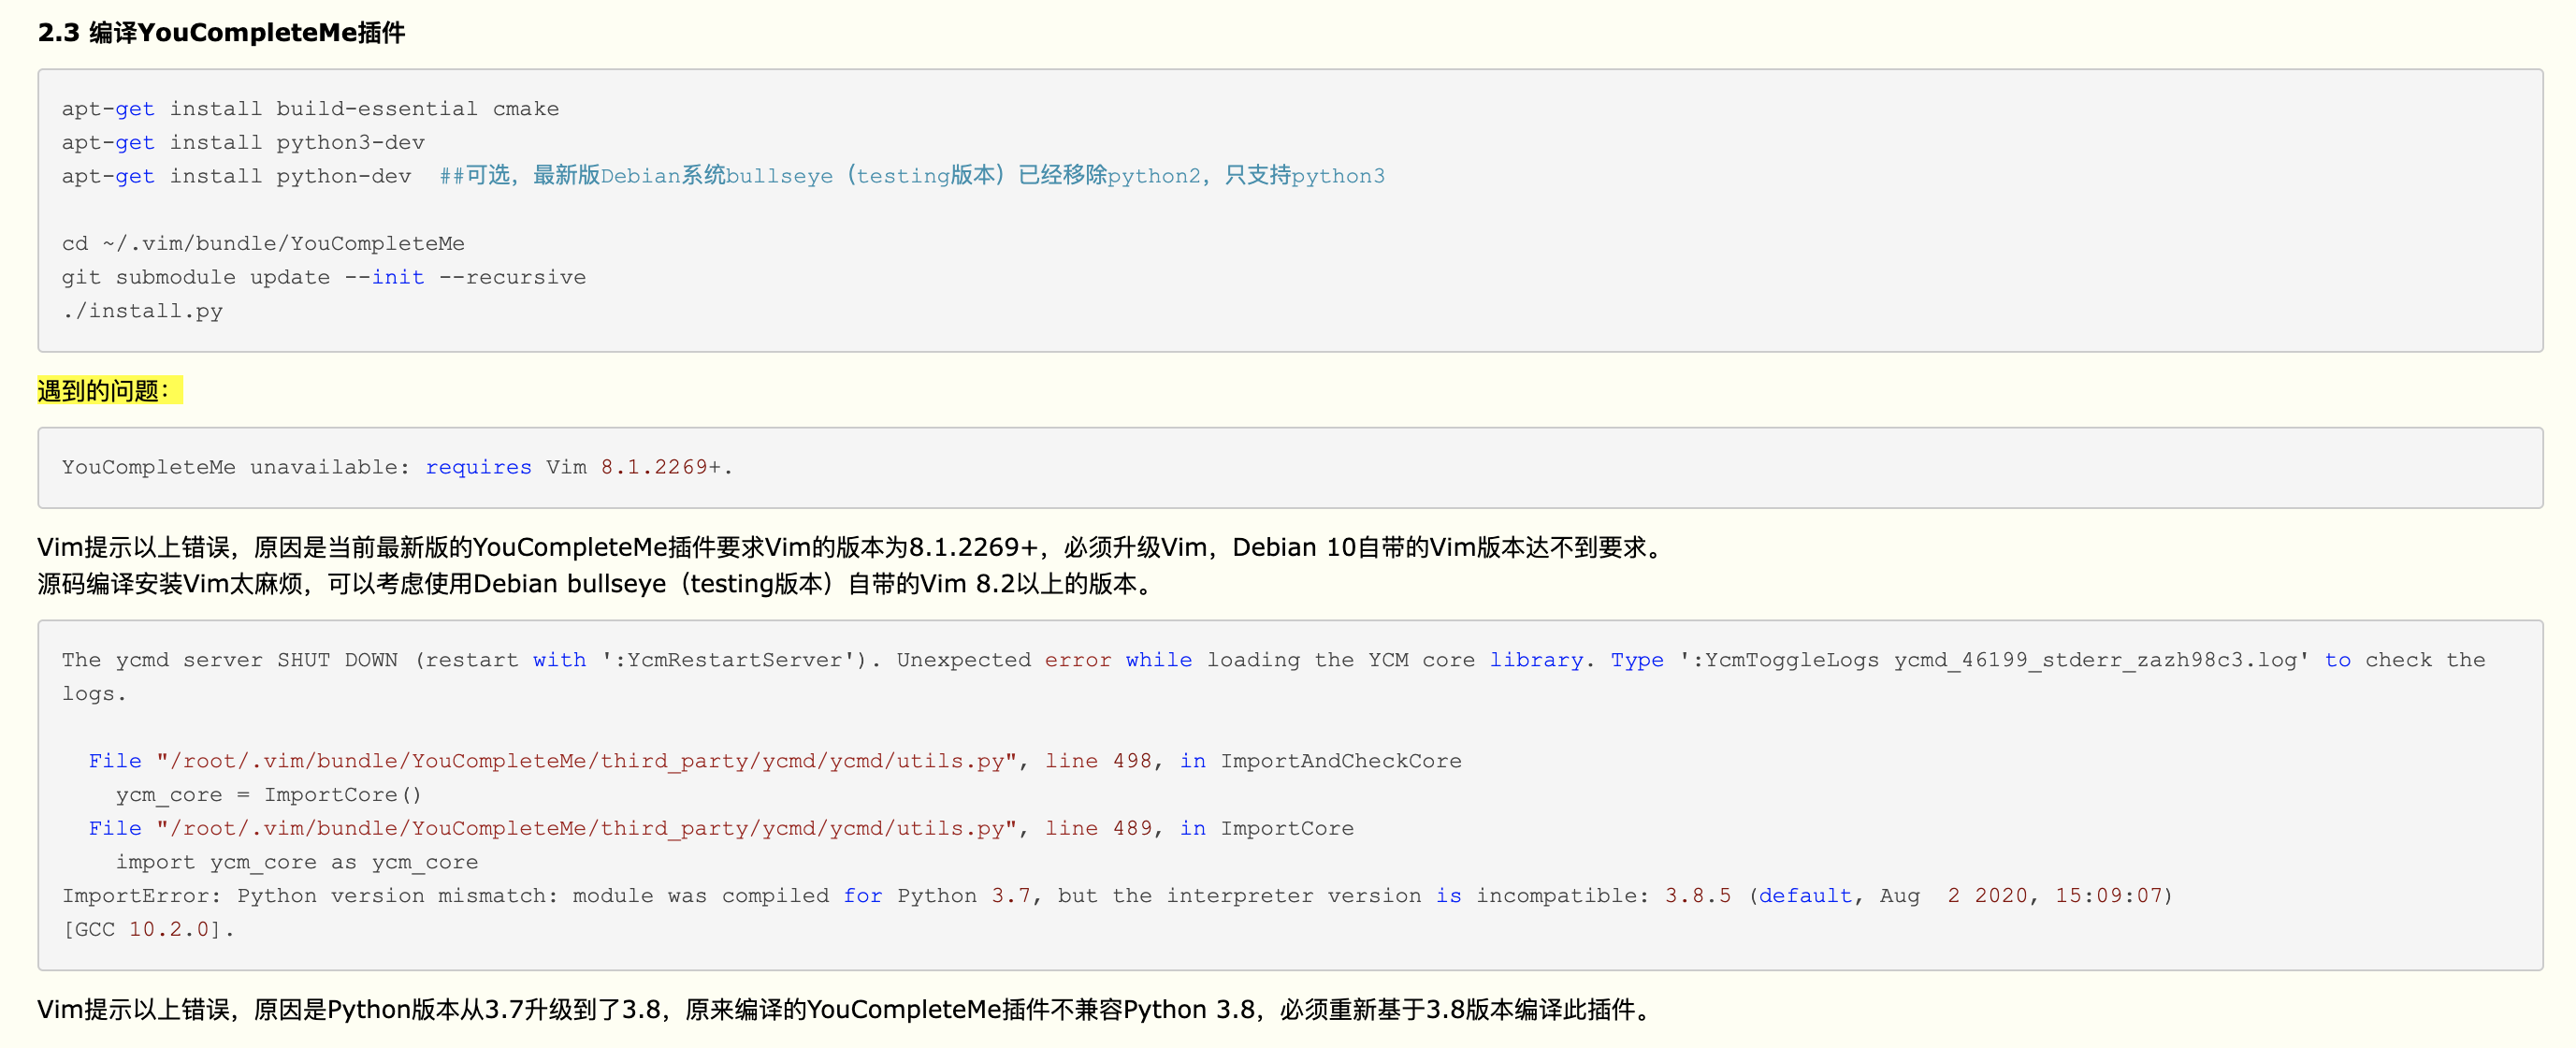
YouCompleteMe unavailable: requires Vim 8.1.2269+.
init/config vim
vim plugin: Vundle
ref:
color scheme: monokai
mkdir -p ~/.vim/colors
curl https://raw.githubusercontent.com/sickill/vim-monokai/master/colors/monokai.vim > ~/.vim/colors/monokai.vim

echo "syntax enable
colorscheme monokai" >> ~/.vimrc
ref:
vim plugin: file-line: go/jump to line after name
Bundle 'bogado/file-line'
ref:
autocomplete support: YouCompleteMe
# !IMPORTANT: config proxies for installing YouCompleteMe
PROXY=http://localhost:7890
HTTP_PROXY=$PROXY
HTTPS_PROXY=$PROXY
GOPROXY=$PROXY
NPM_CONFIG_PROXY=$PROXY
NPM_CONFIG_REGISTRY=http://registry.npmmirror.com

# mac only, or installing `macvim`
    brew install python # !IMPORTANT: change default python to be python3 under `/usr/local/bin` instead of python2 under `/usr/bin`, if it doesn't work with `python -V`, resetting `$PATH` may be helpful!

# linux only
    sudo apt install -y build-essential cmake vim-nox python3-dev
    sudo apt install -y mono-complete golang nodejs default-jdk npm

git clone https://github.com/ycm-core/YouCompleteMe ~/.vim/bundle/YouCompleteMe
cd ~/.vim/bundle/YouCompleteMe
git submodule update --init --recursive

python3 install.py --all --verbose

echo "Bundle 'ycm-core/YouCompleteMe'" >> ~/.vimrc
ref:
bugfix: No .ycm_extra_conf.py file detected. #415
problem: 用vim打开某个 C++文件时,最底部会有一行红的报错,提示No .ycm_extra_conf.py file detected.(但又不影响代码阅读,因为代码还是高亮的),然后操作鼠标或者键盘后,该行又消失。
resolution: 搜了一下,重新“安装”一下YouCompleteMe就好。
cd ~/.vim/bundle/YouCompleteMe
python3 install.py

see: - No .ycm_extra_conf.py file detected. · Issue #415 · ycm-core/YouCompleteMe
Add custom input
Add date input
" https://stackoverflow.com/questions/56052/best-way-to-insert-timestamp-in-vim
nmap <F3> i<C-R>=strftime("%Y-%m-%d %a %I:%M %p")<CR><Esc>
imap <F3> <C-R>=strftime("%Y-%m-%d %a %I:%M %p")<CR>
Add arpara signature input
nmap <F3> i<C-R>=strftime("ARPARA:markshawn@%Y/%m/%d: ")<CR><Esc>
imap <F3> <C-R>=strftime("ARPARA:markshawn@%Y/%m/%d: ")<CR>
Add edit control
filetype plugin indent on
" show existing tab with 4 spaces width
set tabstop=4
" when indenting with '>', use 4 spaces width
set shiftwidth=4
" On pressing tab, insert 4 spaces
set expandtab
ref:
Add display control
" show tabs as characters
set list
ref:
diff2html
ref: - diff to html (diff2html) program - Stack Overflow
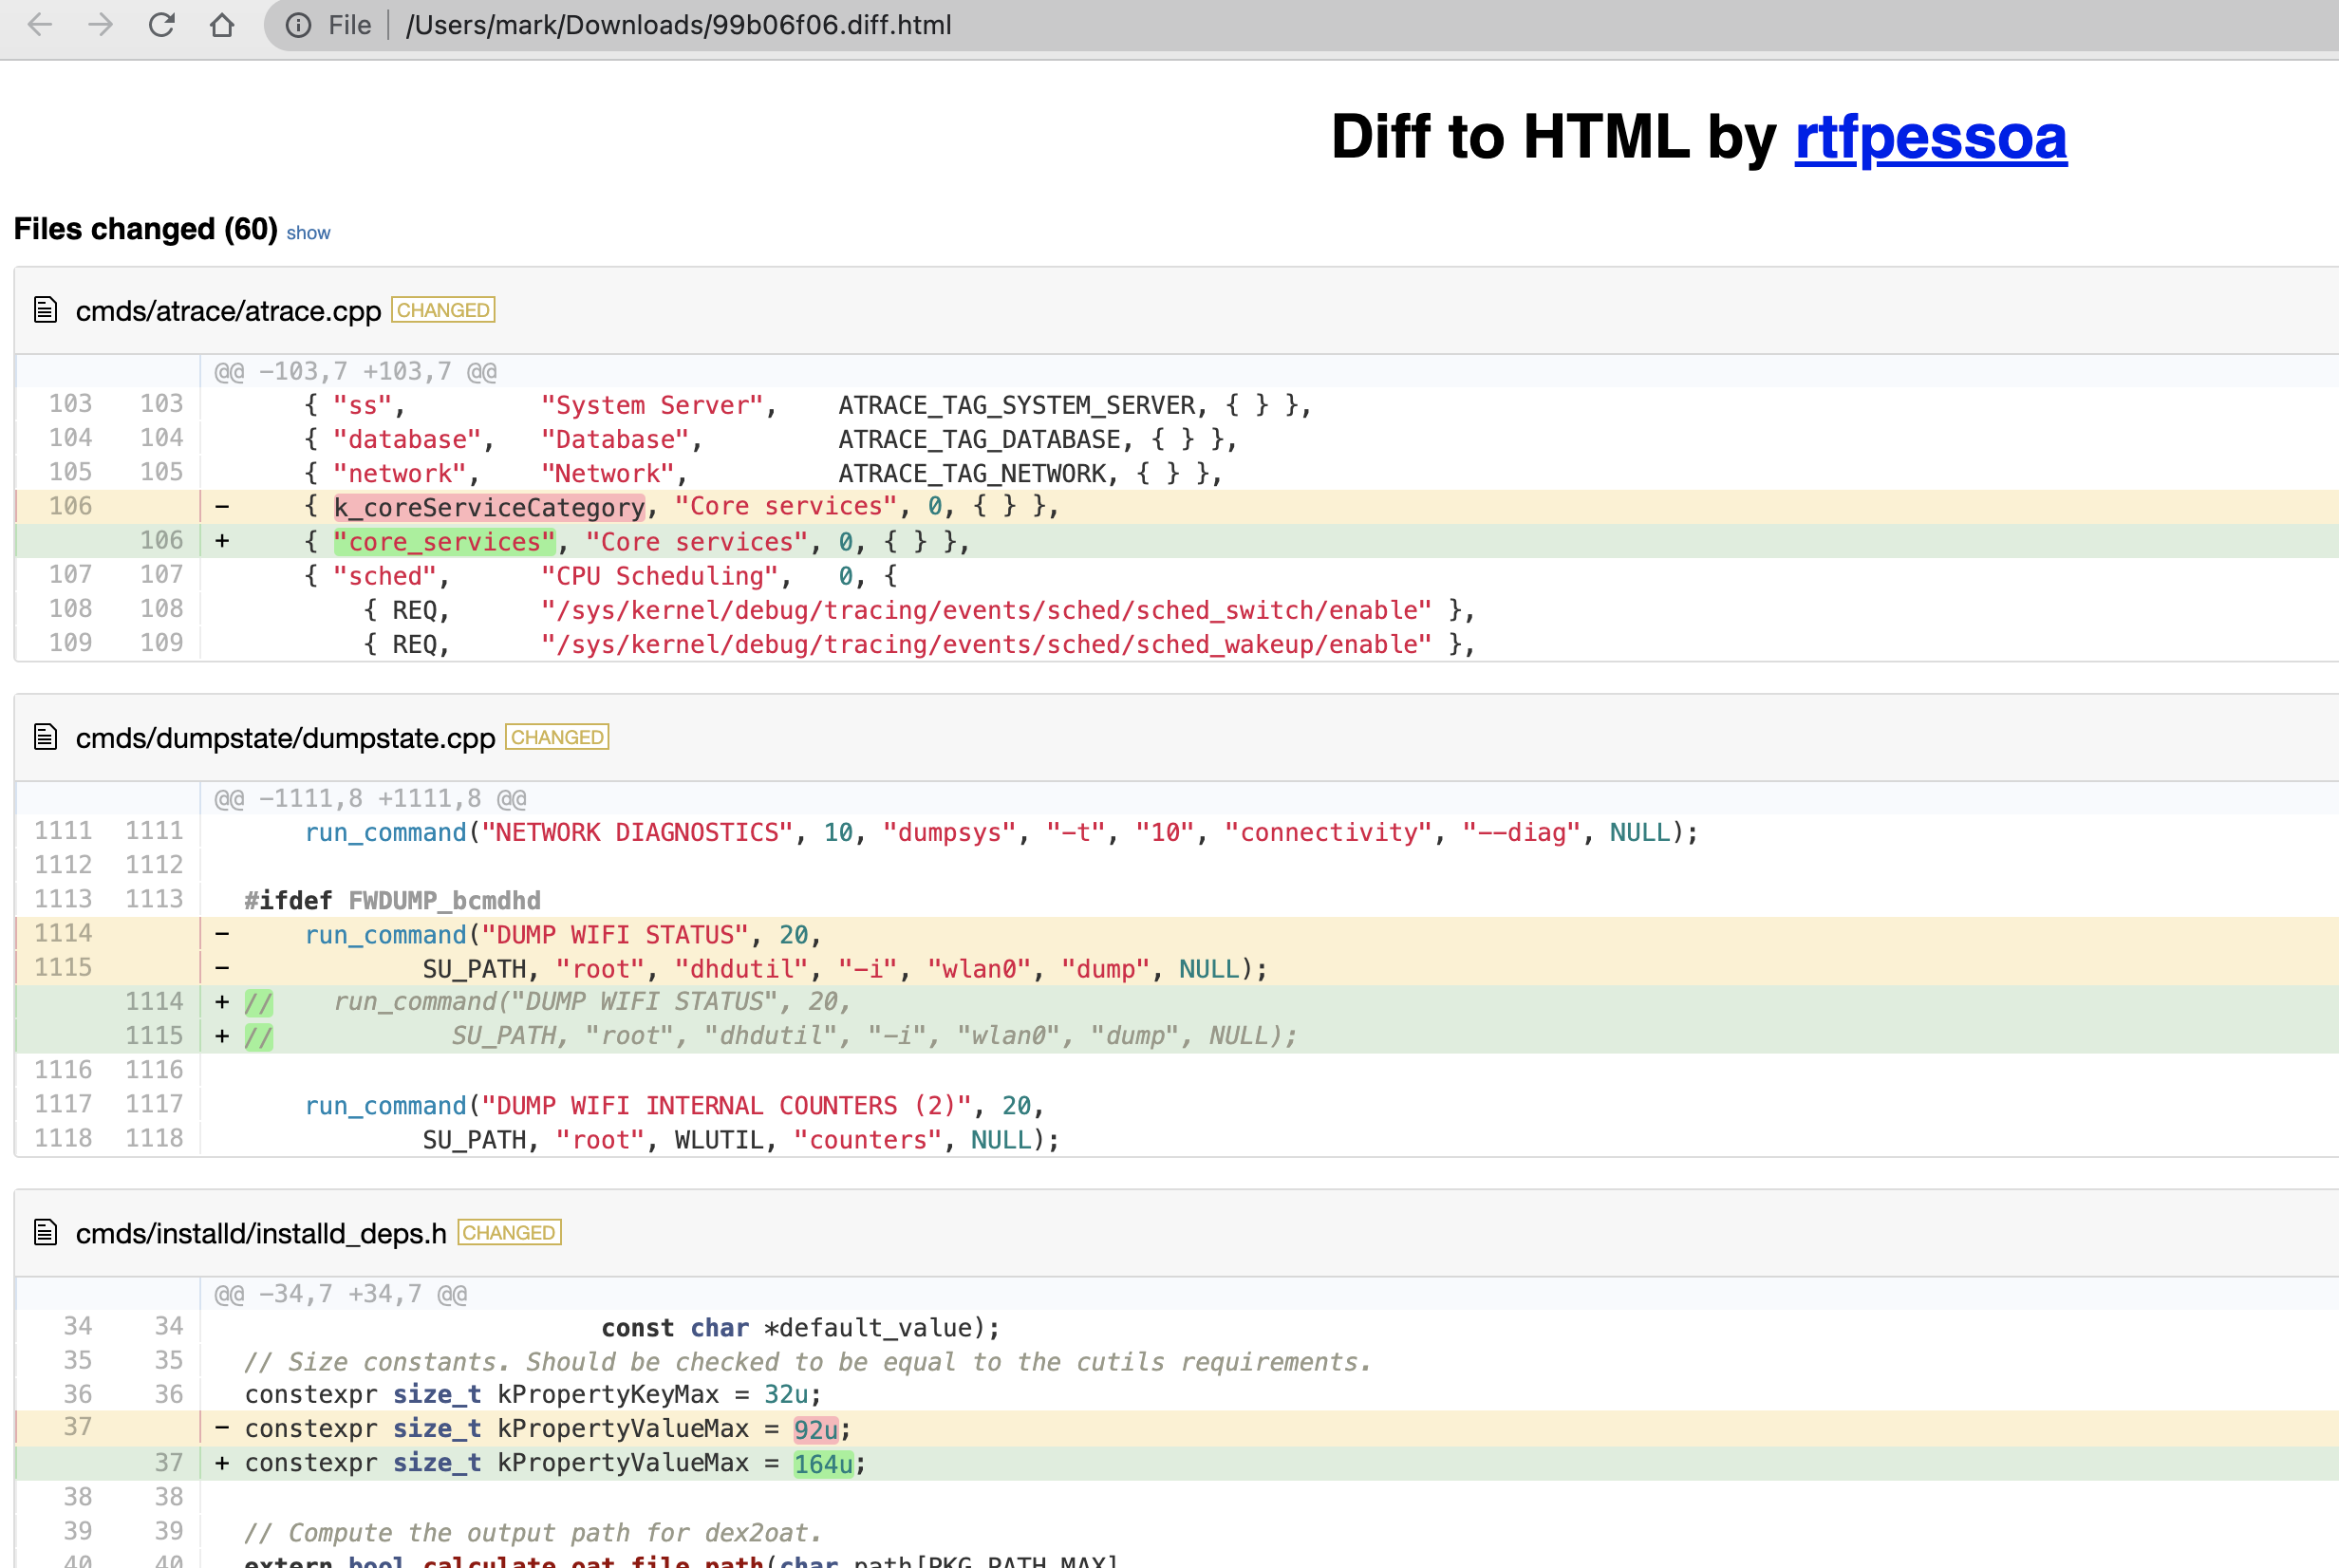
recommended html render solution of diff2html-cli based on npm
ref: - rtfpessoa/diff2html-cli: Pretty diff to html javascript cli (diff2html-cli)
# Step 1. install `diff2html-cli` based on `npm` (`npm` required)
npm i -g diff2html-cli

# Step 2. render

## usage 1. render `xxx.diff` file into temp file (auto open default)
FILE=xxx.diff
diff2html -i file -- $FILE

## usage 2. render `xxx.diff` file into local file (not auto open default)
FILE=xxx.diff
diff2html -i file -F $FILE.html -- $FILE
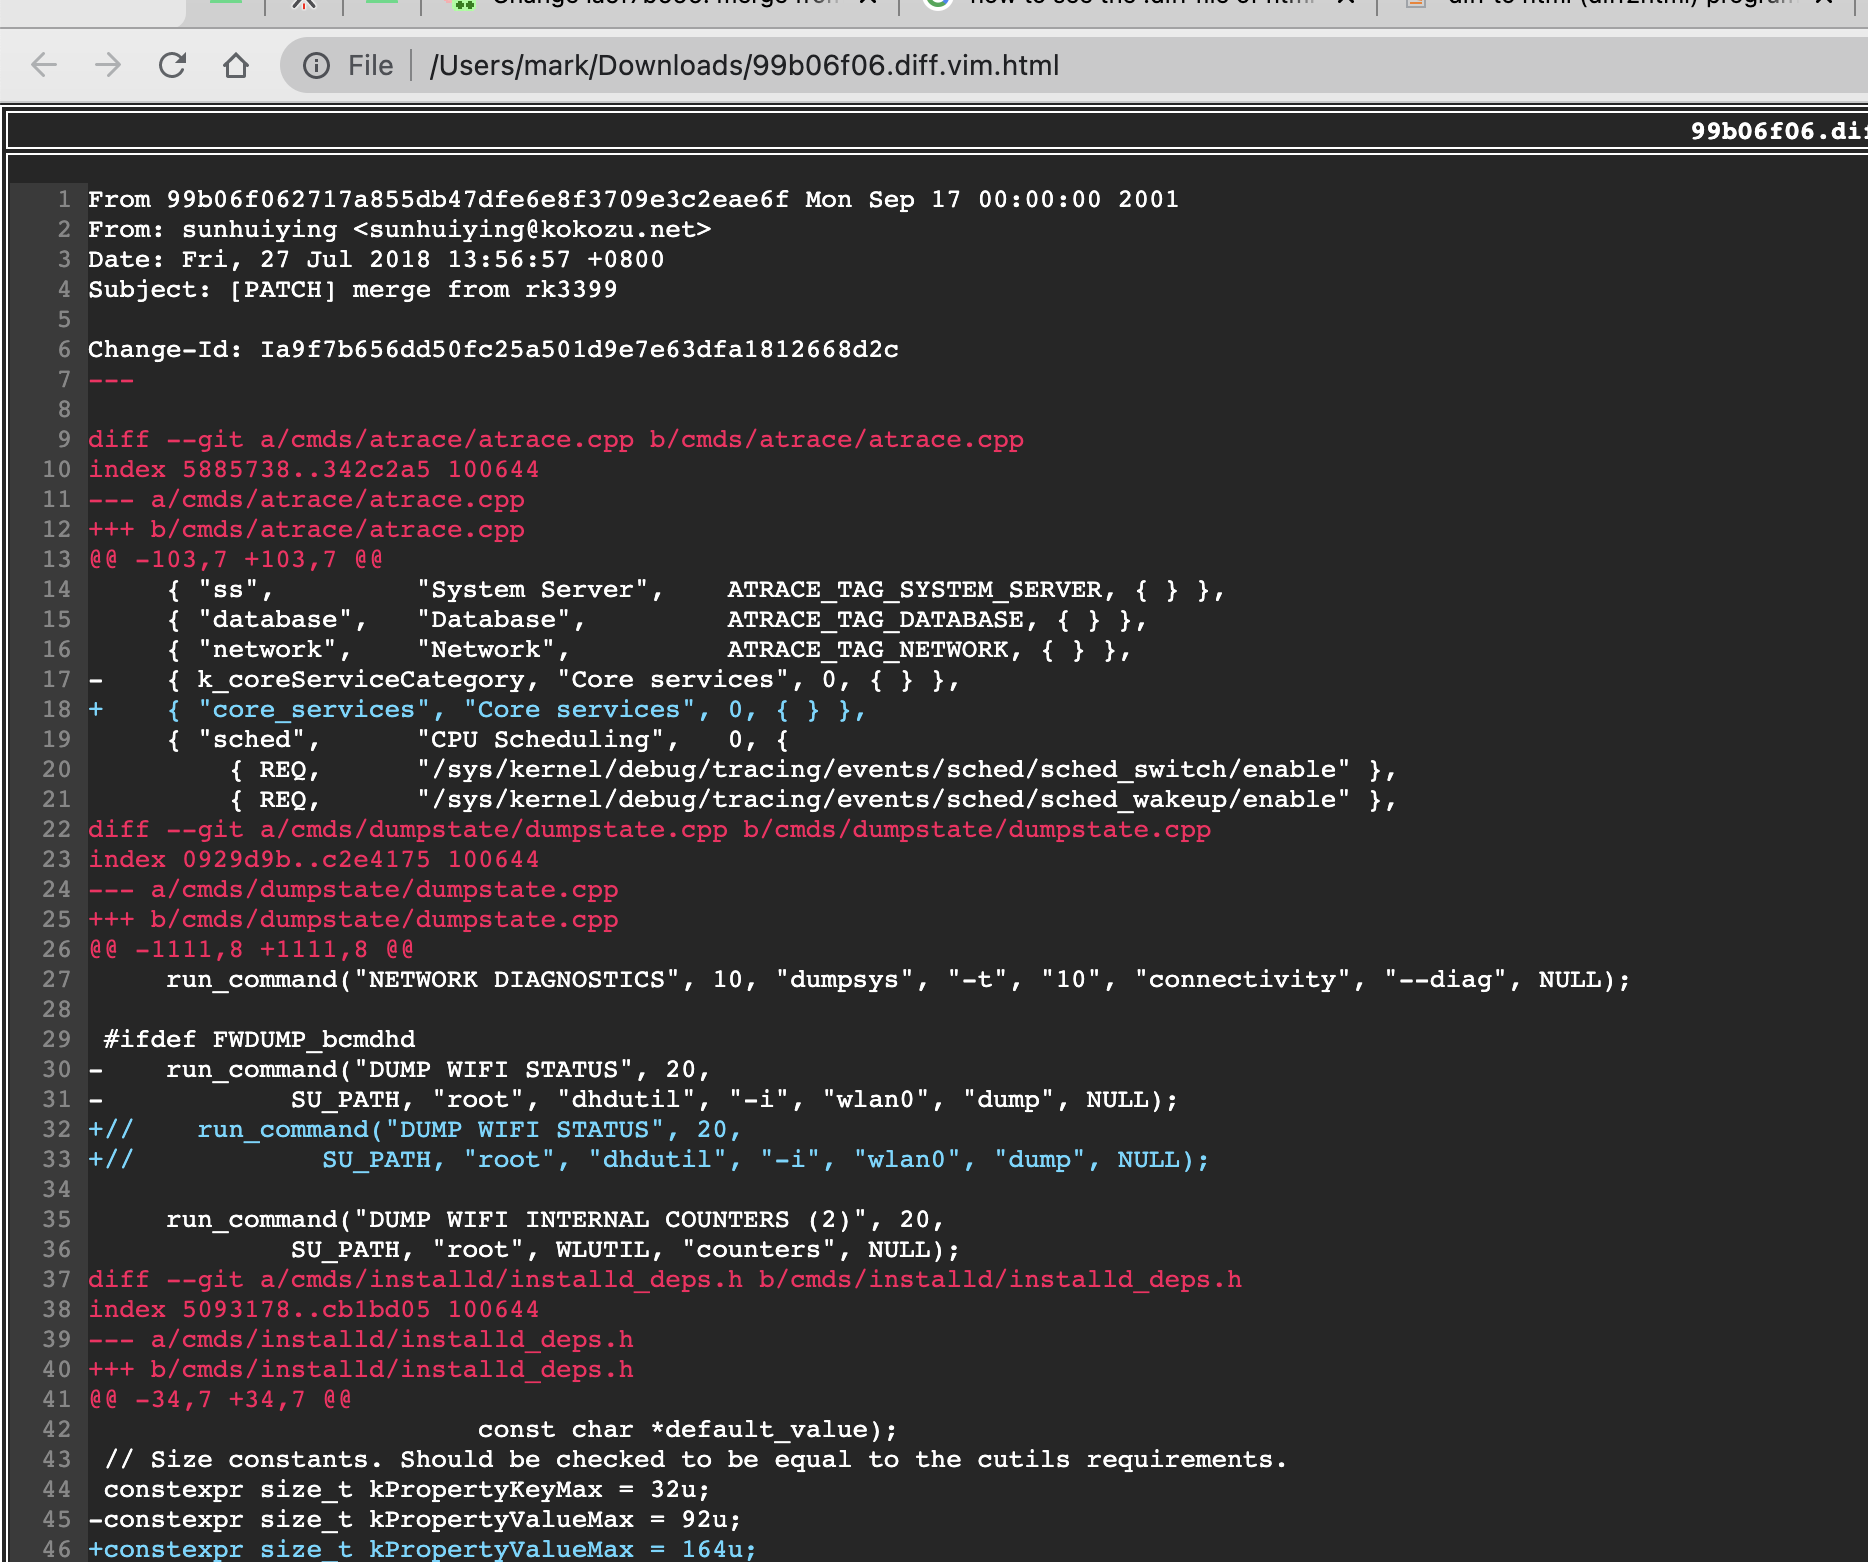
a simpler solution to have a look at basic html style (based on vim)
FILE=xxx.diff
vim $FILE -c TOhtml -c ":saveas $FILE.vim.html" -c ":q" -c ":q"
gerrit render effect
under file list view
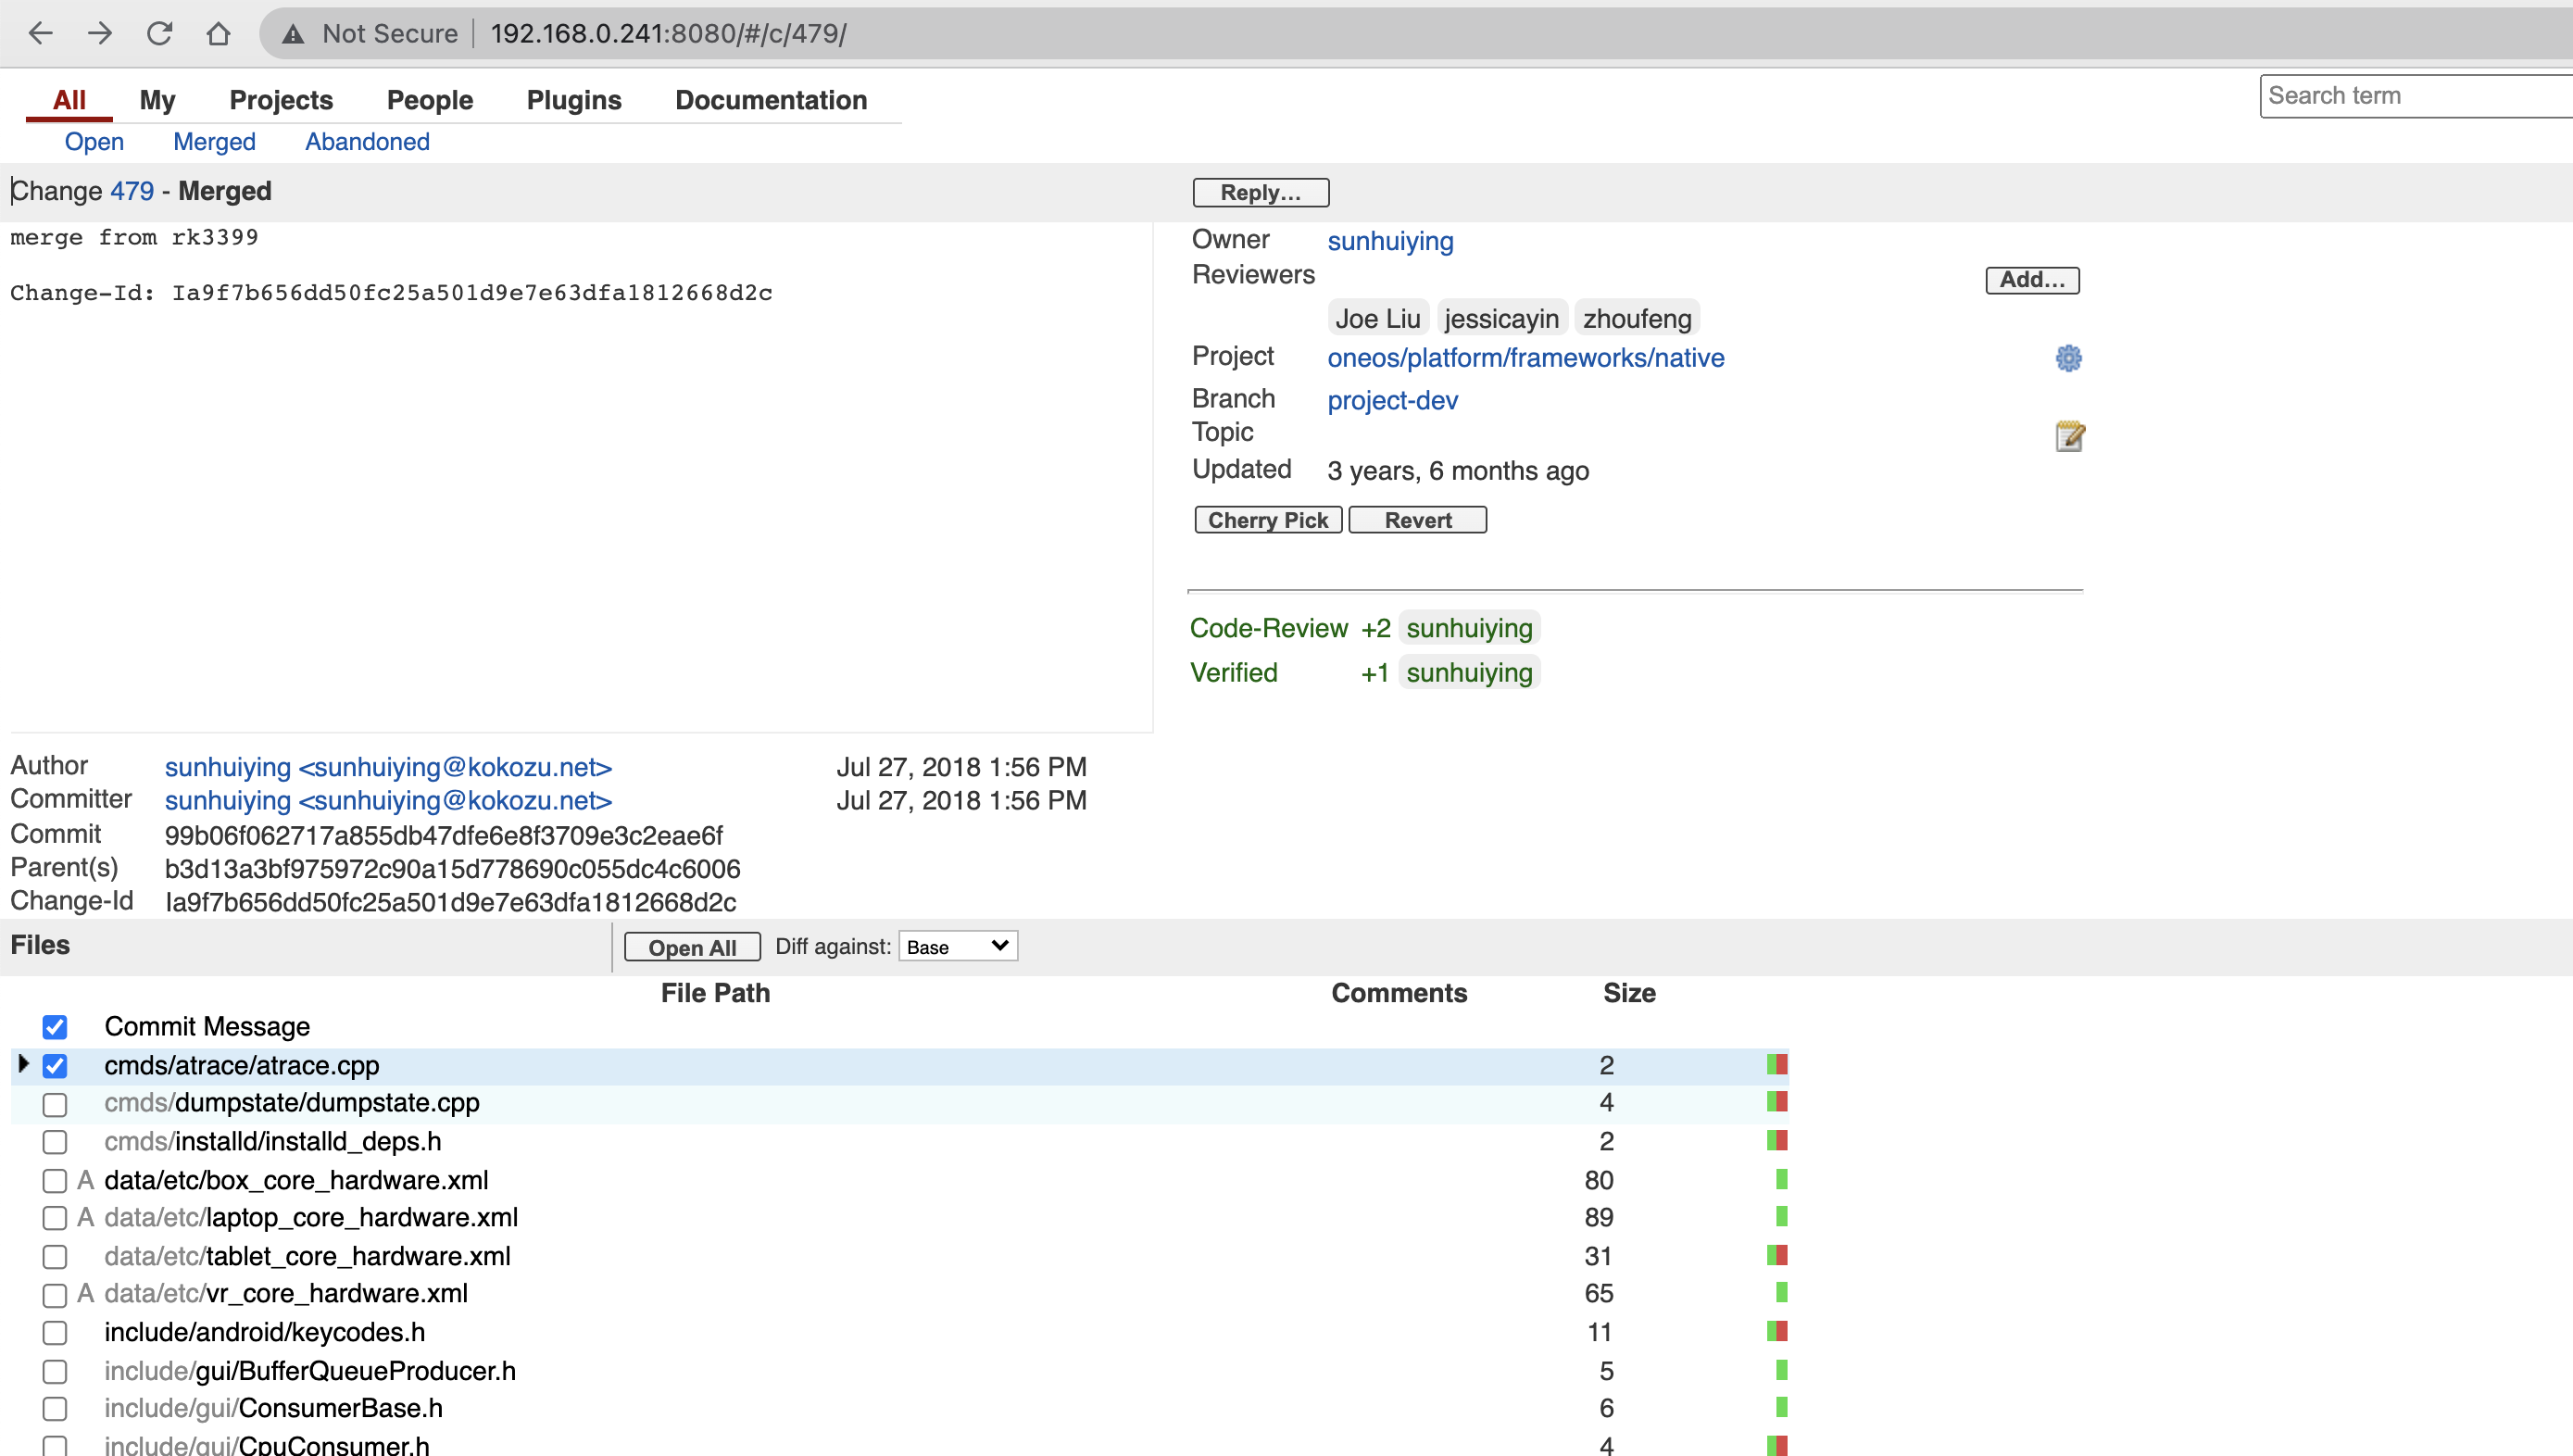
ref: - Change Ia9f7b656: merge from rk3399 | 192.168 Code Review
under file content view

!!!tip Drawbacks of viewing diff on gerrit: 1. there is bug to scroll the page and affects the experience deeply. 2. since the list and the content view are separate, you need to manually switch between files, which is inflexible, comparing to the diff2html-cli solution of recommended html render solution of diff2html-cli based on npm
ref: - SurfaceFlinger.h | 192.168 Code Review
copy selected lines to clipboard
In my mac, I can use shift + V then :w !pbcopy, but I found it invalid in ubuntu.
After a little search, I am suggested to install xclip and then I can use shift + V then :w !xclip.
TODO: Also, it introduced the GNU vim for ease, which deserves me to have a try 【允许我 yank 到全局剪切板,这样我按 y 就有了】.

see:
How to copy selected lines to clipboard in vim - Stack Overflow
How can I copy text to the system clipboard from Vim? - Vi and Vim Stack Exchange
how to delete from current position to the end of line
# resolution 1. general
d$

# resolution 2. synonym
D
ref
how to force tab to be spaces (so that the git diff won't have errors)
" ref: https://vim.fandom.com/wiki/Converting_tabs_to_spaces
" ref: https://stackoverflow.com/questions/234564/tab-key-4-spaces-and-auto-indent-after-curly-braces-in-vim
filetype plugin indent on
:set expandtab
:set tabstop=4
:set shiftwidth=4
how to filter matched lines
ref:
resolution 1. just to display (no buffer)
:g/PATTERN
resolution 2. write into current files
" `m` means move, `0` means the head
:g/PATTERN/m0

" `$` means the end
:g/PATTERN/m$
BEST-PRACTICE: resolution 3. open a new vim window
" 1. `%` means the current file, other files are also supported
" 2. this command would open matched lines in a new vim window (hidden)
:vim PATTERN %

" 1. `cw` is short for `cwindow`
" 2. it means to open the vim window
" 3. close the window via `cclose` or `ccl` for short
" 4. reopen the closed window via `cw` again
" 5. switch between window via `ctrl + w` then input arrow keys
:cw
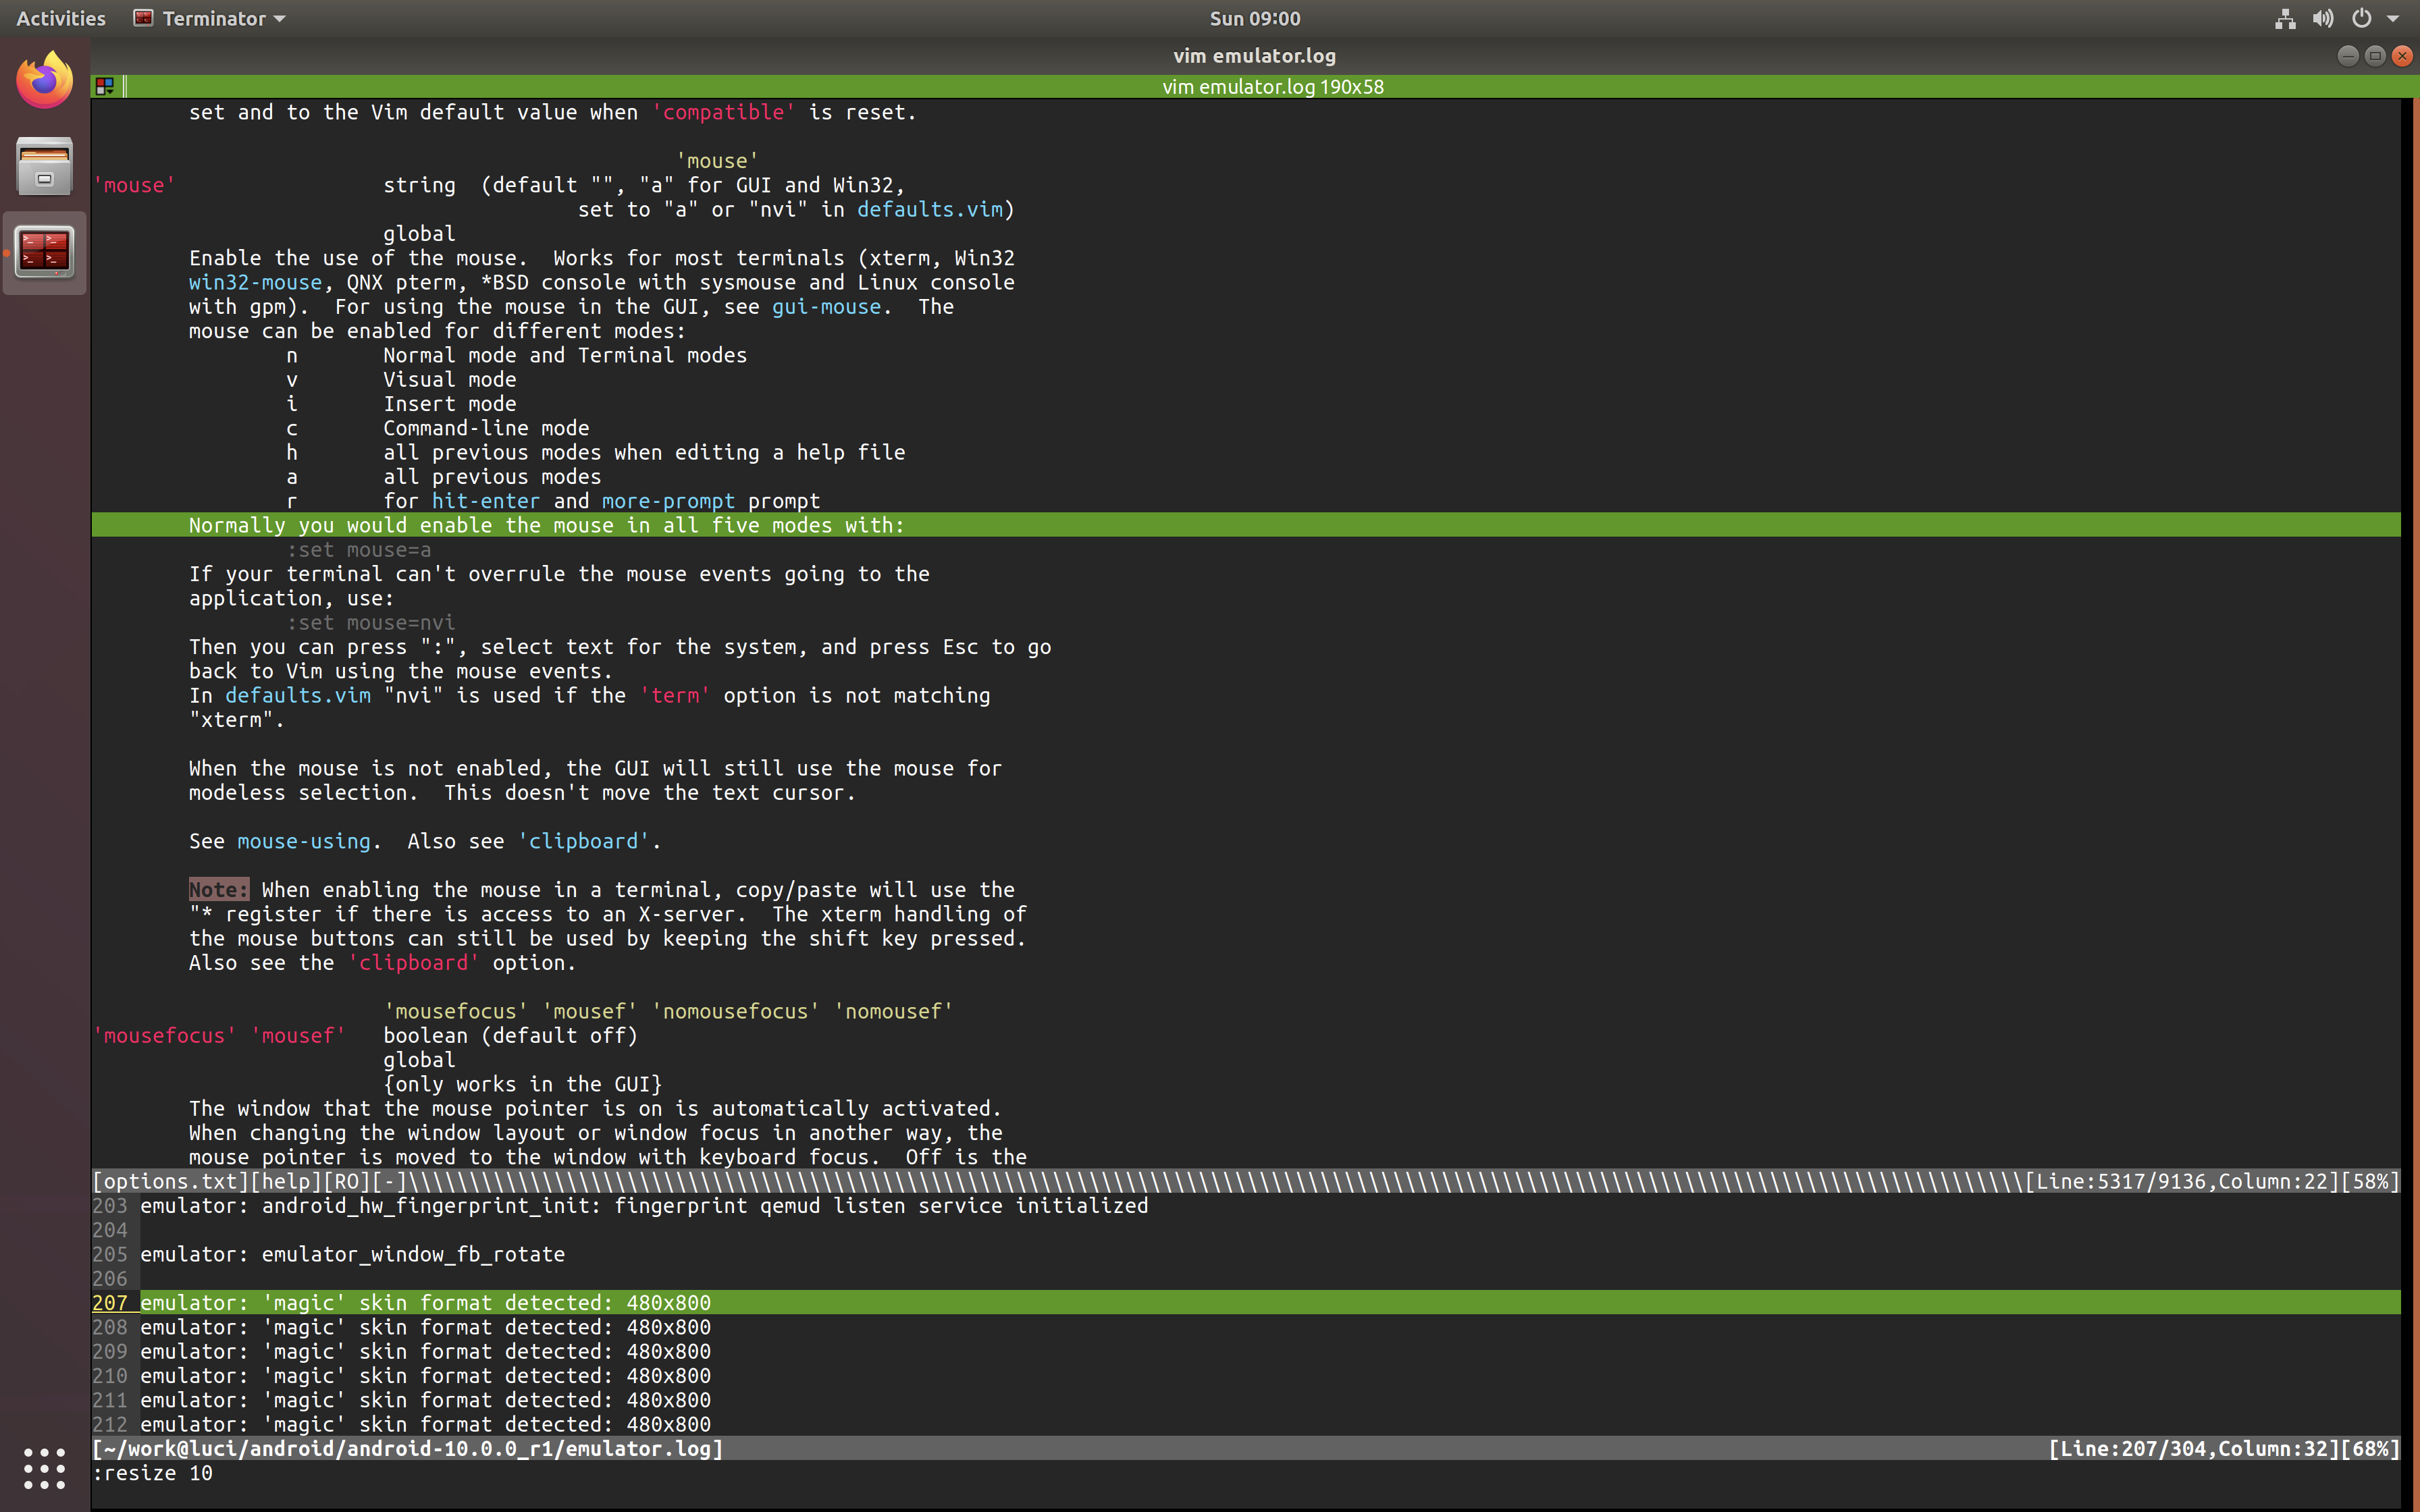
how to resize height and width
resolution 1. use commands
" set the height to be 20 rows
:resize 20

" set the height to be 5 rows more
:resize +5

" set the height to be 10 rows less
:resize -10

" reset the height, i.e. set the hight to be highest possible
:resize "highest possible"

FIXME: set the width (the following one not work)
:vertical resize 10
ref:
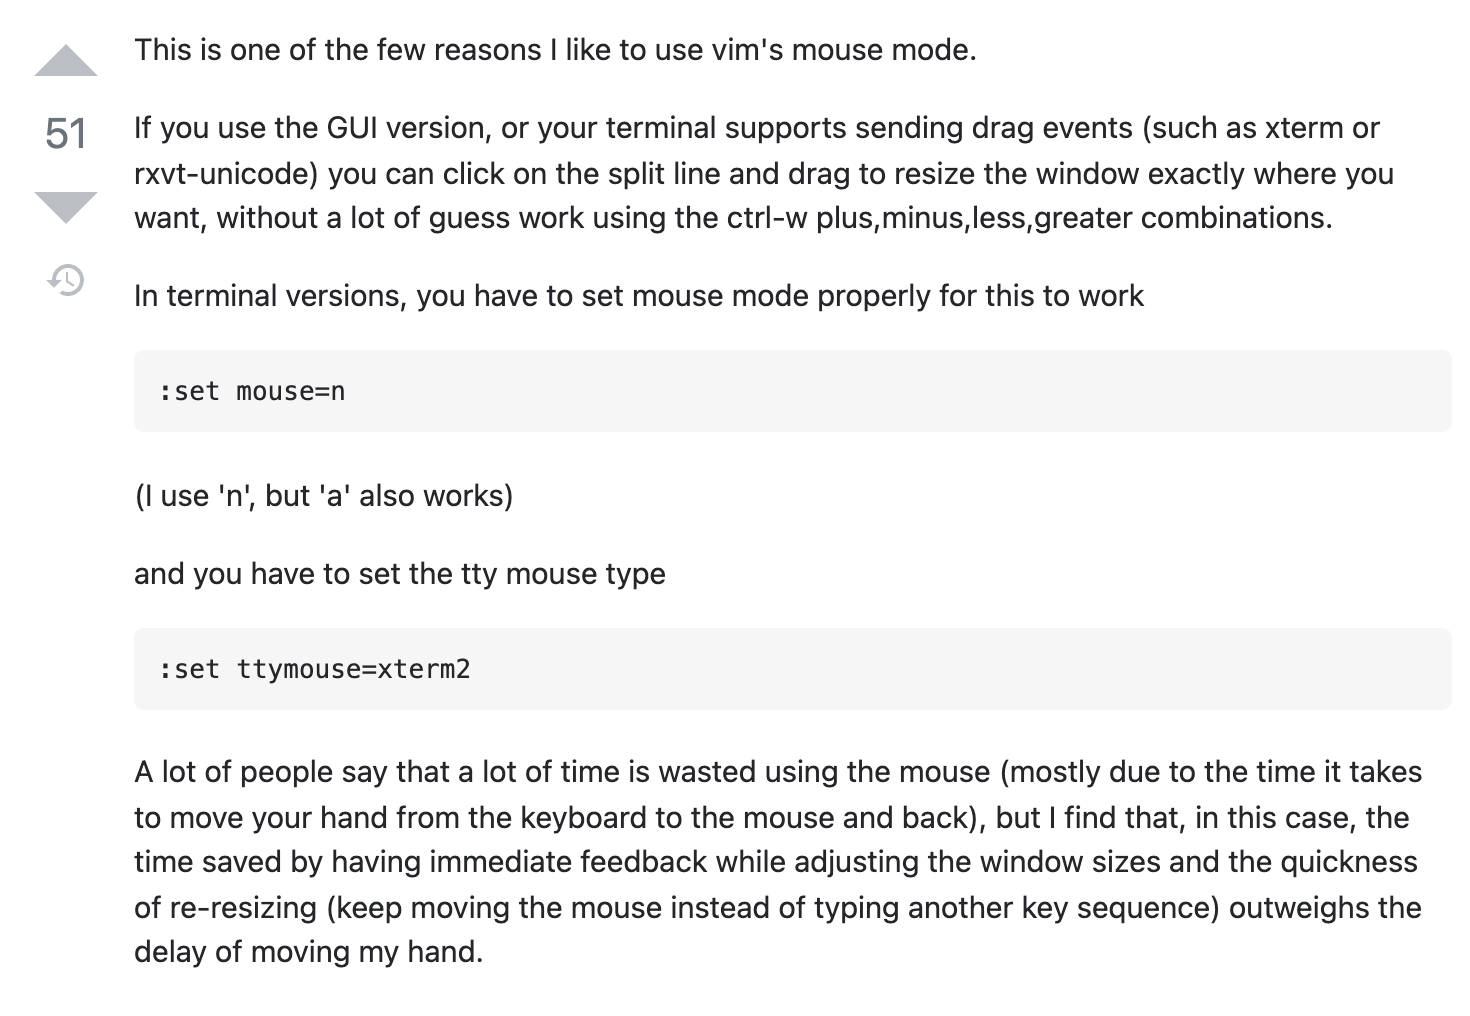
resolution 2. use mouse
:set mouse=n
:set ttymouse=xterm2
And then we can hold on the split edge using mouse, and drag it to resize.
✨ 这一点,就跟我当初做字幕网时思考的东西是一样的!
ref:
how to highlight line or column
✨
ctermXX, the another type isgui(vim started viagvim),ctermcontrols what behaviors like in a vim started by terminal- to highlight column is similar to line, just to change the
cursorlineto becursorcolumn
:hi cursorline ctermbg=darkgreen
:himeans highlightcursorlinemeans the line where the cursor is, so that:hi cursorlinemeans to highlight an entire linectermbg, controls the background color, the general color string is supported, and my favorite one isdarkgreen
ref:
mouse mode
" normal mode, 只支持鼠标点选切换焦点,不支持拖选区域,不支持系统自带右键
set mouse=n

" visual mode, 不支持鼠标点选切换焦点,支持拖选区域,支持系统自带右键
set mouse=v

" insert mode, 测试下来同visual mode
set mouse=i

" nvi mode, 支持鼠标点选(立即切换焦点),支持拖选区域(基于新的焦点为起点或终点),不支持系统自带右键
set mouse=nvi

" all mode, 测试下来同nvi
set mouse=a
✨ 推荐在 vim 中用
:h mouse这种命令打开帮助菜单,显示效果很友好的,如图:
ref:
vimdiff
✅ force vimdiff to wrap line
au VimEnter * if &diff | execute 'windo set wrap' | endif
ref:
TODO: vimdiff show only differences
ref:
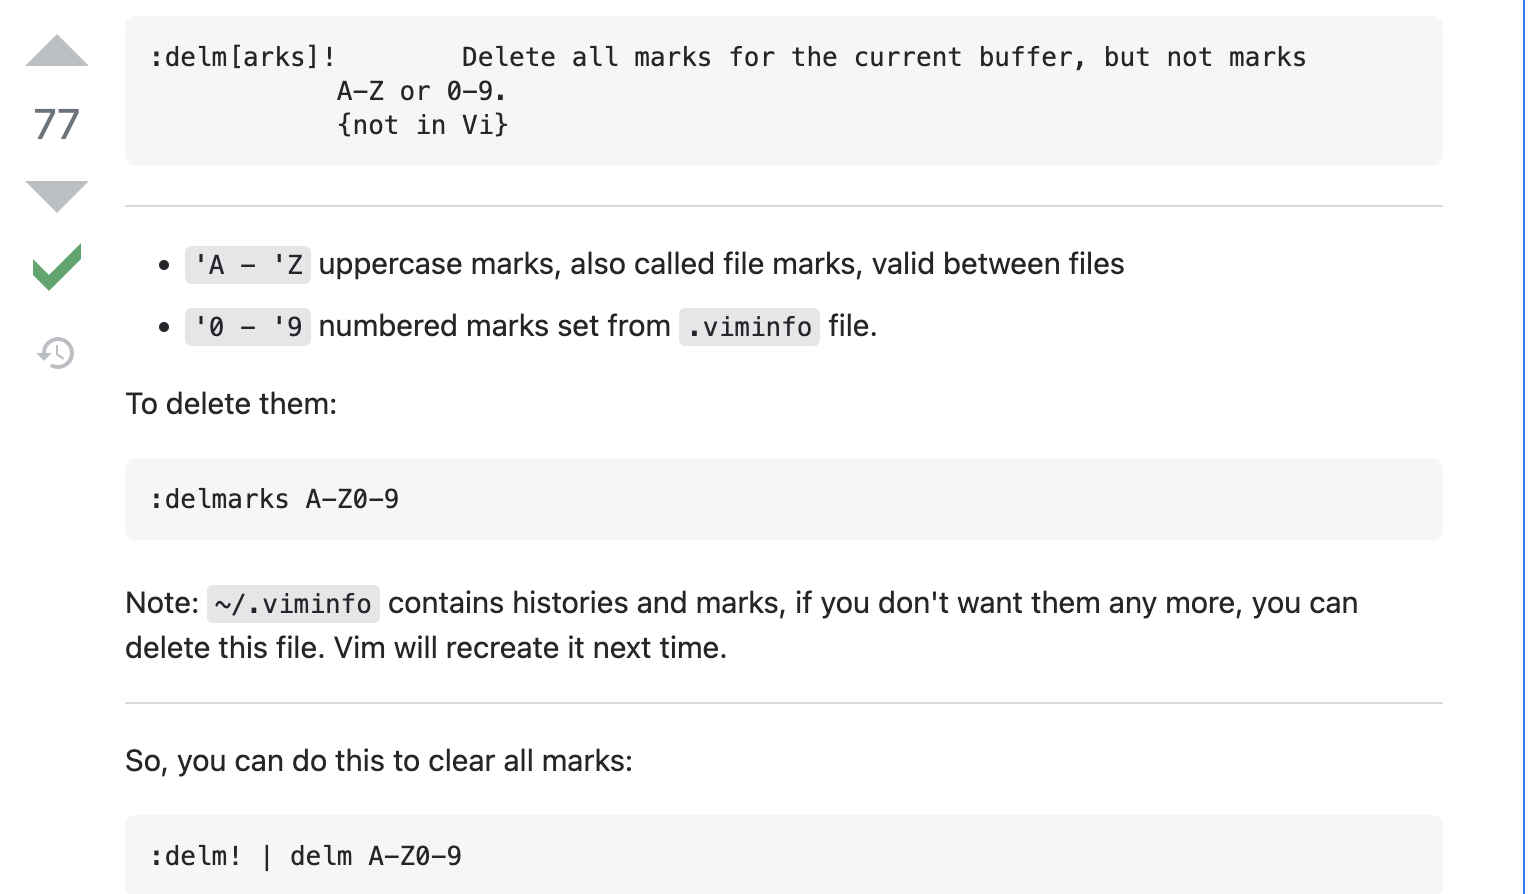
bookmarks
" show all the marks (in normal mode)
:marks

" add mark (in normal mode)
mX

" jump mark (in normal mode)
`X

" delete marks (in normal mode, based on basic regex)
:delm X   " delm: delete marks

" clear all marks
:delmarks A-Z0-9
usage
see:
files relative
open other file
" open new file from current file
:e FILE_PREFIX<TAB>

" list buffer files
:ls

" choose next buffer file
:bn  " bn: buffer next
see:
copy between two vim files
:e ANOTHER_FILE (auto-complete support)
ref:
how to update vim
ref:
multi-line insert under visual mode
ctrl + vinto 'visual block' modeshift + iinto 'visual block insert' mode- input whatever I want (while only can see the realtime effect on first line)
ESCmark the modification has been doneEntermake the modification work
ref: recommend
Copy-Paste in Vim
copy paste of line
# copy line (yank)
y

# cut line (delete)
d

# paste after cursor (small case)
p

# paste before cursor (upper case)
P
copy paste of selected
# select word (small case)
v

# select whole line (upper case)
V

# block(rectangular) select
ctrl + v
more:
how to copy to clipboard
其中我最喜欢基于map的方案:https://stackoverflow.com/a/67890119/9422455
nnoremap Y "+y
vnoremap Y "+y
nnoremap yY ^"+y$
这个方案,在本地mac上测试通过,但是在公司服务器(ubuntu)上没有成功,就是没有进粘贴板,还没太明白。
how to insert datetime
ref:
column selection
Vim Tip: Select Column Put cursor and beginning of text to select. Press \<CTRL-V> to begin select of the column. When you reach the end of your select, type '\<c> ' Type the new text. Note that this will only replace the first instance. Now hit \<ESC> . All the text has been changed!
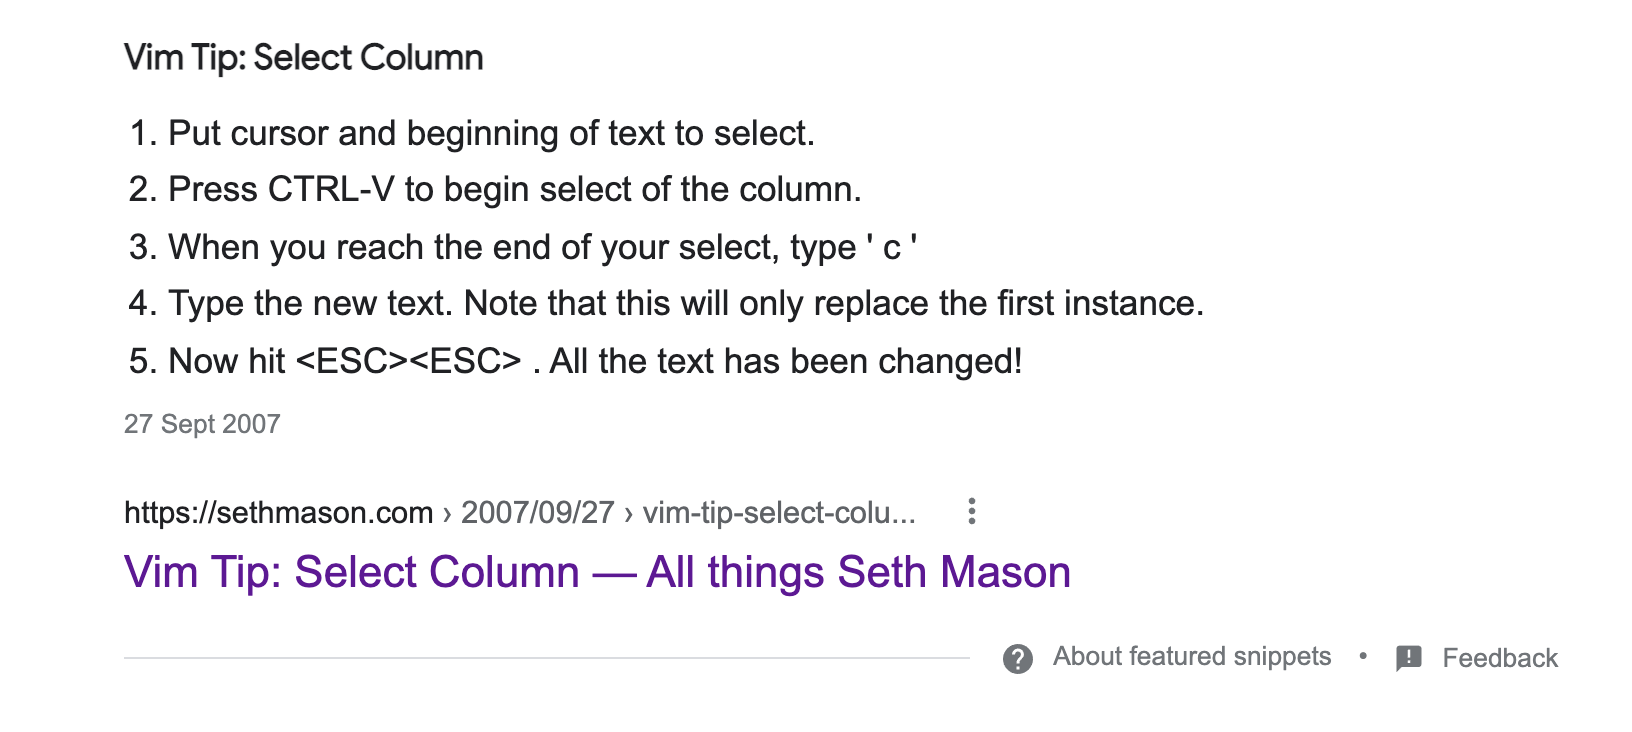
ref:
https://sethmason.com/2007/09/27/vim-tip-select-column.html
undo changes after file saved
There's persistent undo option in vim, :h persistent-undo Note: It was introduced in VIM 7.3 version, so for earlier versions, it will not work.
It can be turned on by placing following text in your .vimrc:
if has('persistent_undo')      "check if your vim version supports it
  silent !mkdir -p ~/.vim/undo
  set undofile                 "turn on the feature
  set undodir=$HOME/.vim/undo  "directory where the undo files will be stored
  endif
Note: Before enabling this option, whatever that was lost, remains lost. After enabling the option, you will be able to do subsequent undo/redo on whatever was added/deleted after enabling the option.
ref:
search for selected text

see:
fold(collapse) and unfold(expand)
"~/.vimrc

set foldmethod=indent
set foldlevel=1
set foldclose=all
In-file Controls:
zo: opens folds
zc: closes fold
zm: increases auto fold depth (collapse more)
zr: reduces auto fold depth (show more words)
zR: not fold (show the most words)
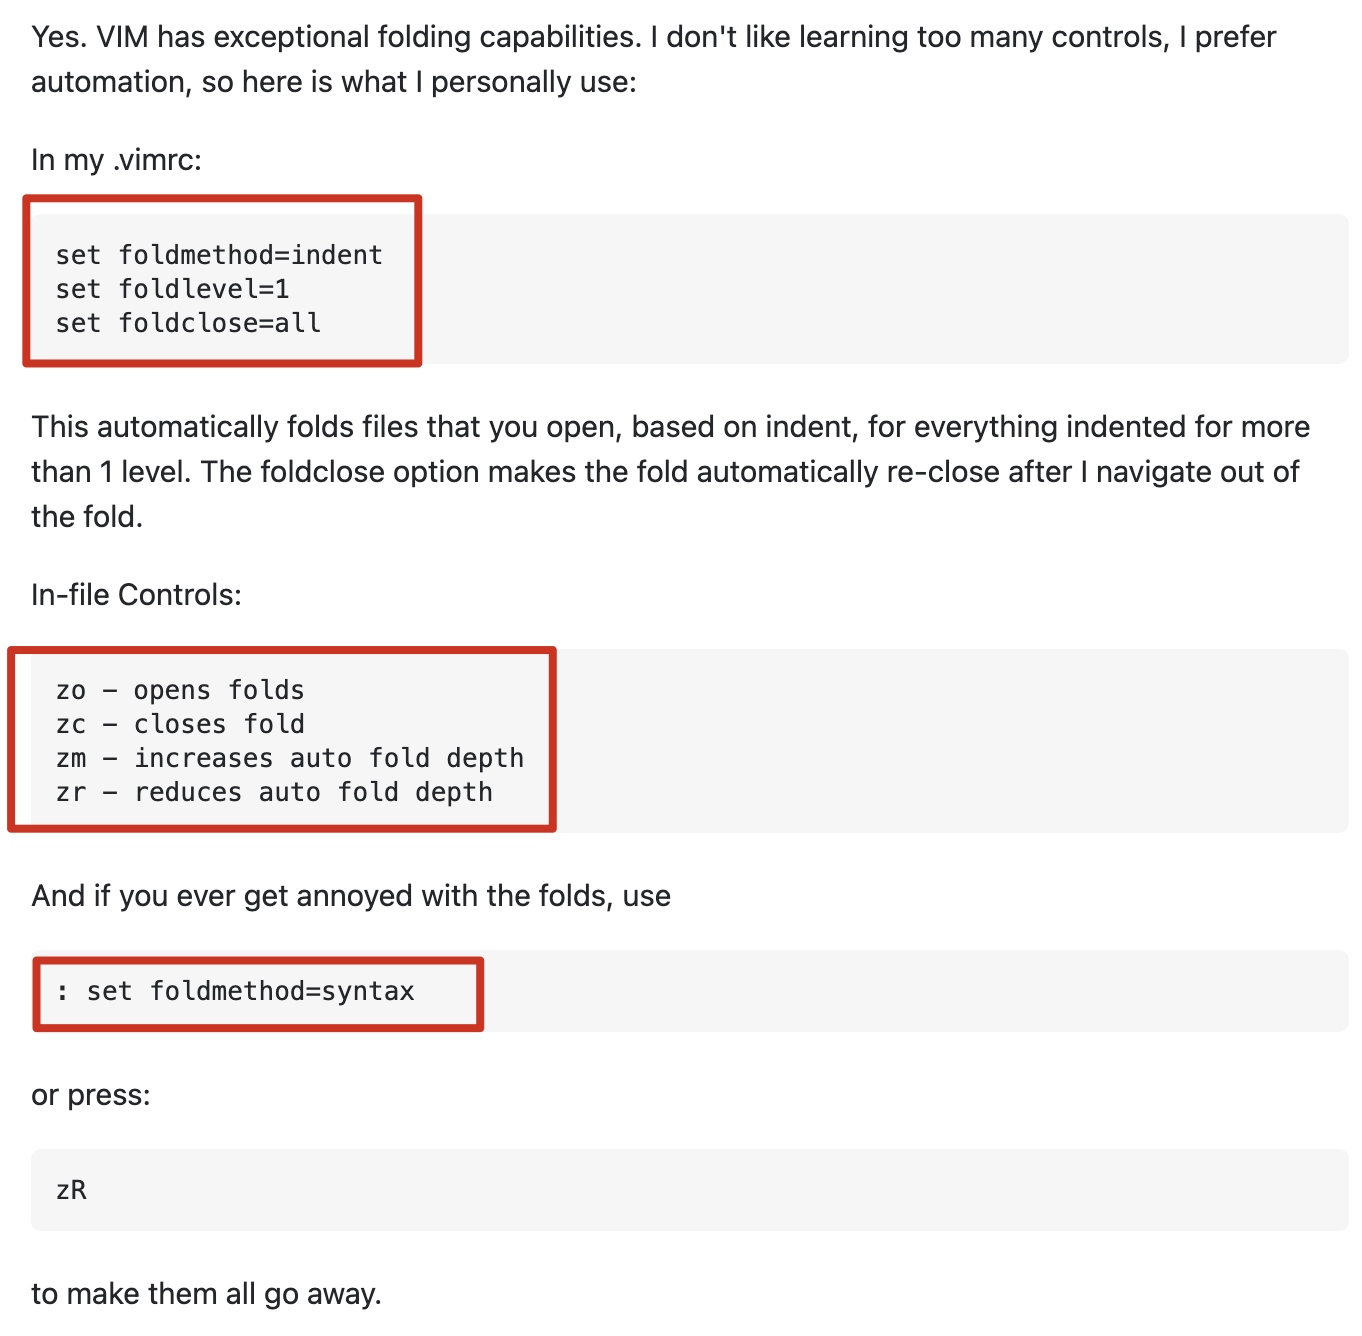
ref
Plugin Manager
comparison
vim-plug
install:
curl -fLo ~/.vim/autoload/plug.vim --create-dirs \
    https://raw.githubusercontent.com/junegunn/vim-plug/master/plug.vim
sample config of vim-plug official:
call plug#begin()$$
" The default plugin directory will be as follows:
"   - Vim (Linux/macOS): '~/.vim/plugged'
"   - Vim (Windows): '~/vimfiles/plugged'
"   - Neovim (Linux/macOS/Windows): stdpath('data') . '/plugged'
" You can specify a custom plugin directory by passing it as the argument
"   - e.g. `call plug#begin('~/.vim/plugged')`
"   - Avoid using standard Vim directory names like 'plugin'

" Make sure you use single quotes

" Shorthand notation; fetches https://github.com/junegunn/vim-easy-align
Plug 'junegunn/vim-easy-align'

" Any valid git URL is allowed
Plug 'https://github.com/junegunn/vim-github-dashboard.git'

" Multiple Plug commands can be written in a single line using | separators
Plug 'SirVer/ultisnips' | Plug 'honza/vim-snippets'

" On-demand loading
Plug 'scrooloose/nerdtree', { 'on':  'NERDTreeToggle' }
Plug 'tpope/vim-fireplace', { 'for': 'clojure' }

" Using a non-default branch
Plug 'rdnetto/YCM-Generator', { 'branch': 'stable' }

" Using a tagged release; wildcard allowed (requires git 1.9.2 or above)
Plug 'fatih/vim-go', { 'tag': '*' }

" Plugin options
Plug 'nsf/gocode', { 'tag': 'v.20150303', 'rtp': 'vim' }

" Plugin outside ~/.vim/plugged with post-update hook
Plug 'junegunn/fzf', { 'dir': '~/.fzf', 'do': './install --all' }

" Unmanaged plugin (manually installed and updated)
Plug '~/my-prototype-plugin'

" Initialize plugin system
" - Automatically executes `filetype plugin indent on` and `syntax enable`.
call plug#end()
" You can revert the settings after the call like so:
"   filetype indent off   " Disable file-type-specific indentation
"   syntax off            " Disable syntax highlighting
enable:
vim +PlugInstall
install YouCompleteMe via vim-plug
# bugfix: CMake Error at ycm/CMakeLists file DOWNLOAD HASH mismatch #1711
# ref: https://github.com/ycm-core/YouCompleteMe/issues/1711#issuecomment-329520570
python3 ./install.py --clang-completer --system-libclang --all
vundle: how to uninstall vim plugin
ref: https://stackoverflow.com/a/49251184/9422455
- comment target plugin to be removed
:BundleClean
bugfix: YouCompleteMe unavailable: requires Vim 8.1.2269+.
core ref:
- YouCompleteMe unavailable: requires Vim 8.1.2269+ · Issue #3764 · ycm-core/YouCompleteMe
- Building Vim from source · ycm-core/YouCompleteMe Wiki
scenario
see: https://www.cnblogs.com/varden/p/13857004.html
resolution 1: using an older version of youcompleteme
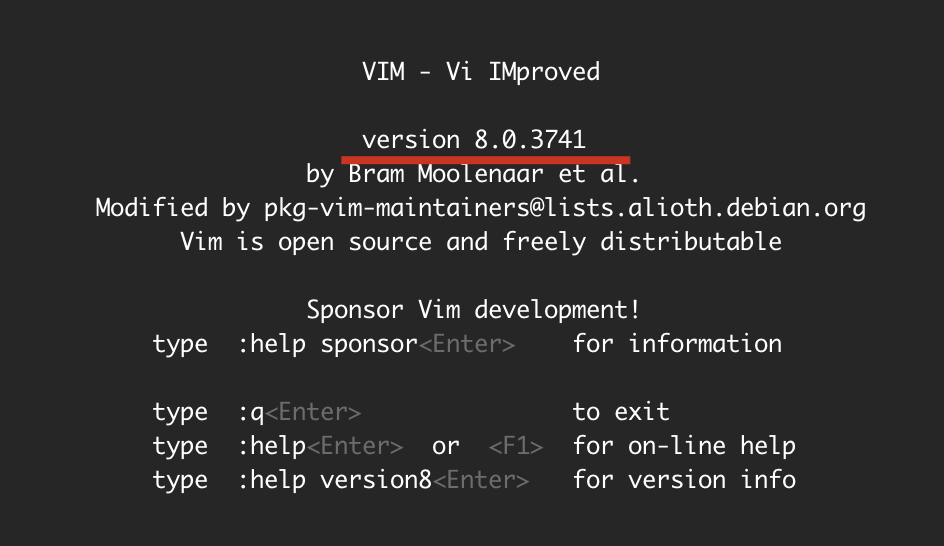
- check vim version
check vim version installed on local (run $ vim):
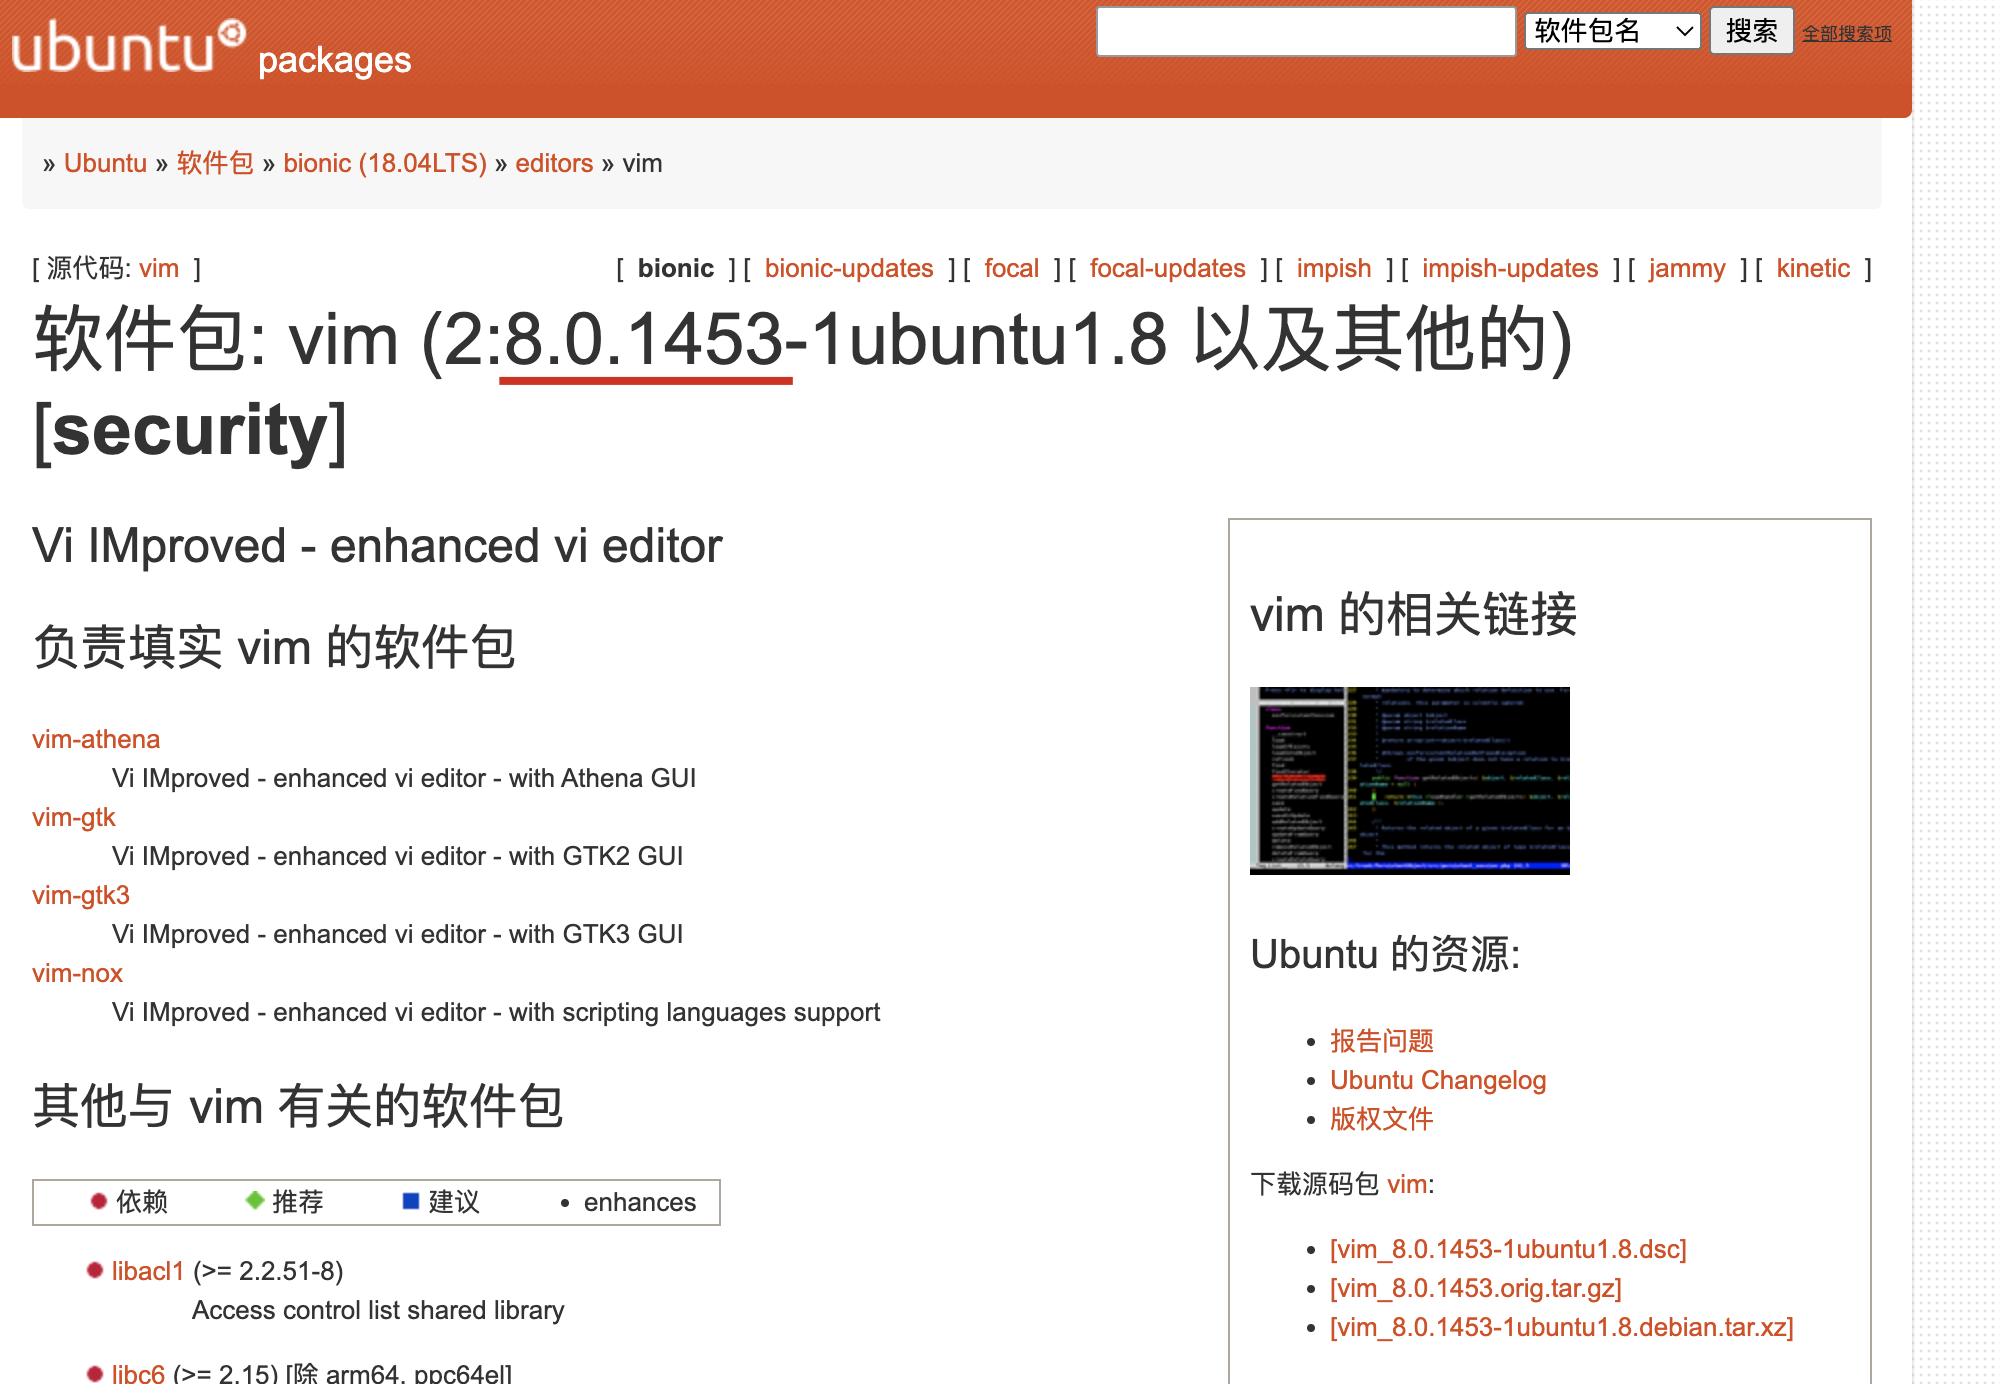
check vim version supported for this system:
- checkout youcompleteme
# ref:
- install
cd ~/.vim/bundle/YouCompleteMe

# 要保证 github.com 的网速要好,最好用代理或者 host,否则很慢,以及看运气!
git submodule update --init --recursive
python3 install.py
resolution 2: using the latest vim built from source
core ref: Building Vim from source · ycm-core/YouCompleteMe Wiki