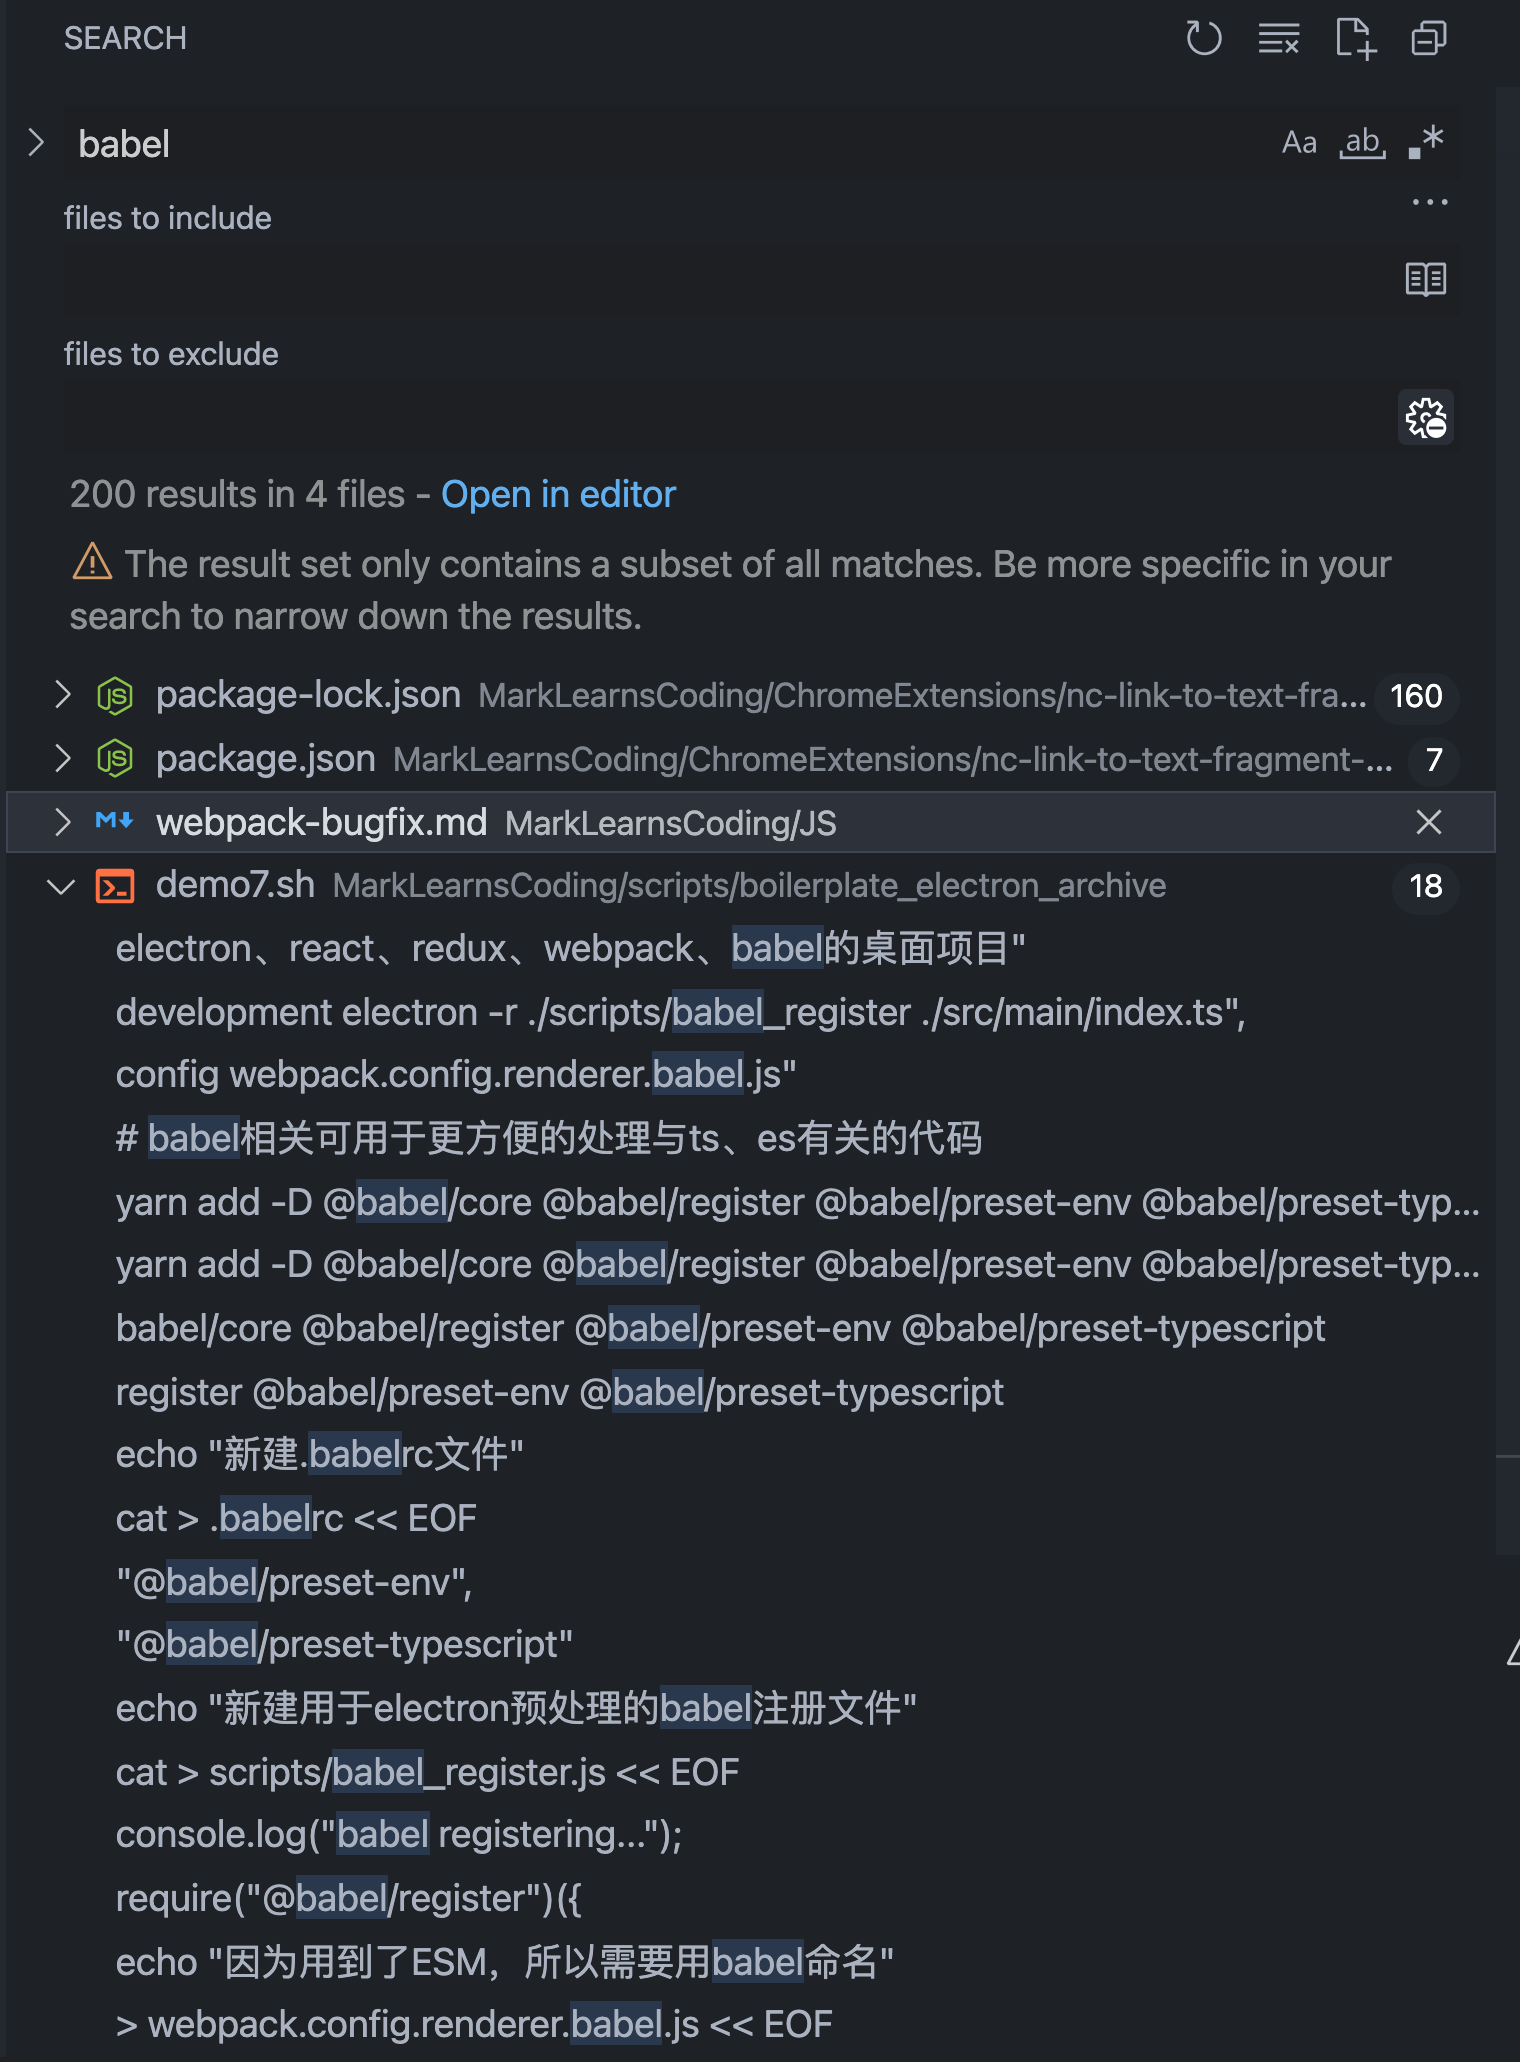
很久以前,自打我刚开始学计算机,就有一个认知:精通 linux 的人都是大神。
但,我是不需要学的。
很长一段时间,我都是这么认为的。
直到这两年,我选择了 Mac 作为自己的主力开发工具,两年的摸爬滚打,尤其是始于对iTerm + zsh + oh-my-zsh颜值的惊艳,到现在能够在 mac、ubuntu、centos、windows 等各大操作系统之间自如切换,并逐渐意识到命令行系统对于现代操作系统的重要性,命令行熟练度对于提升工作效率的重要性,我知道,我已经走向了一条与计算机越来越近的不归路。
而这一切中间的桥梁,正是 linux,于我而言,不认识不掌握 linux,不可谓入了程序的真正世界。
因此,本系列第一篇,献给 linux,一方面是致敬我心中曾经那触不可及的信仰,另一方面也是为了能重新认识它,对它说一句它可能真正想听的:"hello linux, I'm mark"。
因为每一个 linux 的学习者最后都会发现,linux 并不神秘,而 linux 真正启迪人的,是它的设计哲学,与对你工作流的重塑。
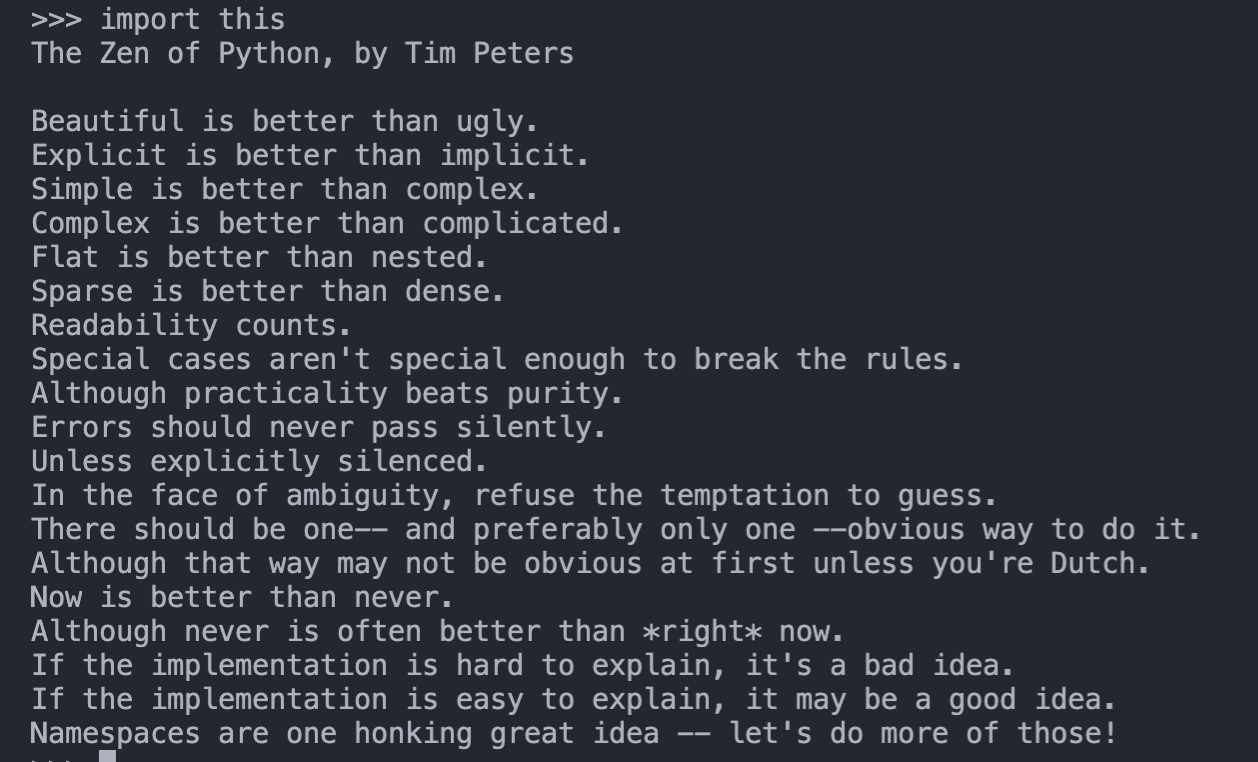
在此,我斗胆把 python 之禅搬于此,因为在我心中,它于 linux,是心有灵犀,同样适用:
首先,linux 是什么
作为南川的核心开发笔记(从实际工作经验中提炼出来的笔记),我无意过多展开一些基本的背景介绍,因此也不会花时间去讲述 linux 和 unix 和 mac 之间的关系,这些读者们都可以很方便地在互联网找到答案。
我只简单地如下描述,目前用于个人使用的电脑系统,主要分为 windows 和 mac。
windows 的最大优点,是价格相对平民,生态丰富,交互习惯最符合人类直觉。
mac 的最大优点,是审美一流,做工一流,触控板和屏幕天花板的存在,然后于我而言最大的优点,是其 unix 系统,可以允许我像 linux 一样方便地使用命令行。
所以,我在使用了五年的 windows 后,毅然投入了 mac 的怀抱,而其中的目的之一,就是为了更好地掌握 linux。
(当然,纯粹使用 linux 我是不会接受的,我还是觉得追求审美也是生活中很重要的一部分,于是乎,我现在已经极其极其不想看到任何 windows 的界面)
说了这么多,还是没说 linux 是什么。
没错,就应该这样,这篇是核心开发笔记,非核心的,可以出门右转某乎,比如:
PS: 以上链接,我都没有看过,只是随手一搜。😄
其次,如何拥有一台 linux
有很多种方法。
如果你是 windows 10+用户,最方便的方法,是基于内置的wsl系统,不知道是什么?出门右转。
至于内置的wsl会不会有什么限制和性能损耗?这个我也不知道,我不用,如果你知道,欢迎留言,我还挺想知道的,只要你愿意留我就愿意听,并且可能会影响我接下来的认知。
但我不会因为这个出门右转,我已经为了给大家示范如何出门右转,已经出门一次了,寒冬腊月,怪冷的。
这是其一。
其二,装一个双系统。
我一直想装个双系统,并且尝试到了最后一步,因为工作需要。当时我给我的 mac 装 ubuntu 的双系统,结果到了安装界面,鼠标和键盘没有响应,查了查好像我的版本 mac 2020 pro 的鼠标和键盘不走 usb,而是总线?
不清楚,后续我可能会继续尝试装个双系统,目前我用的是虚拟机。
PS:友情提示,小白不要轻易尝试双系统,容易留下不学无术后悔的泪。
其三,装一个虚拟机,比如vmware或者virtual box。两个都尝试下来,个人比较喜欢vmware。
至于怎么装,怎么配置,出门右转,或者等我后续系列,会有虚拟机/双系统专刊的,应该(如果不懒的话)。
我目前的虚拟机(内部运行的 ubuntu,可以同时运行多个操作系统)界面如下:

其四,阿里云/腾讯云/华为云/亚马逊云……租一个 linux 服务器或者操作系统等。这是业界搭建后端必备。我之前一直用的阿里云/腾讯云,因为以前做全栈多一些。
目前市面上,服务端应该用 centos 比较多,客户端应该用 ubuntu 比较多,主要原因可能是 centos 默认没有界面,程序较为稳定;ubuntu 的界面很好看,比较适合个人鼓捣。
我目前使用的 ubuntu 界面如下:
这里值得注意的是,有一些企业可能购置了类似于 windows server 之类的服务端,这种本质上还是 windows 系统,不是 linux 系统,只不过一直跑在公司网络上。
所以当我们谈到服务器的时候,可能并不一定是 linux 系统,这是值得注意的。
我为啥知道这玩意呢,因为之前碰到一个项目是这样的,我本来写好的 linux 的后端,想着直接移到目标公司网上,结果一看,windows server,把我给整不会了。
接着,如何登录 linux
理论上,登录这个动作,不应该是个问题,但那仅限于是登录自己的本地的每天都用的电脑。
linux 一般都是在服务端的,一般涉及到远程访问,所以通用做法是用ssh。
基本的 ssh 用法出门右转即可,本文只记录如何免密登录 ssh。
因为 ssh 默认每次都会输入密码,很不畅快。更严重的是,如果涉及到写批运行脚本,则密码输入会成为脚本杀手,至少会让脚本更难理解,出错概率更高。
很简单,第一步,先ssh USERNAME@SERVER,其中USERNAME和SERVER是目标服务器的用户名和 IP 地址(或者域名,如果有的话)。
一般,默认的USERNAME是root,密码也是root,虽然这很不推荐,不安全,但对于新手却是很友好。
尽管我的密码更简单,简单到你会拍案惊奇。
当你第一次ssh之后,会在本机的当前用户文件夹下(mac 和 linux 都是~文件夹,windows 是C:\\Users\\XXX)生成一个.ssh/id_rsa.pub,这是公钥。
这个文件的内容,涉及到了 rsa 算法等密码学相关内容,不展开。而你要做的,就是把里面的文本复制,粘贴到目标服务器的~/.ssh/authorization_keys文件内(如果文件不存在,则新建;如果文件已有内容,则另起一行,补在后面即可)。
以下给出一键脚本:
USERNAME="xxx"
SERVER="xxxxx"
file="id_rsa.pub"

scp ~/.ssh/$file $USERNAME@$SERVER:
ssh $USERNAME@$SERVER
cat $file >> .ssh/authorized_keys
rm $file
这个脚本里的scp是在本地与服务器之间交换文件的意思,最后一个冒号表示当前文件夹,而$USERNAME@SERVER即目标服务器的用户文件夹,这就对上了。
cat是读取所有文本内容到输出流,>>是把输出流内容添加到目标文件的末尾。
rm是删除,这里代表传送的file是一个中转文件的意思,为啥要中转,你猜。
最后,为了防止ssh超时断开,可以在本地(客户端)的ssh配置文件中补一下以下配置,这样每分钟发送一次消息给服务端,服务端就不会主动清理客户端了。相信我,如果不解决这个问题,后续你会很头疼的。
HOST: *
ServerAliveInterval 60
最后,如何掌控 Linux,以下给出一部分经验笔记
-------------------------------------
BEST-PRACTICE: ubuntu initialization
step 0. install
step 1. config apt source
1. change apt source
ref:
fastest/script way: 直接修改/etc/apt/sources.list
其中,第一种方案虽然可行,但是有两个缺点,一个是侵入性高,所以一般都会先备份一下原文件,然后使用替换命令。
Update 2022-01-24:实际上所有方式底层都是通过修改 apt sources.list 文件配置的,所以没有什么侵入性一说,都会先做备份。
GUI 版(也就是softwares & update app 里会提供测试,自动修改,改完之后触发更新操作,而这些其实可以自己用脚本完成,响应也更快!
# backup source file
APT_SOURCES_LIST_FILE=/etc/apt/sources.list
cp $APT_SOURCES_LIST_FILE $APT_SOURCES_LIST_FILE.bak

# change source
APT_SOURCE="http://mirrors.yun-idc.com/ubuntu/"
sudo sed -i  "s|deb \S+|deb $APT_SOURCE|g" $APT_SOURCES_LIST_FILE

# update source
sudo apt update
另一个就是,只能填入自己想填的源,但很可能不是最好的源。比如我一直以为阿里云的源很好,结果这次发现,极其地慢,我确认在update时走的是cn.xxx,但依旧只有十几 k。
robustest/recommend-for-newbie way: 在softwares & update里修改 server
第二种办法就是在softwares & update里自动测试最好的服务器,然后选择它。我测出来是yun-idc最好,但是因为我没用过,所以当时没考虑它,后来被阿里云折磨的不行了,就试了它,结果飞快,十兆每秒!
use others way: 使用别人写好的 git 仓库进行配置
第三种办法,由于我还没配好源,所以也没 git,而此时下载 git 又会极其地慢,所以也不考虑。
2. update apt
!!!tip If the following commands warn that files are locked, then wait for some minutes, or use lsof FILE to have a check, more refer to: - 解决 apt-get /var/lib/dpkg/lock-frontend 问题 - 知乎
sudo apt get update
sudo apt get upgrade
step 2. config git
sudo apt get git
git config --global user.name YOUR_NAME
git config --global user.email YOUR_EMAIL
step 3. config terminal
step 4. config language
ibus 输入方式和搜狗输入法之间不是很兼容,如果出现两者都无法输入中文的情况,建议根据Ubuntu 18.04LTS 安装中文输入法以及快捷键设置 - 简书先卸载搜狗输入法,确认 ibus 是可以用的,具体就是:sudo apt-get remove fcitx*
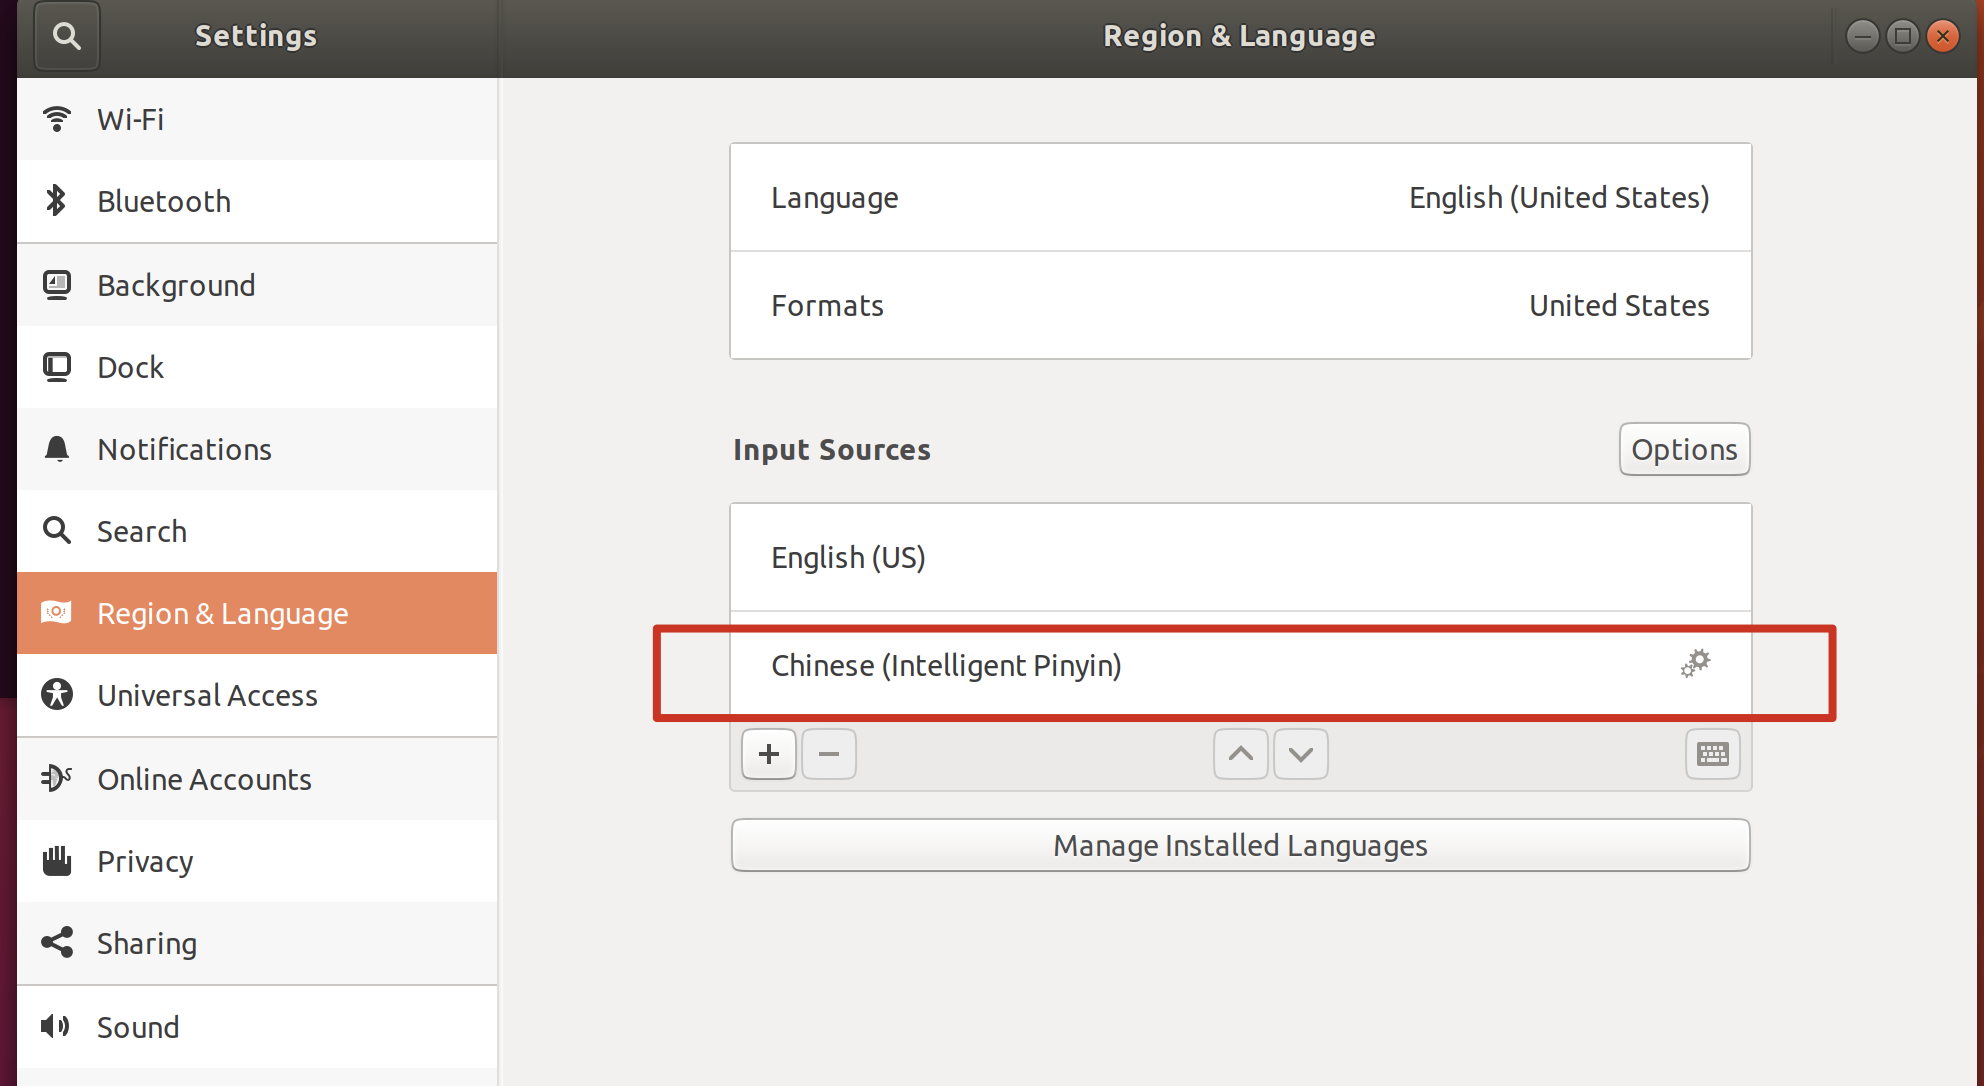
确认以下配置:
- 设置 - 地区与语言 - 输入法,中要添加包含智能拼音:
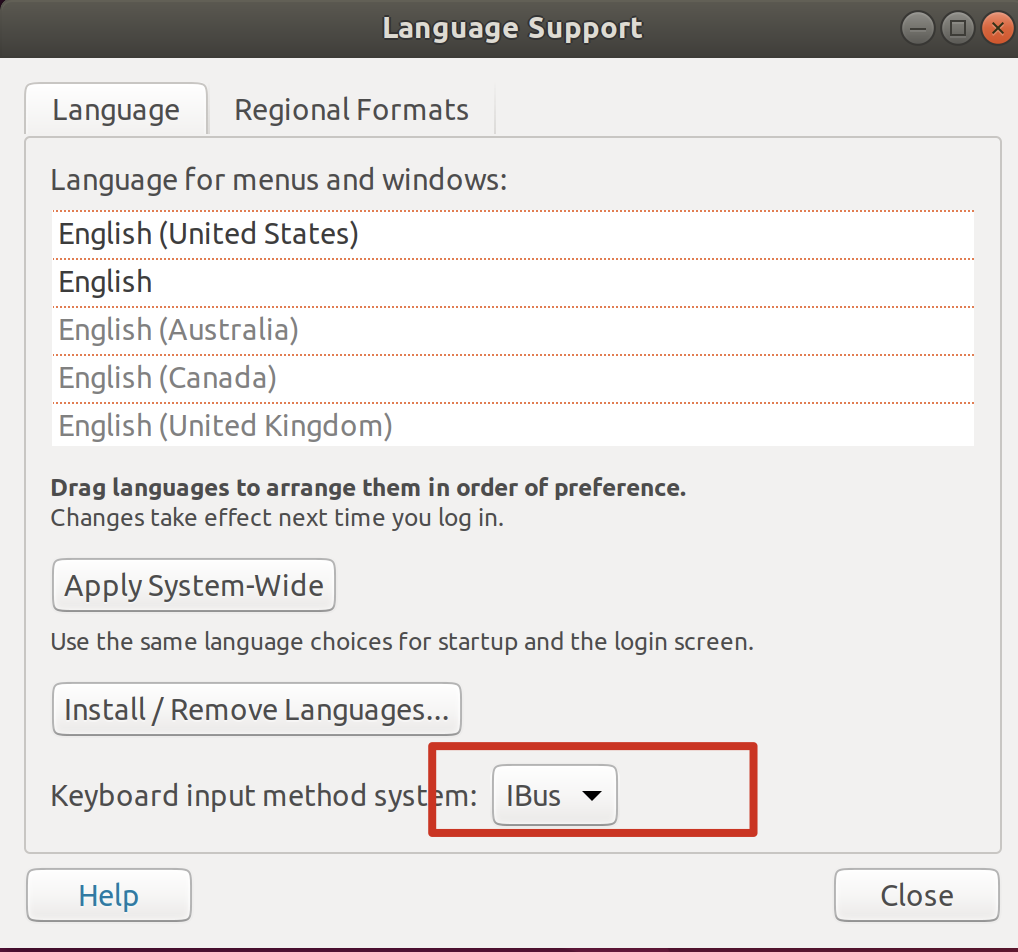
语言支持中,要启用 ibus 方案
注销账号重新登录即可。
如果注销账号还不行, 就要尝试sudo reboot一下。
虽然按照官网走了好几遍,但始终还是没有配成这套方案,我也不知道什么原因。
而且 ibus 方案也必须在 fcitx 卸载之后才能正常使用。
参考官网:
更新:确保:
- 输入源中只有一个英文(不要有 ibus 的中文,否则会干扰)
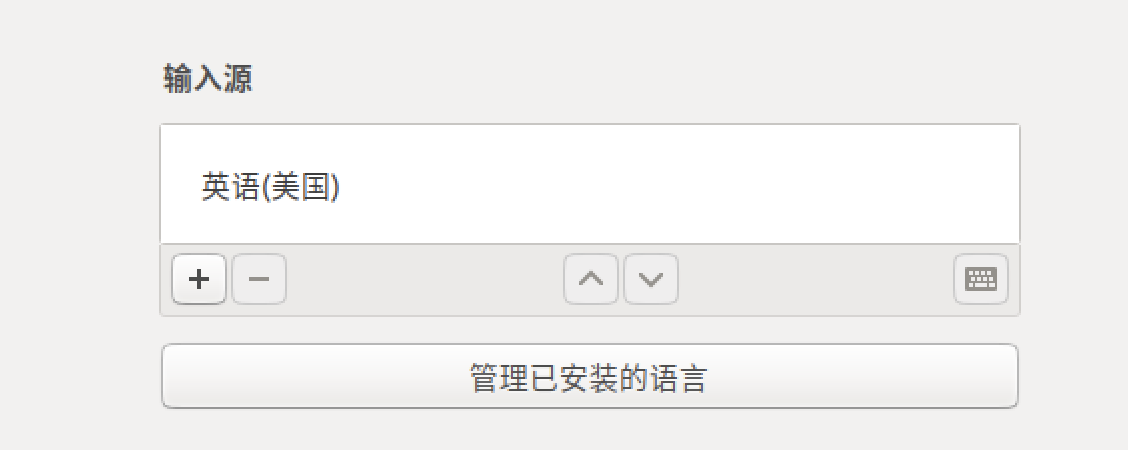
- 输入系统用
fcitx

再更新:算了吧,我个人觉得搜过 ubuntu 的 bug 是真地多,一会能用一会不能用,尤其是我在调成中文版能用后又调成英文版,然后用不了了,接着再怎么调中文版都用不了了,非常蛋疼。
The best way is to directly install the Chinese version of ubuntu, since the Chinese feature is built-in.
However, what we download directly from the official ubuntu website, may not support chinese choice natively. So it highly depends on what distribution version of ubuntu we download.
ref:
how to change language to english
echo export LANGUAGE=en_US.UTF-8 | sudo tee -a ~/.bashrc
ref:
IMPROVE: a script to init ubuntu (may not work)
"
version: 0.0.3
features:
    1. disable sudo password so running commands faster
    2. disable apt password so installing packages faster
    3. enable arrow up/down to backward/forward search prefix command
    4. auto change deb(apt) source
    5. auto install zsh, config oh-my-zsh, set as the default shell, you may need to switch to bash when build android in case of errors, it's easy just to input `bash` in terminal
    6. re-login to make these changes work
"

# !IMPORTANT: config global variables
PASSWORD=" "

# --- step 1 ---
# write password variable into bash_profile
echo "export PASSWORD=$PASSWORD" >> ~/.bash_profile
source ~/.bash_profile

# disable sudo password, ref: https://askubuntu.com/a/878705
echo "$USER ALL=(ALL:ALL) NOPASSWD: ALL" | sudo tee -a /etc/sudoers.d/$USER

# --- step 1.5 ---
# enable backward/forward prefix commands search
echo '"\e[A": history-search-backward
"\e[B": history-search-forward' >> ~/.inputrc
bind -f ~/.inputrc

# --- step 1.7 ---

# change timezone, so that time display ok
echo "export TZ='Asia/Shanghai'" >> ~/.profile # need relogin

# --- step 2 ---
# update apt and install packages

# change apt source
APT_SOURCE="http://mirrors.yun-idc.com/ubuntu/"
APT_SOURCES_LIST_FILE=/etc/apt/sources.list
sudo sed -i.bak -r  "s|deb \S+|deb $APT_SOURCE|g" $APT_SOURCES_LIST_FILE

echo "Y" | sudo apt update # need confirm but skipped since configured
echo "Y" | sudo apt upgrade

INSTALLED_PACKAGES="vim git htop zsh terminator"
echo $INSTALLED_PACKAGES | xargs sudo apt install -y

# --- step 3 ---
# modify timezone (need relogin)

export "TZ=Asia/Shanghai'\n" >> ~/.profile

# --- step 4 ---
# configure zsh (installed in \$INSTALLED_PACKAGES) / oh-my-zsh

# install oh-my-zsh (built-in backward search)
# ref: https://ohmyz.sh/#install
sh -c "$(curl -fsSL https://raw.github.com/ohmyzsh/ohmyzsh/master/tools/install.sh)"

# --- step 5 ---
# diy zsh based on 'oh-my-zsh'

# add dynamical time display
echo 'PROMPT="%{$fg[yellow]%}%D{%Y/%m/%d} %D{%H:%M:%S} %{$fg[default]%}"$PROMPT' >> ~/.zshrc

# set zsh as the default terminal (need relogin!)
sudo chsh -s $(which zsh) # after configed sudo, no need to input password

# enable zsh changes
exec zsh

# --- step 6 ---
# re-login
sudo pkill -u $USER
BEST-PRACTICE: linux connection (ssh)
ssh generate public keys
ref: https://git-scm.com/book/en/v2/Git-on-the-Server-Generating-Your-SSH-Public-Key
mkdir -p ~/.ssh
cd ~/.ssh
ssh-keygen -o
ssh no secret/password
最近遇到了发现即使加了 authorization_keys 还是不行,搜了很多帖子,大致理出了解决办法
首先可以在服务器上使用 /usr/sbin/sshd -d -p 2222 开启sshd调试,然后在client上使用 ssh -vv xxx@xxx 进行调试,主要看服务端报什么错,例如:esca算法不支持啥的,然后就意识到了是 ssh 版本太低,要升级。
不过由于 ssh-client 依赖于 ssh-server,所以也可能还比较难升,具体的办法可以用:
sudo apt purge openssh-server
sudo apt-get install openssh-client
sudo apt-get install openssh-server
sudo systemctl restart sshd
sudo systemctl restart ssh
It's easy that if only you generate a id_rsa.pub and scp to your ~/.ssh/authorization_keys then things all done.
Solution 1
username="xxx"
server="xxxxx"
file="~/.ssh/id_rsa.pub"
cat $file | ssh $username@$server "cat - >> ~/.ssh/authorized_keys"

# sample
cat $file | ssh aosp@192.168.1.242 "cat - >> ~/.ssh/authorized_keys"
Solution 2
username="xxx"
server="xxxxx"
file="~/.ssh/id_rsa.pub"

scp $file $username@$server:
ssh $username@$server
cat $file >> .ssh/authorized_keys
rm $file
ref:
ssh keep connection alive
the simplest way is to force the client to keep sending [a null] message(packet) to the server, in case that the server closed the connection beyond the time limitation, and what you need to do is just to modify 2 lines in your /etc/ssh/ssh_config file.
sudo vim /etc/ssh/ssh_config
change into these:
HOST: *
    ServerAliveInterval 60
finally, maybe you should restart your client. If you use the mac, you can:
# restart-ssh, reference: https://gist.github.com/influx6/46c39709a67f09908cc7542ca444fca2
sudo launchctl stop com.openssh.sshd
sudo launchctl start com.openssh.sshd
BEST-PRACTICE: linux env management
how to change apt source
ref:
resolution 1: manual change from the App of Softwares & Updates
resolution 2: modify the configuration manually from the terminal
CONCLUSION
MIRROR_FROM="us.archive.ubuntu.com"
MIRROR_TO="mirrors.tuna.tsinghua.edu.cn"
APT_FILE="/etc/apt/sources.list"
sudo sed -i "s|${MIRROR_FROM}|${MIRROR_TO}|g" ${APT_FILE}
DETAIL
There are a few mirror servers can be used in China:
- mirrors.tuna.tsinghua.edu.cn
- ftp.sjtu.edu.cn
- mirrors.aliyun.com
- mirrors.huaweicloud.com
- mirrors.yun-idc.com
- ...
The format of these mirrors may be as http://${MIRROR_URL}/ubuntu/
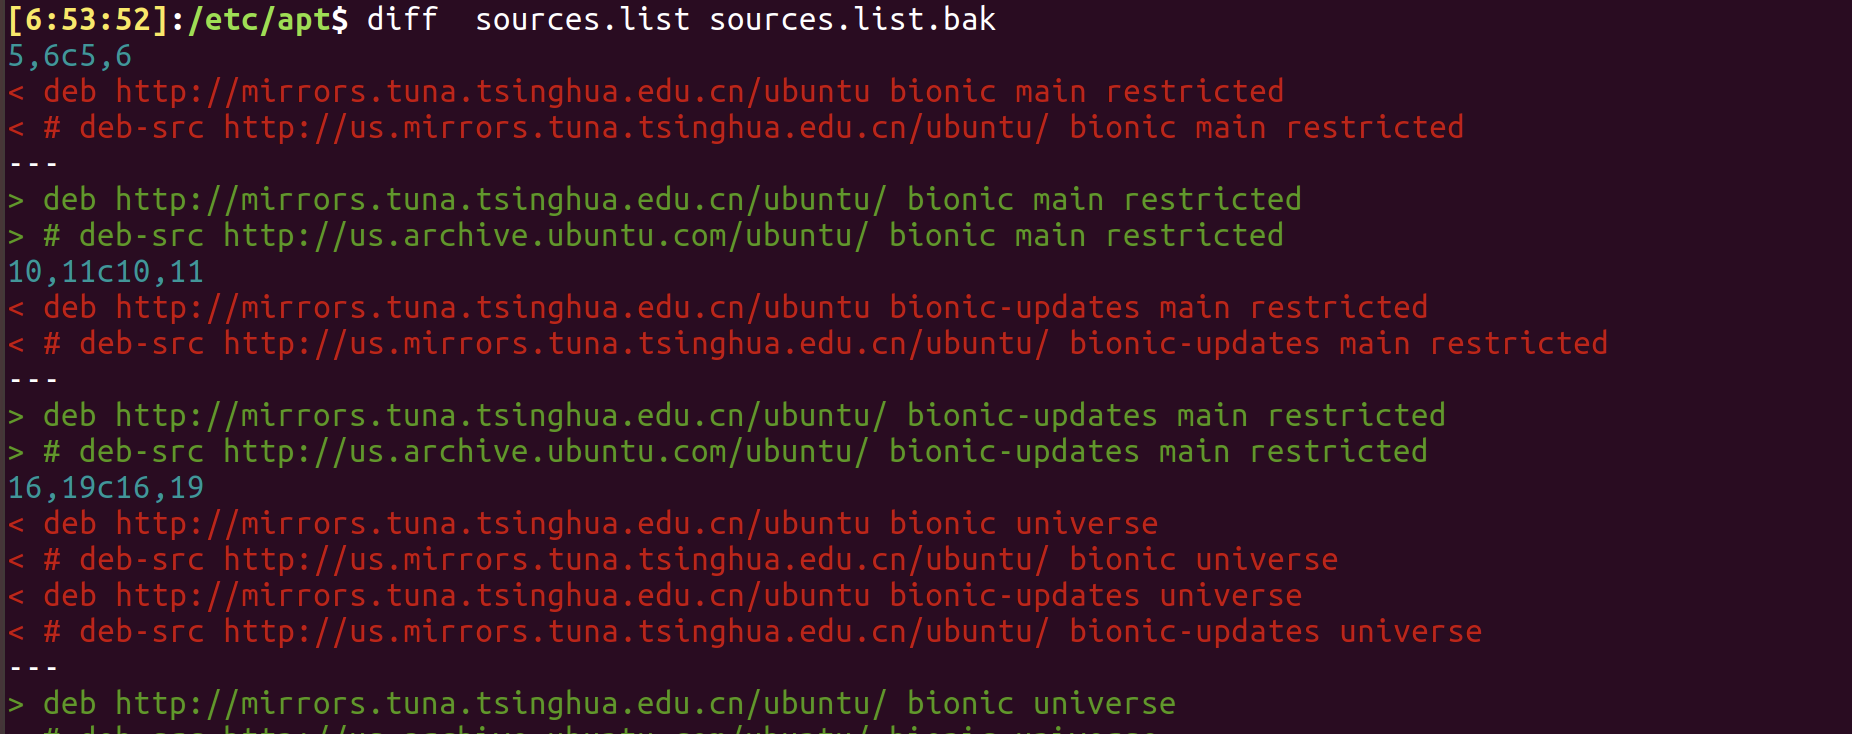
And the default configuration of ubuntu servers are at /etc/apt/sources.list, with a copy of backup at /etc/apt/sources.list.save.
Here is what the save contents are:
// /etc/apt/sources.list.save
deb http://us.archive.ubuntu.com/ubuntu/ bionic main restricted
deb http://us.archive.ubuntu.com/ubuntu/ bionic-updates main restricted
deb http://us.archive.ubuntu.com/ubuntu/ bionic universe
deb http://us.archive.ubuntu.com/ubuntu/ bionic-updates universe
deb http://us.archive.ubuntu.com/ubuntu/ bionic multiverse
deb http://us.archive.ubuntu.com/ubuntu/ bionic-updates multiverse
deb http://us.archive.ubuntu.com/ubuntu/ bionic-backports main restricted universe multiverse
deb http://security.ubuntu.com/ubuntu bionic-security main restricted
deb http://security.ubuntu.com/ubuntu bionic-security universe
deb http://security.ubuntu.com/ubuntu bionic-security multiverse
# mac: Darwin
uname

# if platform is mac
if [[ $(uname) == Darwin ]];
then XXX;
else YYY;
fi;
ref:
- install the python on the server, the version of which would better correspond with the one of the local in case of unexpected error caused by version difference
- use
virtualenv to create an env based on this python version named venv_py under this working directory - activate this env
- use
pip to install the requirements.txt - run!
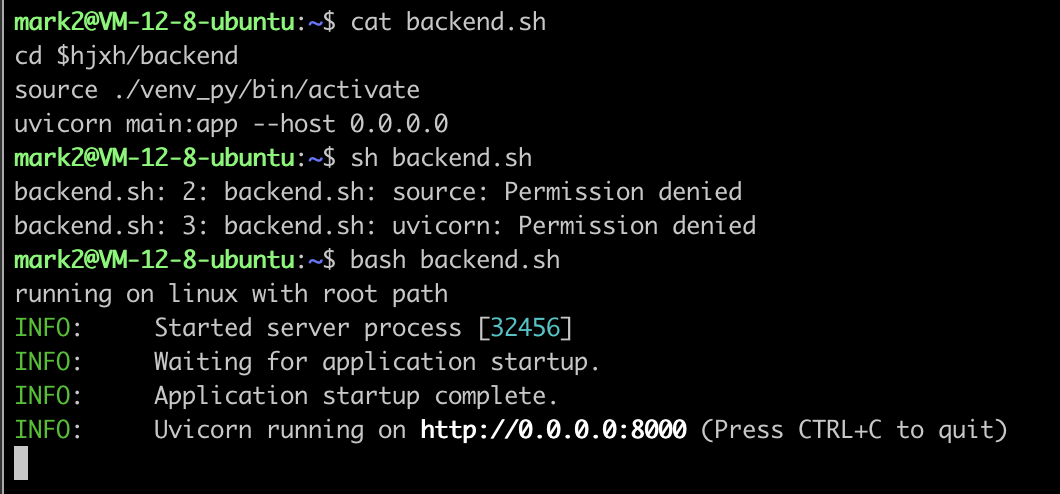
PY_VERSION=python3.9

# install the target python version based on its version number
# if you don't use these two lines, then you would suffer from `wget blablabla...` when you checked what the hell the python repo url is
sudo apt install software-properties-common -y
sudo add-apt-repository ppa:deadsnakes/ppa
sudo apt install ${PY_VERSION}

# use `virtualenv` to create and activate a new python env fast~
sudo apt install virtualenv
virtualenv -p ${PY_VERSION} venv
source venv_py/bin/activate

# install all the requirements
# if you need to dump all the requirements of a python project used, you can use `pip freeze > requirements.txt` so that a file named of `requirements.txt` would be generated under the current directory
pip install -r requirements.txt

# run our backend of `fastapi`
python main.py
✅ cannot use sudo apt-get install xxx to install packages
cd /var/lib/dpkg/updates
rm -rf ./*

sudo apt-get update

sudo apt-get disk-upgrade # it may cost a little of time
ref:
I changed the suggestion in this article from rm -r to rm -rf, otherwise not successful.
This discussion seems wonderful but didn't get my problem solved.
BEST-PRACTICE: linux file system management
mkdir if not exist
ref:
ls and delete files
ls | grep STR | xargs rm -f
WARNING! Since the operation pipeline is silent, you are likely to remove files that you did not intend to remove.
Hence, you'd better use ls | grep STR first to check whether all the files to remove meet your expectation.
fastest delete file
Don't bother checking if the file exists, just try to remove it.
rm -f PATH

brew install dialog
# or
rm PATH 2> /dev/null

find . -name 'test'

if [ "$BLEG" != xxx ]; then command; fi
interface Test {
  name: string;
}
ref:
how to show absolute path of file from relative
I cannot use brew install realpath like their apt install realpath, but I can use realpath, which may be pre-built-in.
Plus, later I saw that maybe realpath is a submodule of mac package, which is named as findutils.
ref:
how to copy file into clipboard
core ref: https://apple.stackexchange.com/a/15327
it's easy to copy a text file
# copy
pbcopy < FILE

# paste to command line
pbpaste

# paste to a new file
pbpaste > FILE2
But attention, the pbpaste would cause corruption when deals with binary file.
but it cannot be done for a binary file
Since the traditional command + c | command + v is just copy the reference of file into clipboard, instead of the content itself, we had no way to use pbcopy to copy a file, and then use command + v to paste at another place.
A solution is to use osascript.
#!/usr/bin/osascript
on run args
  set abs_path to do shell script "/usr/local/bin/greadlink -f -- " & (first item of args)
  set the clipboard to POSIX file abs_path
end
ref:
how to show file size
# -l show detail
# -h show 'human readable size
ls -lh FILE/DIR
ref:
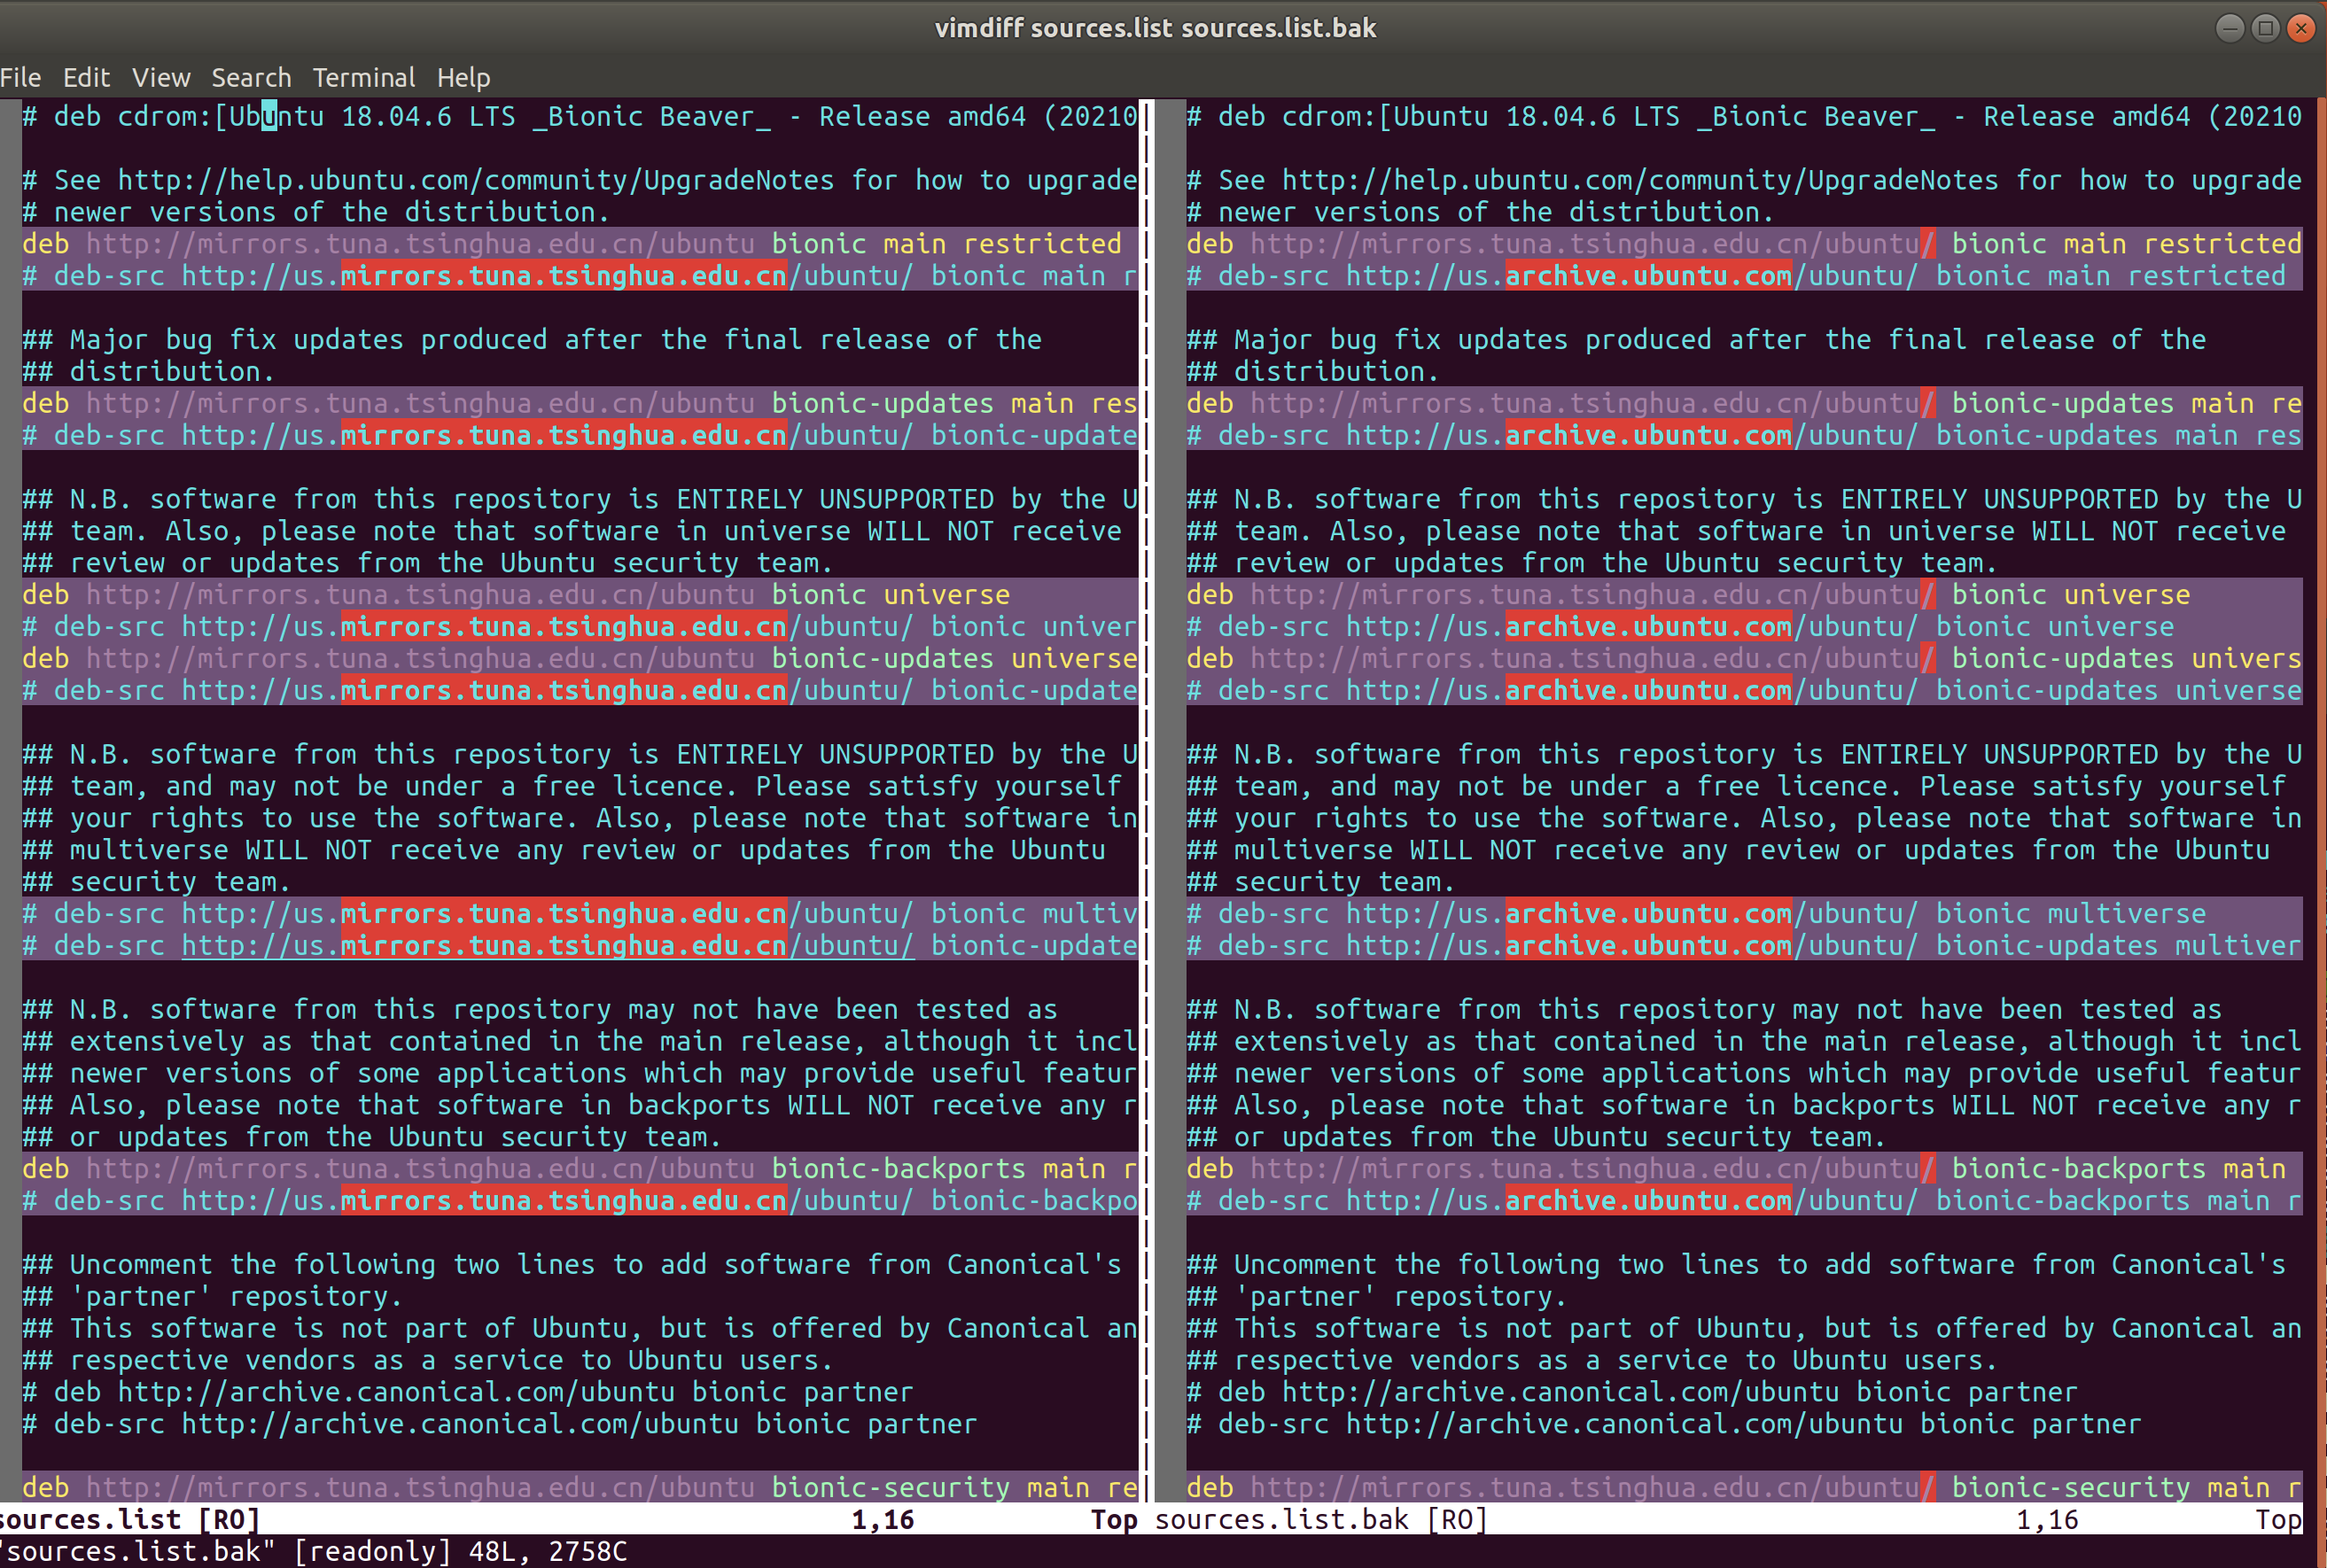
how to compare between files (diff & vimdiff)
There is a few of diff commands for us to choose.
resolution 1: diff F1 F2
resolution 2: diff -y F1 F2 or sdiff F1 F2

resolution 3: vimdiff F1 F2
It's awesome! Isn't it?
TODO: resolution 4: git diff
FIXME: how to copy/move directory files correctly to soft links under target directory without affecting git?
example:
When I zipped one modified frameworks/native directory to be e.g. RAW, and then reset the frameworks/native to be the init.
Then I move all the files under RAW to frameworks/native with the command:
cp -r RAW/* TARGET/frameworks/native/
The error arose up since there are soft links under frameworks/native, such as libs/ui which is indeed libs/ui -> XXX/ui.
However, in my zipped file of RAW, the links seemingly have turned to be the real files/dirs, which introduced the problem directory --> non-directory.
The wanted effect is copying/moving all the files under conflicted directory to where they should be.
However, the git marked those files as TypeChange...
ref:
BEST-PRACTICE: linux disk management
ncdu, disk space tui
baobab, disk space gui
ref:
install problem
When installing ncdu, error ocurred: No such file or directory @ rb_sysopen ruby - Stack Overflow
The reason is that some dependency is missing, we can first install it and then install the target.
brew install librsvg
brew install baobab
effects
BEST-PRACTICE: linux shells management
ref:
this article is enough and recommended:
list all the shells
$ cat /etc/shells # list valid login shells
/bin/sh
/bin/bash
/bin/rbash
/bin/dash
/bin/zsh
/usr/bin/zsh
background: sh is different with bash
When I write source in shell script, and run by sh xx.sh, then it failed with no permission.
However, when I use bash xx.sh, then everything runs well.
Thus, the sh definitely doesn't equal as bash, and it seems that function of sh is the subset of bash.
If so, why I still need to use sh? Just for short?
ref: https://stackoverflow.com/a/48785960/9422455
see what's the current Shell
[1:42:41]:~$ echo $SHELL
/usr/bin/zsh
[1:43:25]:~$ echo $0
/usr/bin/zsh
[1:43:29]:~$ ps -p $$
   PID TTY          TIME CMD
 29657 pts/2    00:00:00 zsh
switch shell
You can change your default shell using the chsh (“change shell” ) command as follows.
The syntax is:
# usage
chsh
chsh -s {shell-name-here}
chsh -s {shell-name-here} {user-name-here}

# samples
chsh -s /bin/bash
chsh -s /bin/bash $USER
set zsh as the default terminal (need re-login)
https://askubuntu.com/questions/131823/how-to-make-zsh-the-default-shell
BEST-PRACTICE: linux terminal management
✅ the terminal cannot up down after editing
This is a problem confused me for a long time.
Today, I finally knows what's the hell at: linux - How to scroll up and down in sliced "screen" terminal - Stack Overflow
Anyway, terminal is hard to learn, I just know control + a can help me exit the so-called copy mode.
TODO: bind option + arrow to jump word in zsh on ubuntu vmware on MacOS
ref
BEST-PRACTICE: linux commands management
⚠️
- be careful to use ``` in terminal / shell since it's would be treated as executable commands:

see: (20 条消息) shell 基础知识-echo 及单引号、反引号和双引号详解_Luckiers 的博客-CSDN 博客_echo 单引号和双引号
sparkles: Use sudo -S to read input from stdin.
# sample
echo "$USER ALL=(ALL:ALL) NOPASSWD: ALL" | sudo tee -a /etc/sudoers.d/$USER
ref:
auto yes for some command (yes | )
# usage
yes | COMMAND

# example
yes | sh ./install.sh # install oh-my-zsh
ref:
auto yes for apt installing packages (-y)
Just add a -y in the command.
Example:
ref:
how to search commands by prefix (history-search-backward/forward)
$include /etc/inputrc
"\e[A": history-search-backward
"\e[B": history-search-forward
"\e[5~": history-search-backward
"\e[6~": history-search-forward
;warning: you should Close and re-open all terminals for the new behavior to become effective.
ref:
how to repeat command
#  only show the last result
watch -n X command # X: X seconds; command may need quotes

# show all the result history
while true; do command; sleep X; done; # command may need quotes
ref:
how to use variable as multi args
# when there's only one arg as a variable, it's ok to directly use it, and the following two methods are equal
PACKAGE_TO_INSTALL="vim"
PACKAGE_TO_INSTALL=vim
sudo apt install -y $PACKAGE_TO_INSTALL

# However, if there are multi args as a variable, we need to use [`echo`](https://stackoverflow.com/a/30061925/9422455) to escape the 'hidden quotes' if I didn't understand wrongly. And also, the quotes can't be omitted, or use slashes.
PACKAGES_TO_INSTALL="vim git htop zsh terminator"
PACKAGES_TO_INSTALL=vim\ git\ htop\ zsh\ terminator
sudo apt install -y $(echo $INSTALLED_PACKAGES)

# Since the `echo` is not safe, another way is to use [`xargs`](https://stackoverflow.com/a/51242645/9422455), which seems more professional
PACKAGES_TO_INSTALL="vim git htop zsh terminator"
echo $PACKAGE_TO_INSTALL | xargs sudo apt install -y
ref:
how to set an alias
resolution 1: in terminal
⚠️ this solution only works upon the next command, which can work immediately when executed in shell script file
# don't add any other characters after alias in order to catch bug
alias sed=gsed
resolution 2: write into ~/.bash_aliases
# ~/.bash_aliases
alias update='sudo yum update'
⚠️ this solution needs to ensure the .bash_aliases enabled in .bashrc

✨ resolution 3: use .bash_aliases with zsh
Just add one line in ~/.zshrc:
# ~/.zshrc
source ~/.bash_aliases
ref:
unalias
ref:
how to compare between outputs from two commands
ref:
BEST-PRACTICE: linux accounts management
init user with root config
脚本:

USER_=chuanmx
HOME_=/home/$USER_

# add user with password and home directory
sudo useradd -m $USER_
echo "$USER_\n$USER_" | sudo -S -k passwd $USER_
sudo usermod -a -G dev $USER_

# enable ssh
sudo mkdir $HOME_/.ssh

# enable zsh
sudo cp -rf ~/.oh-my-zsh $HOME_/
sudo cp  ~/.zshrc $HOME_/
sudo chsh --shell /bin/zsh $USER_

# enable user grant
sudo chown -R $USER_:$USER_ $HOME_

# avoid typing password when using sudo command
echo "$USER_  ALL=(ALL) NOPASSWD:ALL" | sudo tee /etc/sudoers.d/$USER_
how to create user
# create user with a home directory
sudo useradd -m $USER_
ls -la /home/$USER_


# create user [under root]
sudo useradd $USER_

# create passwd [under root]
sudo passwd $USER_
how to log out
resolution 1 (11.10 and above)
resolution 2
ref:
set a shorter password for ubuntu

BEST-PRACTICE: linux net management
how to know my public ip address
# https://apple.stackexchange.com/questions/20547/how-do-i-find-my-ip-address-from-the-command-line
curl ifconfig.me
# https://www.digitalocean.com/community/tutorials/how-to-configure-remote-access-for-mongodb-on-ubuntu-20-04#:~:text=curl%20%2D4%20icanhazip.com
curl -4 icanhazip.com
how to monitor network traffic
sudo apt install nethogs

sudo nethogs
ref:
FIXME: check proxy
In Ubuntu 18.04.6 LTS (Bionic Beaver), it introduced two methods to see what/which proxies are we using:
## approach 1
echo $http_proxy

## approach 2
env | grep -i proxy
However, when I configured the proxies in Manual Proxy, I am surprised to find nothing using either commands in the above, while the ping to google.com does work so that I use it as the measure then.
And another wield thing is before the system was restarted, the env | grep -i proxy even shows duplicated results and the change in Manual Proxy doesn't work, which is quite confusing.
Maybe we can do more tests later.
BEST-PRACTICE: linux date/time management
⚠️
- the space in formatter should be using
\ or anything other ways date是一个函数,不是变量,变量采用$XX或者${XX}的形式,但是函数要用$(XX),并且不能在字符串中
# directly output date
date +%Y-%m-%d\ %H:%M:%S

# output date into variable
T='the date is '$(date +%Y-%m-%d\ %H:%M:%S)
ref:
how to change timezone (and time)
resolution 1 (conclusion): directly export
echo "export TZ='Asia/Shanghai'\n" >> ~/.profile

sudo pkill -u $USER --force
resolution 2 (detail): choose following directions
# check current time, as well as timezone
date -R

# if the ending is `+0800`, then it's ok, otherwise you need to change (e.g. `-0800`)

# change timezone (just choose as directed)
tzselect
And finally you will get a command suggestion to write into profile file, that is #solution-1-directly-export
BEST-PRACTICE: linux system management
✅ A stop job is running for Session c2 of user ... (1min 30s)
resolution
- restart system
journalctl -p5- search
timed out. Killing - analyze the target process of
Killing process 1234 (jack_thru) with signal SIGKILL.
⚠️ 注意,也有其他几种解决方案,比如装watchdog和缩短timeout时间的,这些都侵入性太高了,并且不是治本之策,所以还是得从 log 来分析原因找对应政策。尤其是装watchdog的方案,我简单看了一下,大致是每分钟检查一下系统的情况,但问题是,为什么很久以前系统就没有这种问题呢?那个时候也没装 watchdog 啊,所以对于这个问题,我们不能偷懒!
.
result
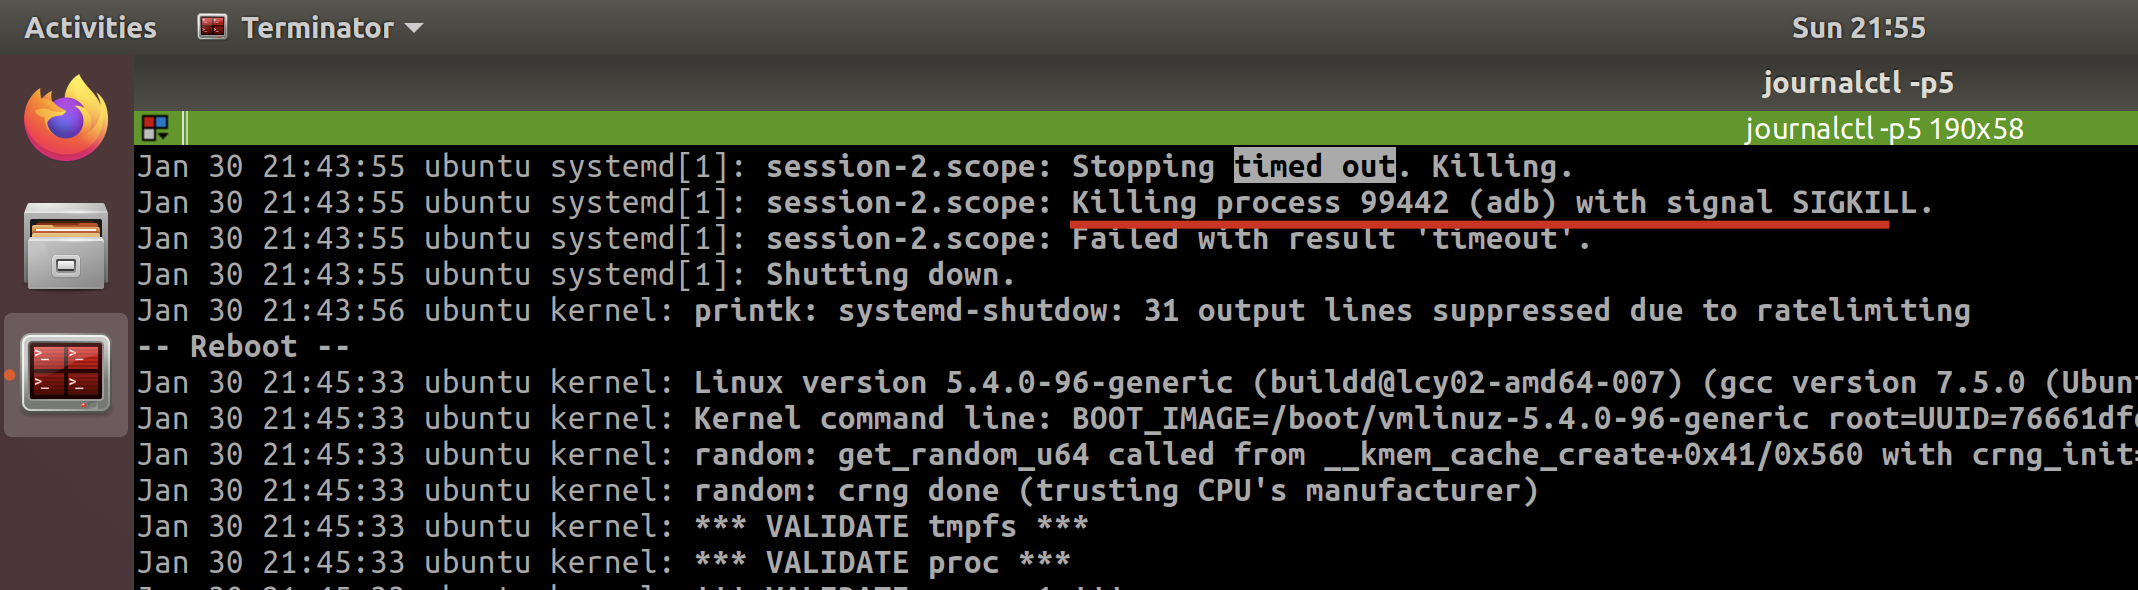
It tells me the last one is because of adb, since I do open the adb and not responding then.
And I also checked the last few times when timed out, but to find they are different.
So I confirmed the timeout error is temporary, since now I am not going to run any adb.
I tried to restart again, and the system does well which identified what I think.
ref
-----------------------------------
BEST-PRACTICE: linux common commands
command:tar
# x: extract, f: file
tar -xf FILE

# v: verbose, logging output, careful when extracting big files, e.g. AOSP
tar -vxf FILE
ref:
command:perl
how to use perl to replace multi-lines
perl -0pe 's/search/replace/gms' file
-0: without the -0 argument, Perl processes data line-by-line, which causes multiline searches to fail.-p: loop over all the lines of a file-e: execute the following arg as a perl script/s: changes the behavior of the dot metacharacter . so that it matches any character at all. Normally it matches anything except a newline "\n", and so treats the string as a single line even if it contains newlines./m: modifies the caret ^ and dollar $ metacharacters so that they match at newlines within the string, treating it as a multi-line string. Normally they will match only at the beginning and end of the string./g: global replace(not sure)
ref:
special thanks to: Not sure if you know, but sed has a great feature where you do not need to use a / as the separator.
command:find
how to ignore case
ref:
how to specify search type
Use -type to specify the search type (default is c for file), here I used d for directory, ref: find type
And then, when I search directory, it would search all the sub-folders with '/' concatenated, so I need to specify -d 1 in order to only search the top current directory.
➜  Application Support find . -name '*electron*' -type d -d 1
./electron-react-boilerplate
./electron-react-typescript
➜  Application Support rm -rf electron-react-boilerplate
➜  Application Support rm -rf electron-react-typescript
how to exclude dir
TODO: in fact, I really can't catch why -prune is combined with -o (or)
# 1. use `-not -path`
find -name "*.js` -not -path "./directory/*"

# 2. use `-path xx -prune`
find . -path ./misc -prune -o -name '*.txt' -print

# 3. use multiple prune (need to add escaped bracket)
find . -type d \( -path ./dir1 -o -path ./dir2 -o -path ./dir3 \) -prune -o -name '*.txt' -print

# 4. use regex prune (-name)
find . -type d -name node_modules -prune -o -name '*.json' -print
ref:
TODO: how to find file with time used
tip: find efficiency comparison
Use a specified directory is the best and fastest;
If not, limit the maxdepth to a number small enough is also ok;
And then consider the directory prune.
Finally bared run is the worst.
➜  hjxh_express_match git:(main) time find .imgs  -name readme-1641287704584-613d44afa250b17be45e5b366487d1dbd42939da44543700b5e7fbd7f6a8ca9e.png
.imgs/readme-1641287704584-613d44afa250b17be45e5b366487d1dbd42939da44543700b5e7fbd7f6a8ca9e.png
find .imgs -name   0.00s user 0.00s system 52% cpu 0.005 total

➜  hjxh_express_match git:(main) time find . -maxdepth 3  -name readme-1641287704584-613d44afa250b17be45e5b366487d1dbd42939da44543700b5e7fbd7f6a8ca9e.png
./.imgs/readme-1641287704584-613d44afa250b17be45e5b366487d1dbd42939da44543700b5e7fbd7f6a8ca9e.png
find . -maxdepth 3 -name   0.01s user 0.05s system 70% cpu 0.079 total

---

➜  hjxh_express_match git:(main) time find . -maxdepth 4  -name readme-1641287704584-613d44afa250b17be45e5b366487d1dbd42939da44543700b5e7fbd7f6a8ca9e.png
./.imgs/readme-1641287704584-613d44afa250b17be45e5b366487d1dbd42939da44543700b5e7fbd7f6a8ca9e.png
find . -maxdepth 4 -name   0.06s user 0.69s system 87% cpu 0.854 total

➜  hjxh_express_match git:(main) time find . -maxdepth 5  -name readme-1641287704584-613d44afa250b17be45e5b366487d1dbd42939da44543700b5e7fbd7f6a8ca9e.png
./.imgs/readme-1641287704584-613d44afa250b17be45e5b366487d1dbd42939da44543700b5e7fbd7f6a8ca9e.png
find . -maxdepth 5 -name   0.14s user 1.86s system 93% cpu 2.137 total

➜  hjxh_express_match git:(main) time find . -maxdepth 6  -name readme-1641287704584-613d44afa250b17be45e5b366487d1dbd42939da44543700b5e7fbd7f6a8ca9e.png
./.imgs/readme-1641287704584-613d44afa250b17be45e5b366487d1dbd42939da44543700b5e7fbd7f6a8ca9e.png
find . -maxdepth 6 -name   0.26s user 3.21s system 94% cpu 3.683 total

---

➜  hjxh_express_match git:(main) time find .  -name readme-1641287704584-613d44afa250b17be45e5b366487d1dbd42939da44543700b5e7fbd7f6a8ca9e.png
./.imgs/readme-1641287704584-613d44afa250b17be45e5b366487d1dbd42939da44543700b5e7fbd7f6a8ca9e.png
find . -name   0.44s user 5.85s system 51% cpu 12.172 total

➜  hjxh_express_match git:(main) time find . -path './.imgs/*'  -name readme-1641287704584-613d44afa250b17be45e5b366487d1dbd42939da44543700b5e7fbd7f6a8ca9e.png
./.imgs/readme-1641287704584-613d44afa250b17be45e5b366487d1dbd42939da44543700b5e7fbd7f6a8ca9e.png
find . -path './.imgs/*' -name   0.46s user 5.93s system 51% cpu 12.299 total

➜  hjxh_express_match git:(main) time find . -path './.imgs/*'  ! -path "**/node_modules/*"  -name readme-1641287704584-613d44afa250b17be45e5b366487d1dbd42939da44543700b5e7fbd7f6a8ca9e.png
./.imgs/readme-1641287704584-613d44afa250b17be45e5b366487d1dbd42939da44543700b5e7fbd7f6a8ca9e.png
find . -path './.imgs/*' ! -path "**/node_modules/*" -name   0.46s user 5.91s system 51% cpu 12.268 total
command:grep
how to exclude dir (--exclude-dir=dir)
Recent versions of GNU Grep (>= 2.5.2) provide:
--exclude-dir=dir
which excludes directories matching the pattern dir from recursive directory searches.
So you can do:
grep -R --exclude-dir=node_modules 'some pattern' /path/to/search
ref:
how to limit depth (-maxdepth)
find . -maxdepth 4 -type f -exec grep "11.0.0_r1" {} \;
ref:
tip: grep by lines context is MUCH FASTER than grep by words context, and even better for output
➜  erb git:(main) ✗ time (cat release/build/mac/皇家小虎快递分析系统.app/Contents/Resources/app/dist/main/main.js | tr ";" "\n" | grep --context=3 'fake-database')
# var n=this&&this.__importDefault||function(e){return e&&e.__esModule?e:{default:e}}
# Object.defineProperty(t,"__esModule",{value:!0}),t.isDbFinished=t.initDbUpdateResult=t.initDbInsertResult=t.DB_UPDATE_DECLINED=t.DB_UPDATED=t.DB_INSERT_DUPLICATED=t.DB_INSERT_SUCCESS=t.DB_UNKNOWN=t.DB_TIMEOUT=t.DB_TABLE_NOT_EXISTED=t.prisma=void 0
# const i=r(72298),a=`file:${n(r(71017)).default.join(i.app.getPath("userData"),"express_match.sqlite.db")}?connection_limit=1`
# process.env.DATABASE_URL=a,console.log({__dirname,rawDBPath:"file:dev.db?connection_limit=1",newDBPath:a}),t.prisma={erp:{create:()=>{console.log("fake-database: creating one")},findMany:()=>{console.log("fake-database: finding many")},upsert:()=>{console.log("fake-database: upserting one")}}},t.DB_TABLE_NOT_EXISTED="DB_TABLE_NOT_EXISTED",t.DB_TIMEOUT="DB_TIMEOUT",t.DB_UNKNOWN="DB_UNKNOWN",t.DB_INSERT_SUCCESS="DB_INSERT_SUCCESS",t.DB_INSERT_DUPLICATED="DB_INSERT_DUPLICATED",t.DB_UPDATED="DB_UPDATED",t.DB_UPDATE_DECLINED="DB_UPDATE_DECLINED"
# t.initDbInsertResult=()=>({nTotal:0,nInserted:0,nDuplicated:0,nTimeout:0,nUnknown:0,nTableNotExist:0})
# t.initDbUpdateResult=()=>({nTotal:0,nUpdated:0,nDropped:0,nTimeout:0,nUnknown:0,nTableNotExist:0})
# t.isDbFinished=e=>{let t=0
( cat  | tr ";" "\n" | grep --color=auto  --context=3 'fake-database'; )  0.20s user 0.01s system 121% cpu 0.169 total
➜  erb git:(main) ✗ time ( grep -iEo '.{255}fake-database.{255}' release/build/mac/皇家小虎快递分析系统.app/Contents/Resources/app/dist/main/main.js | tr ';' '\n' )
# =`file:${n(r(71017)).default.join(i.app.getPath("userData"),"express_match.sqlite.db")}?connection_limit=1`
# process.env.DATABASE_URL=a,console.log({__dirname,rawDBPath:"file:dev.db?connection_limit=1",newDBPath:a}),t.prisma={erp:{create:()=>{console.log("fake-database: creating one")},findMany:()=>{console.log("fake-database: finding many")},upsert:()=>{console.log("fake-database: upserting one")}}},t.DB_TABLE_NOT_EXISTED="DB_TABLE_NOT_EXISTED",t.DB_TIMEOUT="DB_TIMEOUT",t.DB_UNKNOWN="DB_UNKNOWN",t.DB_INSERT_SUCCESS="D
( grep --color=auto --exclude-dir={.bzr,CVS,.git,.hg,.svn,.idea,.tox} -iEo  t)  3.27s user 0.01s system 99% cpu 3.279 total
tip: grep by negative captured group needs to use ggrep
Examples Given the string foobarbarfoo:
bar(?=bar)     # finds the 1st bar ("bar" which has "bar" after it)
bar(?!bar)     # finds the 2nd bar ("bar" which does not have "bar" after it)
(?<=foo)bar    # finds the 1st bar ("bar" which has "foo" before it)
(?<!foo)bar    # finds the 2nd bar ("bar" which does not have "foo" before it)
You can also combine them:
# finds the 1st bar ("bar" with "foo" before it and "bar" after it)
(?<=foo)bar(?=bar)
ref:
grep -Pio '(?<=heads\/)(.*?)(?=\n)' text.txt # P option instead of E
ref: https://stackoverflow.com/a/45534127/9422455
command:tree
how to display chinese (-N)
ref:
how to exclude dir(-I)
# use `|` to split choices

# exclude
tree -I "XXX|YYY"   # maybe it means 'ignore'
ref:
command:head
head basic usage
head 这个命令行其实没有什么要讲的,用法非常简单。
# output the first 5 lines (default)
head FILE

# output the first N lines (replace "N")
head -n "N" FILES
how to exclude the last k rows
但是今天 2022-01-26 碰到了一个问题,就是要获取前 n-1 行,然后试了 stackoverflow 上的方案好像都不对。
后来才知道,是因为 mac 的原因,要用ghead才行……
brew install coreutils
ghead -n -4 main.m
而 ghead 是在 coreutils 里面,这个名字一看我就有,所以也不用装了。
ref:
discuss: use head or sed
今天之所以用到 head 其实是因为我想对一个流做 sed 处理,但略去最后一行。
我一开始想用 sed 里的范围标识(地址),但一直没试出来。
后来我把地址标识换成最简单的1,4s/find/replace/之后才意识到,我的思路是不对的。
1,4是一个确实被处理的范围选择,但结果就是,N 行中,前四行都被 sed 替换了,但是后面的行尽管没替换依旧会打印出来,而这正是 sed 的默认行为,它是一个流转换器。
那如果纯粹基于 sed,进行转换,并且去掉最后一行,就要用到-o结合好像是/p的 identifier,具体我也记不大清了。意思就是输出所有被匹配的行,但如果这样的话被匹配的行就会输出两遍了(两遍不必相同(NOT-SURE),一个是转换前,一个是转换后),所以另一个标识符就是阻止原内容的输出,这样就只输出匹配的行的处理结果。
所以,这个思路其实有问题,它可以对,也可以不对,它如果保证匹配 n-1 行,则对;否则就不满足需求了,我们的需求是处理前 n-1 行,并且不管匹配不匹配,都要输出,尽管实际上是都匹配的。
总之,理解到这层后,既可以用纯 sed 的方案,也可以用 head+sed 的方案,一个负责改,一个负责删即可,至于先后,结果都一样,也许 head 在前效率会更高一些。
所以,还是挺有意思的,这个。
command:top
Today(2022-01-27) I finally understood how to use the command of top (though htop is better for display but possibly more costly).
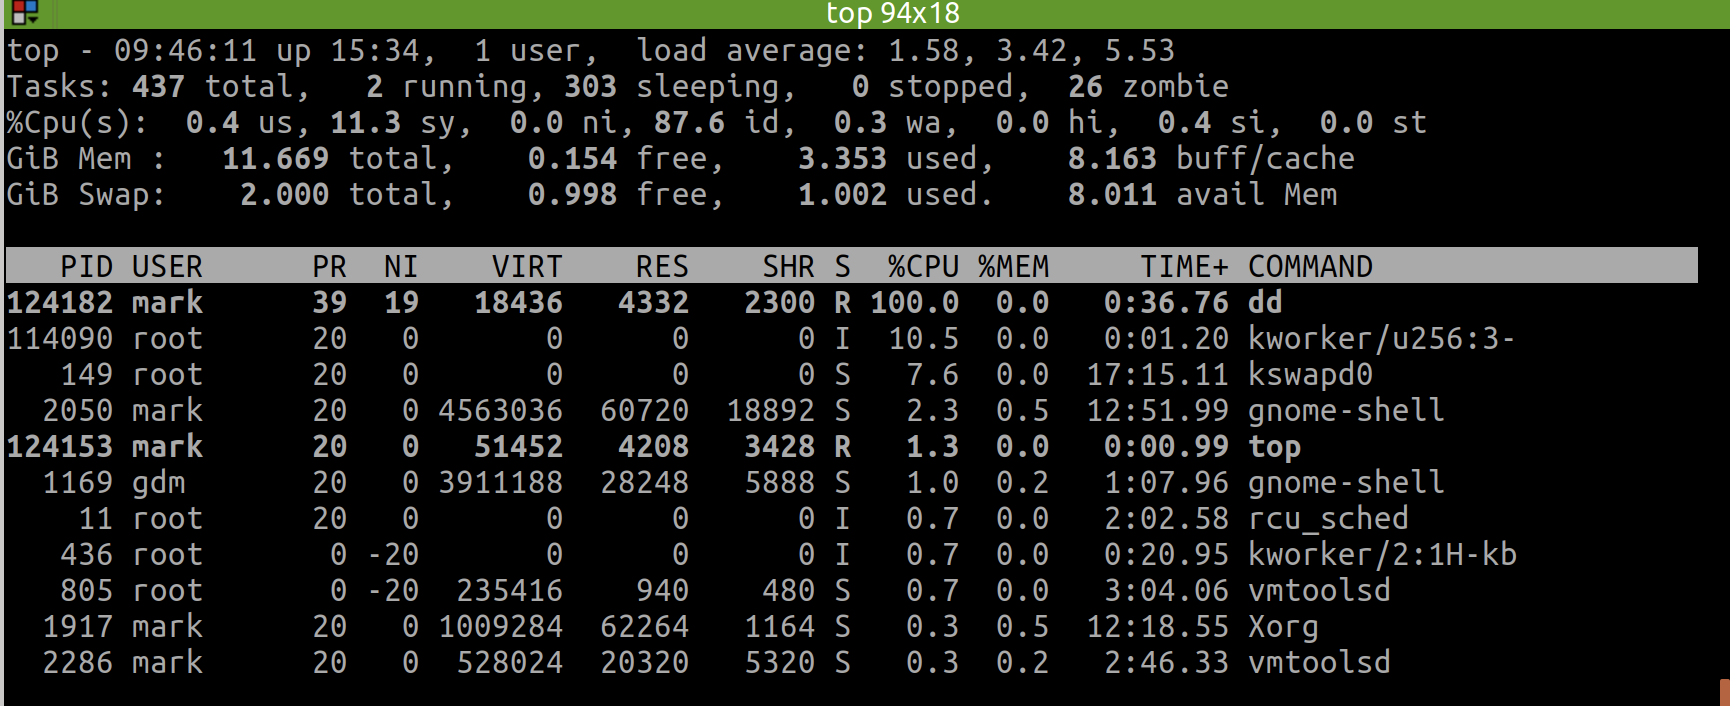
I can switch the display format of memory usage when top has gone to the interactive interface.
The first option I can use is E, which allows to switch memory unit between KiB | MiB | GiB | TiB.
And the second option I can use is m, which switches the memory display type between pure text, columns graph and block graph.
⚠️
- 不可以在命令行中直接用
top -M (显示以MB为单位的内存使用量),因为top -h的帮助中写的很清楚,只支持部分选项。在 stackoverflow 上有 top -M 的建议(see: linux - How to display meminfo in megabytes in top? - Unix & Linux Stack Exchange),但可能我的版本(Ubuntu 18)不支持。正确的做法,是先进入top交互界面,然后按E,这样就会切换单位,比如按两次切换到GB单位。另外,独立的,还可以按m去切换内存的显示样式,比如像htop那种竖条状! - 以上只在 ubuntu 上测试通过,在 mac 上我刚试了,不行!所以到底怎么用命令,还得根据平台自身!
- 具体的,可以通过
COMMAND -h去看简洁版的帮助页面,或者man COMMAND (e.g. Ubuntu Manpage: top - display Linux processes) 去看完整版的帮助页面!
command:cat
how to write raw string into file using cat
# example
GOPATH=$HOME/my-go
cat <<EOF >> ~/.profile
export GOPATH=$GOPATH
export PATH=$PATH:/usr/local/go/bin:$GOPATH/bin
EOF
ref:
usage: how to know what's the bash string
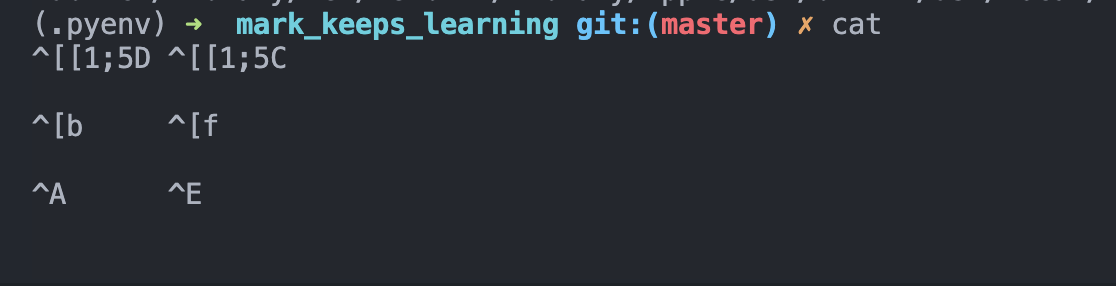
When using bash or zsh, we are supposed to use the function of bindKey.
However, the key we typed are always hard to remember, e.g. what's the ctrl key?
Luckily, there's a super easy (and also interactive) way for us to know it via cat, just to type cat followed by enter in terminal, and then the terminal would display what the character would be when we typing them.
E.g. here is what's the result when we combine control | option | command with arrow left and arrow right would be:
command:Unzip
how to unzip to specific directory
unzip file.zip -d TARGET_DIR
ref:
command:kill
ps aux | grep -i electron | awk '{print $2}' | xargs sudo kill -9
ref:
https://stackoverflow.com/a/30486159/9422455
command:scp
sudo chown -R USER_NAME REMOTE_FOLDER
sudo chmod 777 REMOTE_FOLDER
the -R means "recursively" since there may be file deeply in the target folder that won't allow you to write.
Hence, you can know, you can specifically claim your authority on the file or directory, since it would not automatically transfer.
Thus, a flexible approach is that just add a -R flag.
reference: https://unix.stackexchange.com/a/347412
command:lsof
check status of port occupation
command:ufw
# check status
sudo ufw status

# enable
sudo ufw enable

# white list
sudo ufw allow 9000

# reload
sudo ufw reload
ref:
command:time
I can directly using time ( COMMAND_1 | COMMAND_2 ), so that it can calculate the final time of this pipe.
However, time calculation is a little more sophisticated than what would I have thought, refer more to: bash - How can I time a pipe? - Unix & Linux Stack Exchange
command:tr
It's useful to split line to lines.
$ echo "111;222;333" | tr ';' '\n'
111
222
333
# use `nl` to add the line number
cat main.js | tr ';' '\n' | nl -ba | head -6
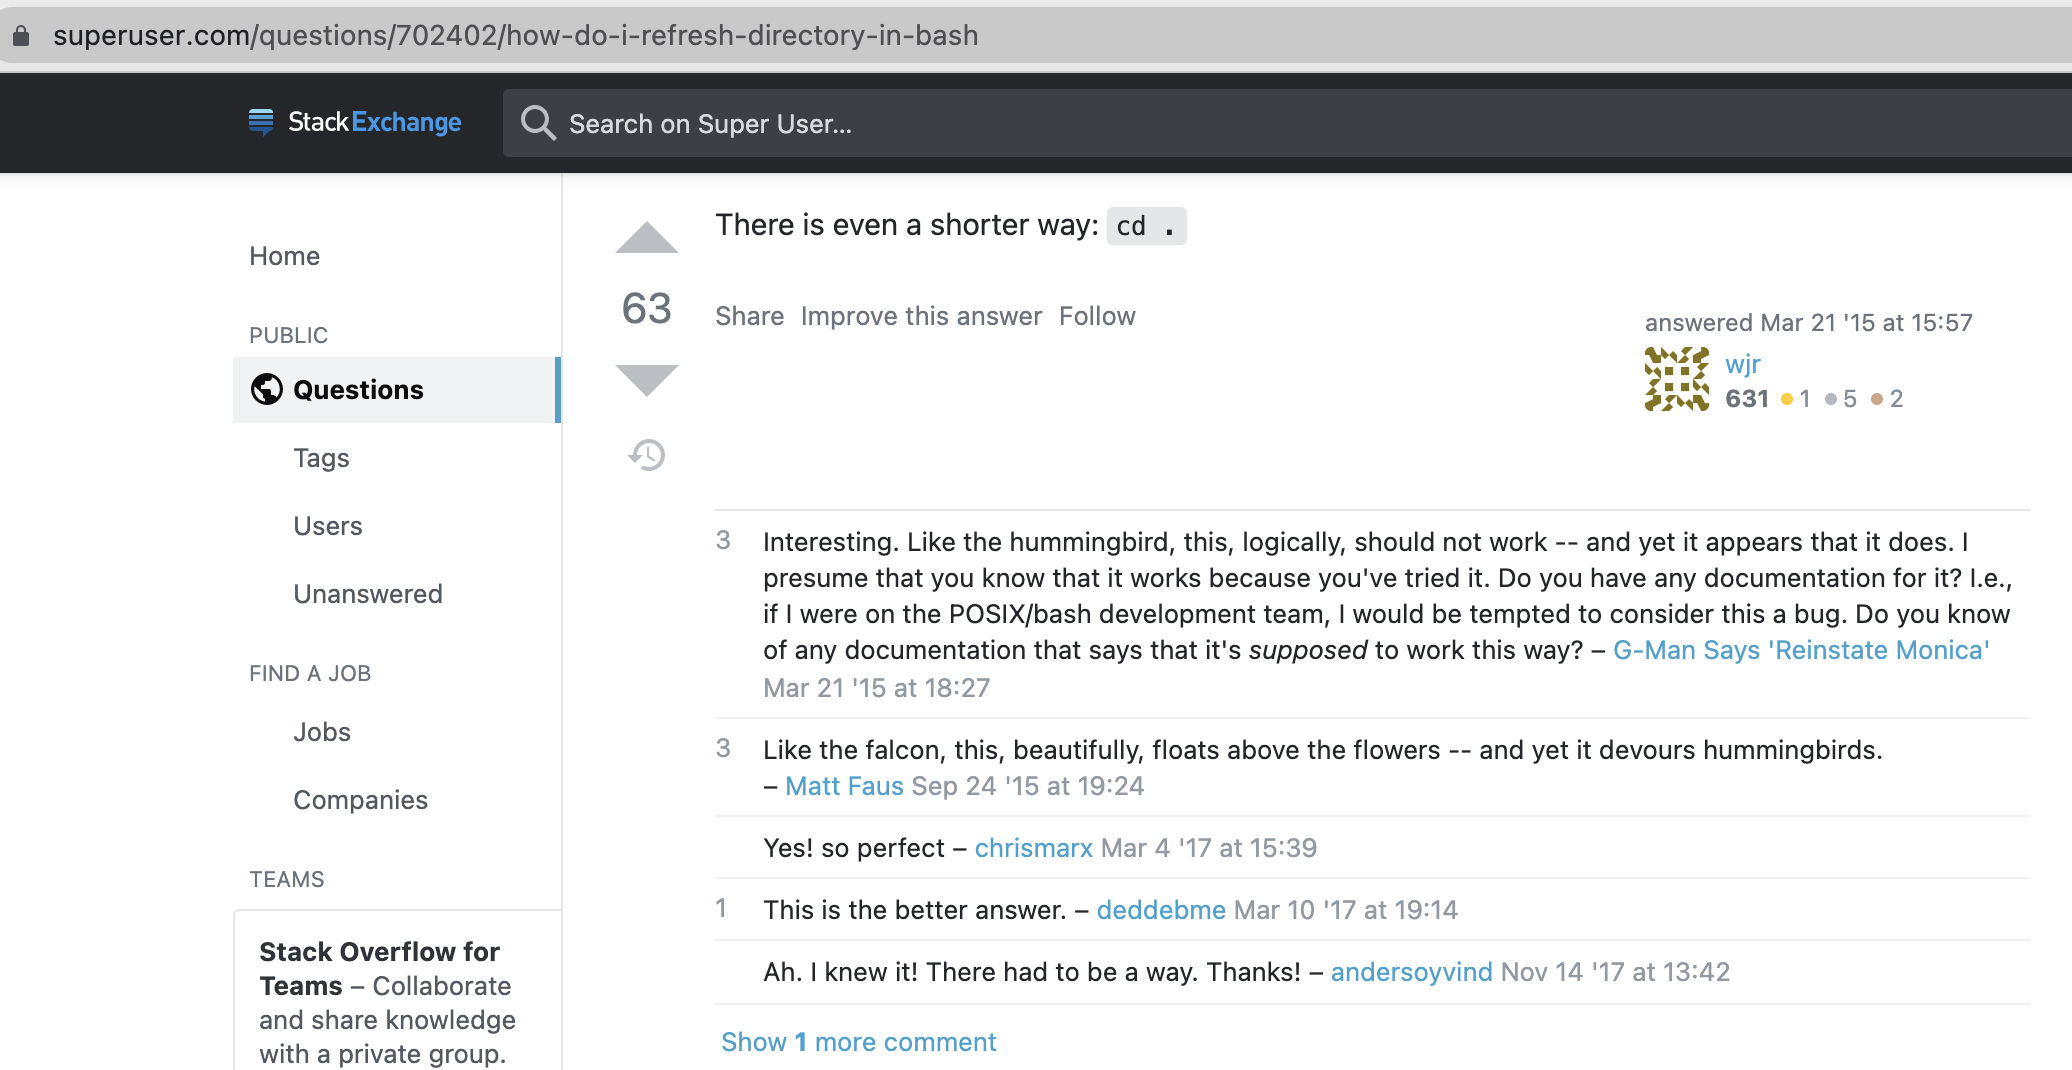
command:cd
usage: a superb scene using cd .
ref:
command:sed
ref
a good start:
how to print only matched lines
-n means "No automatically print the each line"/p means "Print the processed line"
# print only the matched lines
sed -n "s|find|replace|p"

# don't print any line (so useless)
sed -n "s|find|replace|"

# print all the line each, with matched line again(twice, and it's the same)
sed "s|find|replace|p"

# TODO: print the processed, and apply function on it.
ref:
✨ how to increment version number
resolution 1: use echo based on //e
special thanks to: https://stackoverflow.com/a/14348899/9422455
resolution 2: answer
gsed -i -E 's|(.*)"version": "([0-9]+)\.([0-9]+)\.([0-9]+)"|echo "\1\\"version\\": \\"\2.\3.$((\4+1))\\""|e' package.json
test what happened using //pe
➜  erb_sqlite git:(main) head -3 release/app/package.json                                                                                                                                           [7-01-22 | 4:18:17]
{
  "name": "mark.hjxh.express_match",
  "version": "0.2.2",


➜  erb_sqlite git:(main) gsed -E 's|(.*)"version": "([0-9]+)\.([0-9]+)\.([0-9]+)"|echo "\1\\"version\\": \\"\2.\3.$((\4+1))\\""|pe' release/app/package.json                                        [7-01-22 | 4:08:57]
{
  "name": "mark.hjxh.express_match",
echo "  \"version\": \"0.2.$((2+1))\"",
  "version": "0.2.3",
explanation
In fact, the "version": "0.2.2", is changed into echo " \"version\": \"0.2.$((2+1))\"",.
And then the e syntax indicates run this sequency string as a command, so that it finally turns into "version": "0.2.3",
attention
- the
" needs to be escaped, and to escape ", we need to use a \, and to let the \ work in the echo function, we need to escape it again, that is to be \\" sed will match all line (including the leading space), and the e would execute all line. So if I just replace the version number part into echo "\\"0.2.3\\"", then all the line would turns into "version": echo "\\"0.2.3\\"", which is certainly unwanted and deserves reflection.
core ref
bash - How to find/replace and increment a matched number with sed/awk? - Stack Overflow
perl | awk alternative
official hack way (but I failed)
sh #!/usr/bin/sed -f
// d
replace all trailing 9s by _ (any other character except digits, could
be used)
:d s/9(*)$/\1/ td
incr last digit only. The first line adds a most-significant
digit of 1 if we have to add a digit.
s/^(_*)$/1\1/; tn s/8()$/9\1/; tn s/7(__)$/8\1/; tn s/6()$/7\1/; tn s/5(_*)$/6\1/; tn s/4(__)$/5\1/; tn s/3(__)$/4\1/; tn s/2(__)$/3\1/; tn s/1(_*)$/2\1/; tn s/0(_*)$/1\1/; tn
:n y/_/0/
- [sed, a stream editor](https://www.gnu.org/software/sed/manual/sed.html#Increment-a-number)

#### how to match digits (`[0-9]` or `:digit:`)

> ref:

thanks for the direction to sed official documentation in this post.

- [regex - Why doesn't `\d` work in regular expressions in sed? - Stack Overflow](https://stackoverflow.com/questions/14671293/why-doesnt-d-work-in-regular-expressions-in-sed)

#### how to insert text before first line of file

suppose the text is:

```text
@tailwind base;
@tailwind components;
@tailwind utilities;
and the file is public/style.css
first, export this variable for better understanding of commands:
T='@tailwind base;
@tailwind components;
@tailwind utilities;'
F='public/style.css'
and copy file as a backup:
then the reset command is:
resolution 1: use cat and ;
The cat approach meets our intuition, but needs a temp file.
First, we dump the T into temp file, then append F into temp, finally replace F with temp, that is:
echo $T > temp; cat $F >> temp; mv temp $F
Be careful about the second operator of >> since it means append otherwise the $T would be flushed, then $F keeps unchanged.
refer:
resolution 2: use cat and |
In last solution, we used 2 ';', and there is an easy way to change it to just 1 ';'.
echo $T | cat - $F > temp; mv temp $F
In this solution, the $T echoed into second pipe, and cat used - to capture it then joined with $F and dumped into temp, which surely is faster.
refer:
resolution 3: use sed s-command
In the above 2 solutions, we both need an IO, i.e. first saving into a 'temp' file and move to override the raw file, which could be low-efficiently and not elegant.
There's a way allowing us to finish the 'join' action just in the pipe and finally leads to inplace-modify target file. That is "sed's s-command".
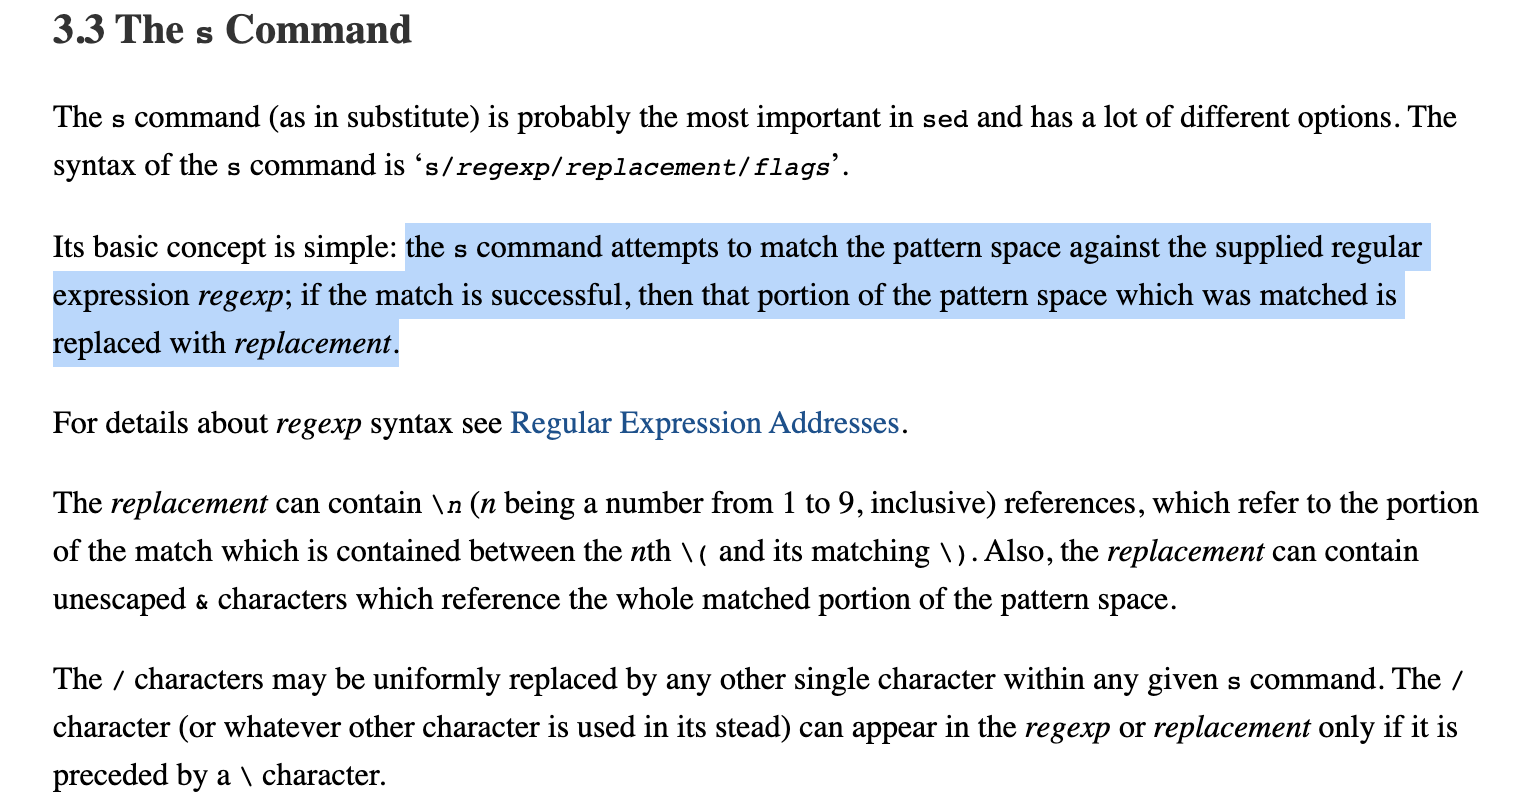

When using s-command, we can easily apply regex grammar to achieve what we want.

Like this, we can easily insert text in front of a sequency of text based on regex of '^', which means the beginning of text.
And then, since the basic grammar of how to insert text before specific line of an input file in sed is sed -i 'Ni TEXT' $F , the problem then converts to how to join '1i' with $T. That is what we just learned can be put into practice:
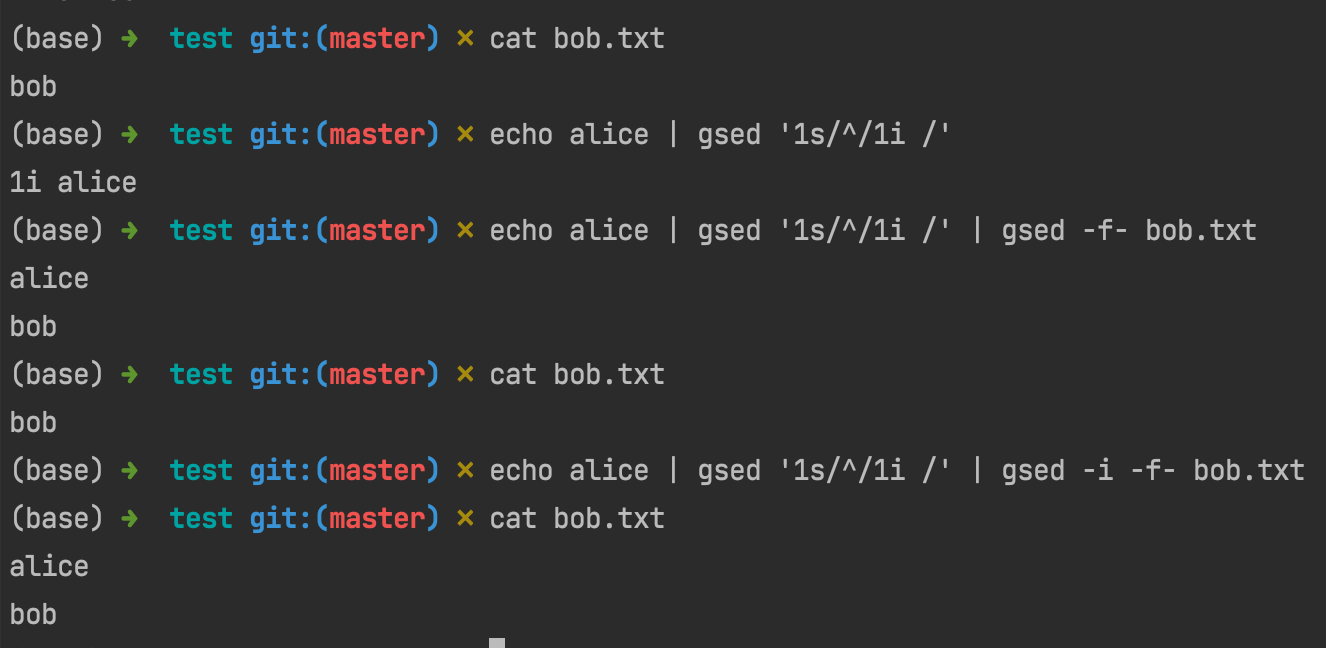
You see, now all the commands have nothing to do with the io, and the principle behind this command chain is straightforward: join into 1i $T then use it as sed -i’s parameter (via -f- which is the former pipe).
resolution 4: use sed e-command
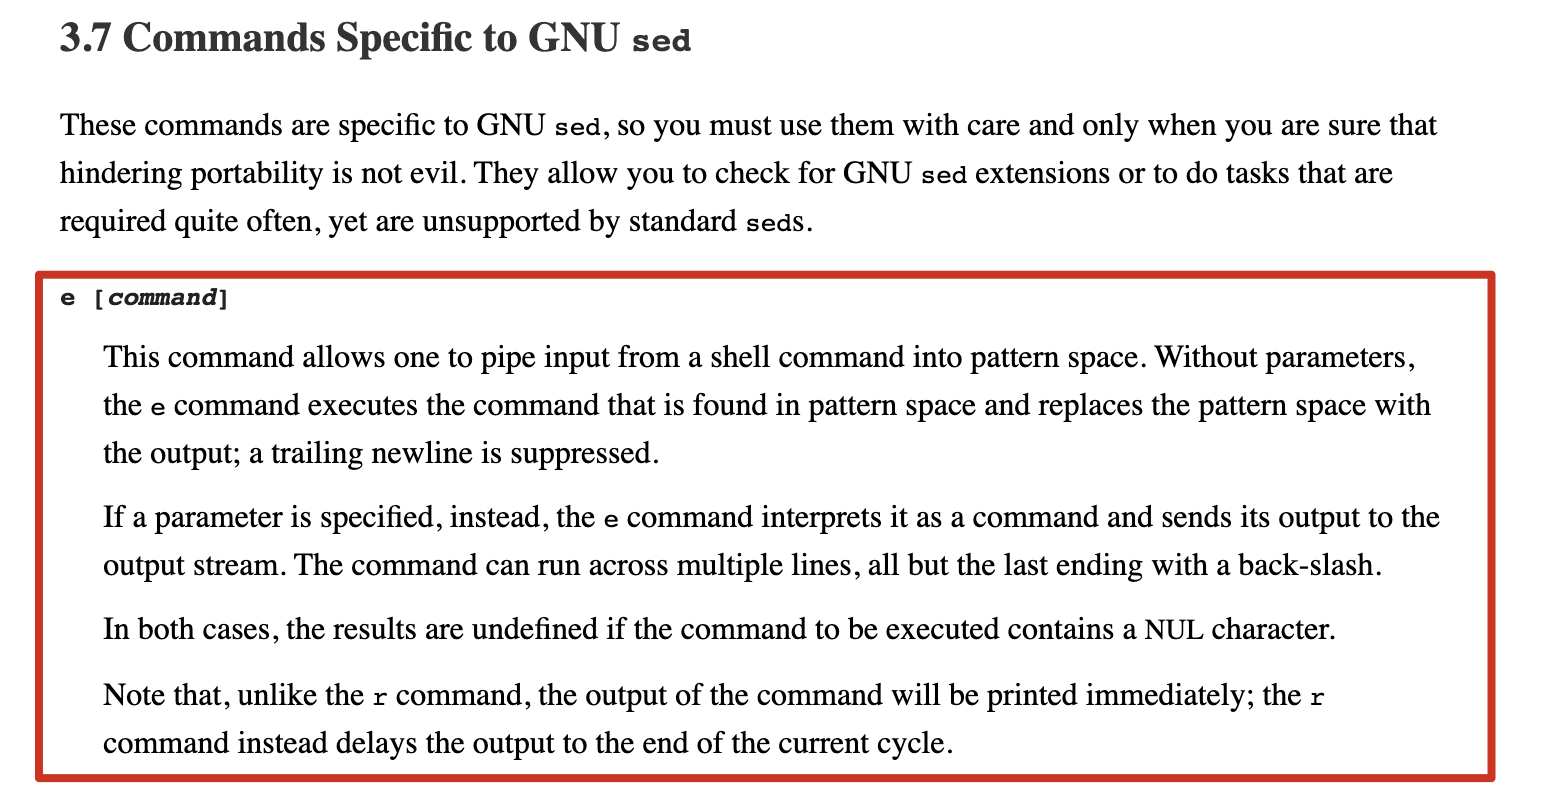
I'd think the e-command is quite confusing, but does good job.
I made some tests on the e-command to help myself understand.
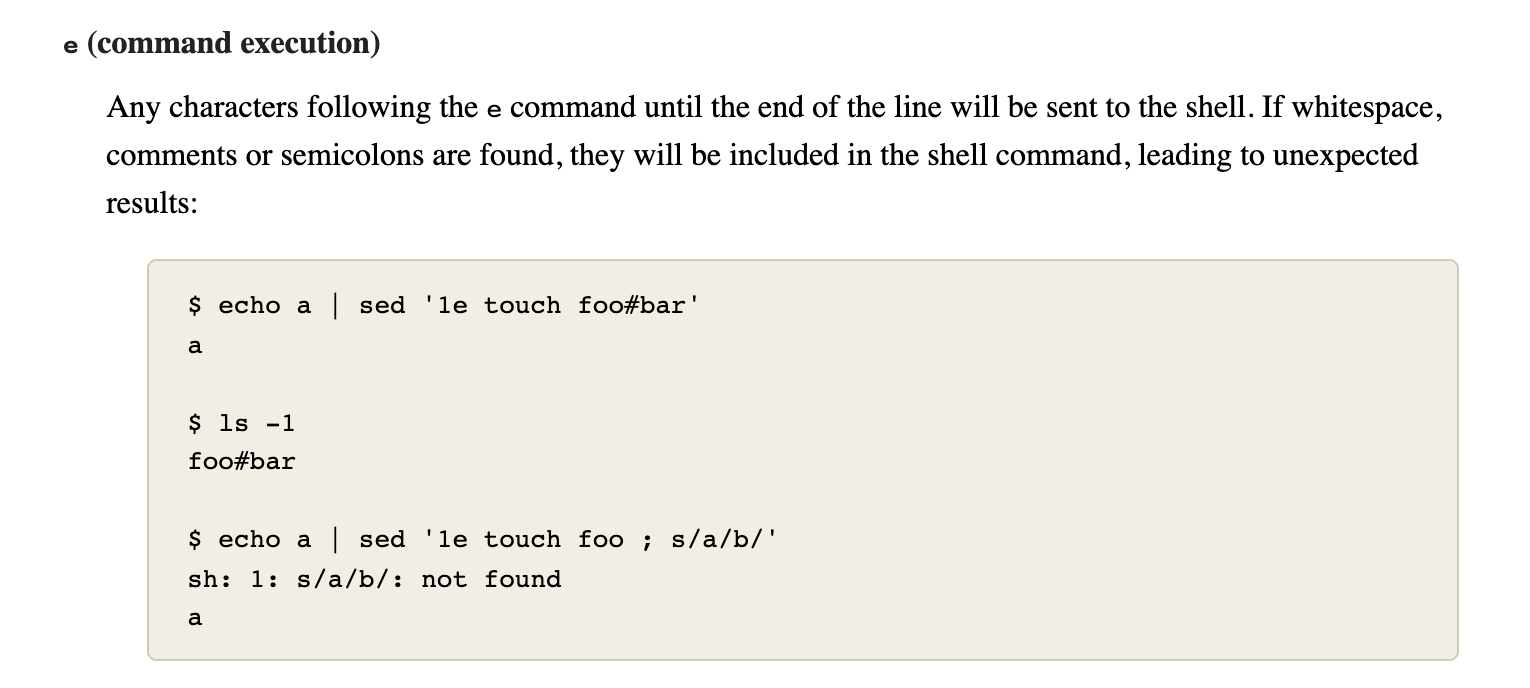
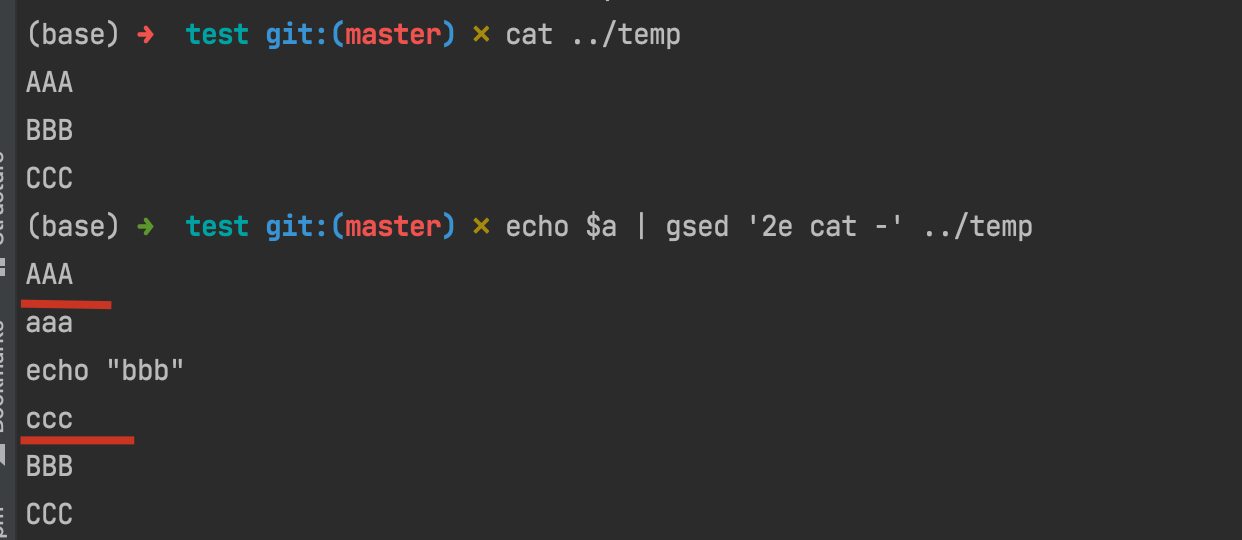
In the above introduction, it indicates that if 'without parameters, the e command executes the command that is found in space and replace the pattern space with the output'.
suppose we have a='aaa\necho "bbb" \nccc', then if we runs echo $a | gsed '2e', that's to say run the second line as a command and let others stay as what they are: 
However, 'if a parameter is specified, instead, the e command interprets it as a command and sends its output to the output stream.'
I made an example which may help us to understand what's the mechanism of gsed 'ne xxx, in which xxx is the so-called 'parameter'.

You can see, as the following shows, since a is a three-line text and sent into the pipe as stream, so first line shows 'aaa', and second line shows 'echo "bbb"', as what we preset.
The most notable point is that since gsed sets a 3e command which means 'it will execute following commands at 3rd row of stream'. Thus, the following commands xxx\n echo "yyy"... are executed as separate commands split by lines.
Obviously, neither xxx nor zzz is a valid command and turned into an error. Plus, since the level of error usually is a bit higher than normal output, the error of zzz came before yyy and then is AAA.
Finally, when all the commands were executed, the next stream in pipe came, i.e. ccc, and all the sequences came into end.
ref:
sed e-command
Still, we had other topics to talk about.
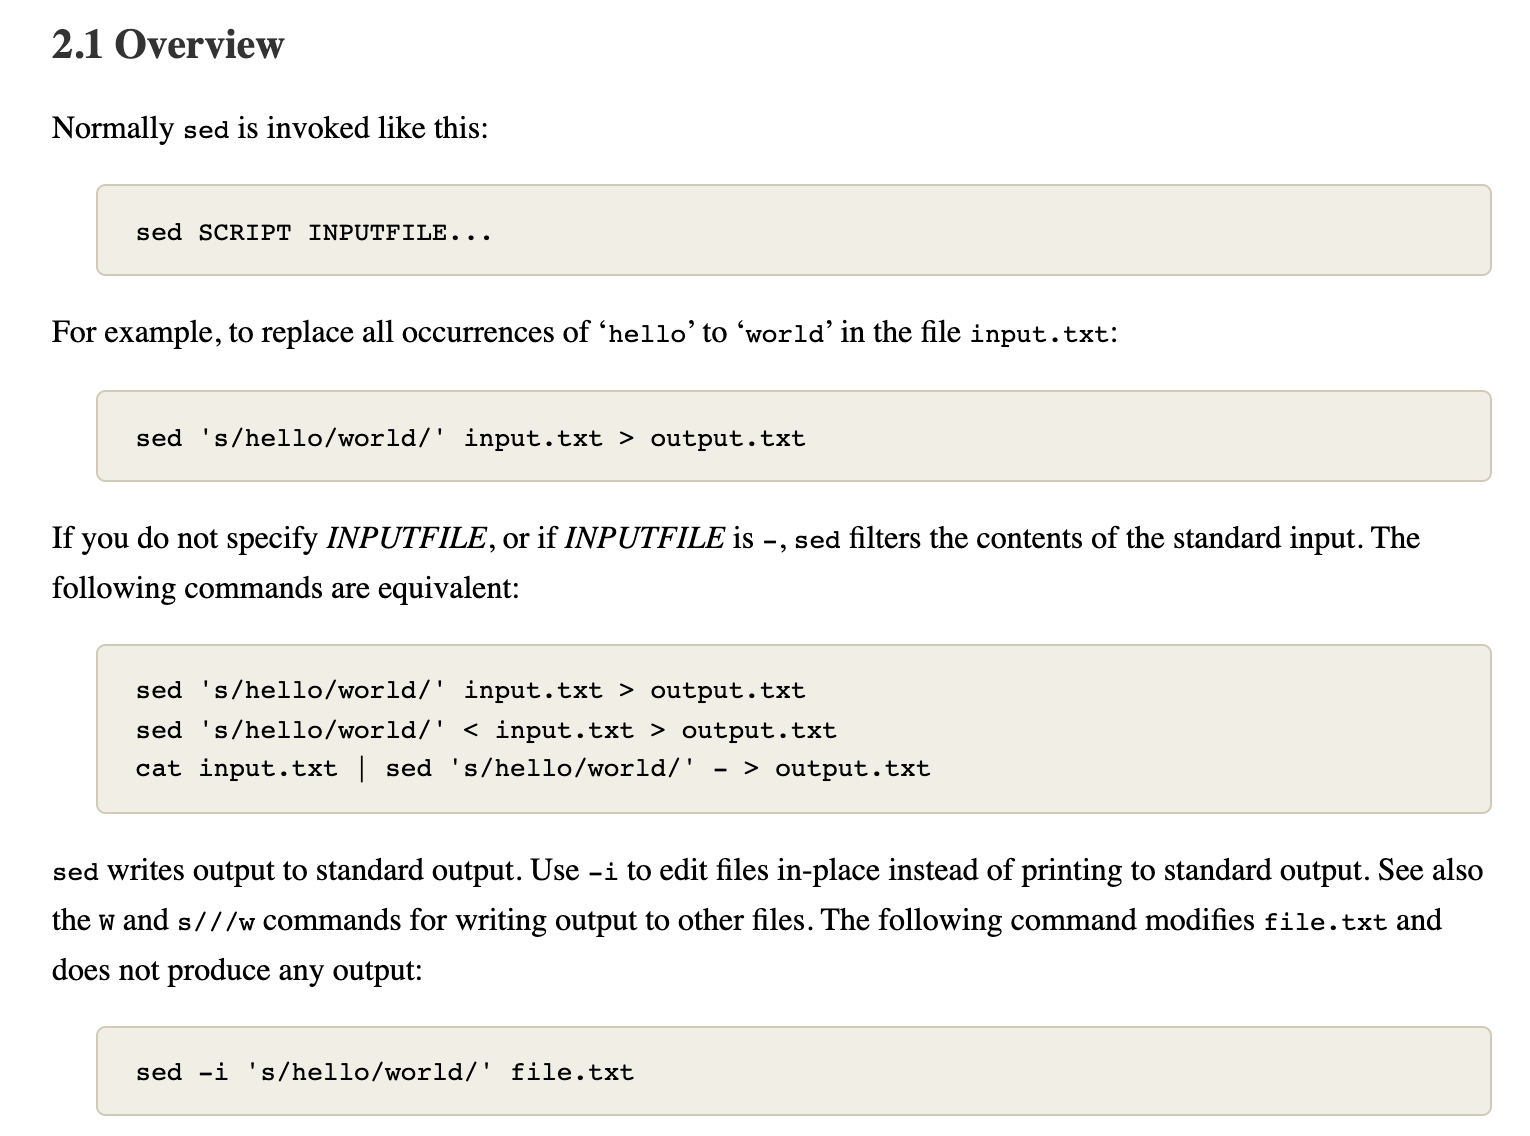
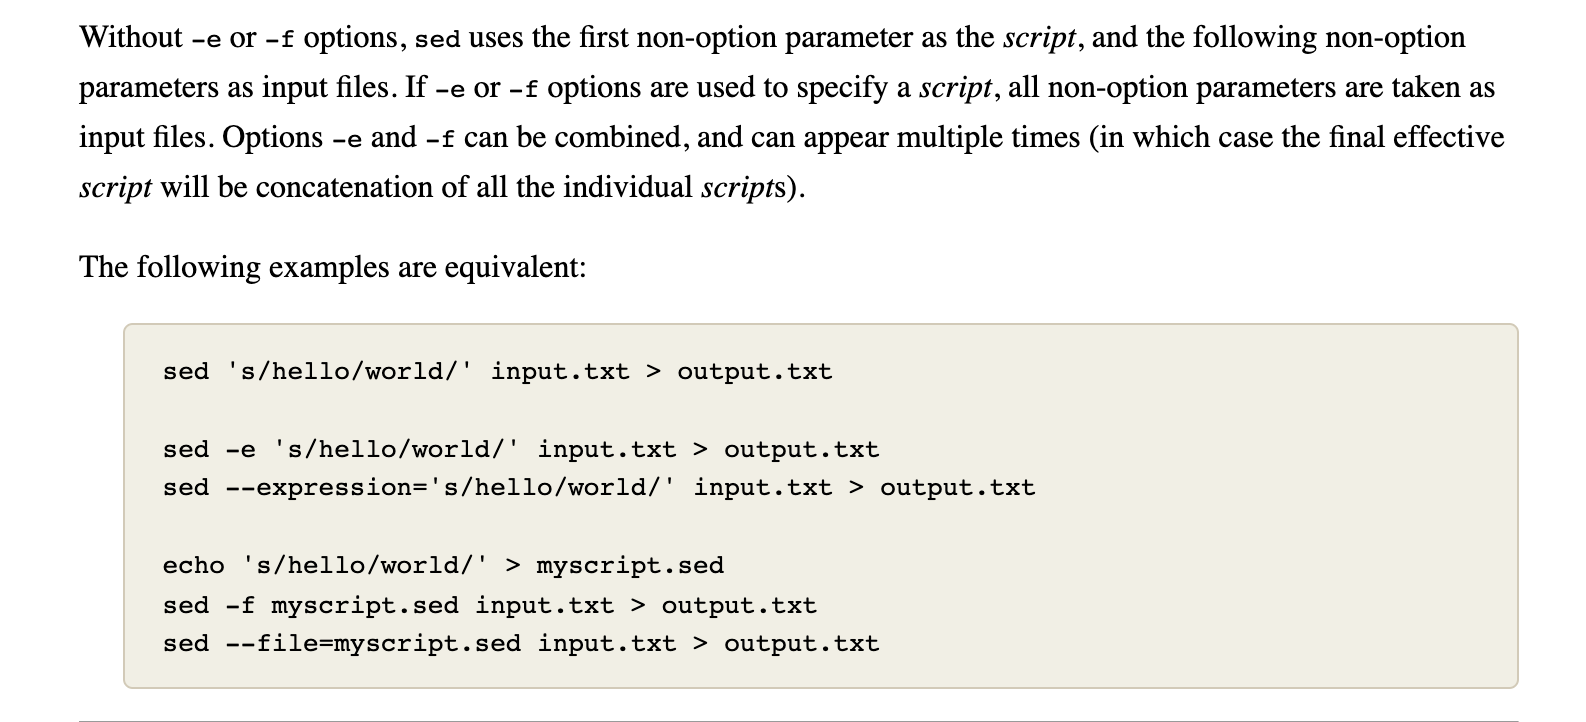
We can know the classic usage of sed is sed SCRIPT INPUTFILE, and if -e option is used to specify a script, with all non-option parameters taken as input files.
So what would happen when we combine the -e and an input file.
Back to what we covered the above, we can move a step further now.
In this example, we can see that gsed first read one line from ../temp file which is AAA, and then paused since the 2e flag to execute cat - command which shows all the input stream from echo $a, and finally continued to read the remaining rows of BBB and CCC.
So what about if we specify a -i option, which means change in position?
It's easy to understand, that is all the output would be sent into ../temp, so that ../temp changes to the output just like the result in this example shows.
Hence, we can derive from our conclusion: if we use the following command:
echo $T | gsed -i '1e cat -' $F
then the goal of inserting text before first line can be achieved just on the fly~
How amazing and beautiful it is!
ref:
conclusion
G1. To insert lines at the beginning of one file:
# 1. dump, dump, and move
echo $T > temp; cat $F >> temp; mv temp $F;

# 2. join, dump, and move
echo $T | cat - $F > temp; mv temp $F;

# 3. [sed s-command] concat-string, inplace-insert
echo $T | gsed '1s/^/1i /' | gsed -i -f- $F

# 4. [sed e-command] ... hard to conclude
echo $T | gsed -i '1e cat -' $F
G2. To insert lines at specific line:
# 1. if text is single line, refer: https://stackoverflow.com/a/6537587/9422455
gsed -i 'Ni $T' $F

# 2. if text is multi lines, refer:
echo $T | gsed -i 'Ne cat -' $F
FIXME: (failed) G3. To insert content after matched position:
# 1. [sed r-command]
echo $T | gsed -i '$P/r -' $F #  the '-' is same for '/dev/stdin'
G4. To insert multi lines manually:
# 1, when lines are already multiplied, just add `\` after each line, refer: https://askubuntu.com/a/702693

# 2, when lines are in one, using `\n`, refer: https://askubuntu.com/a/702690
G5. To insert lines after matched line with the same leading space format:
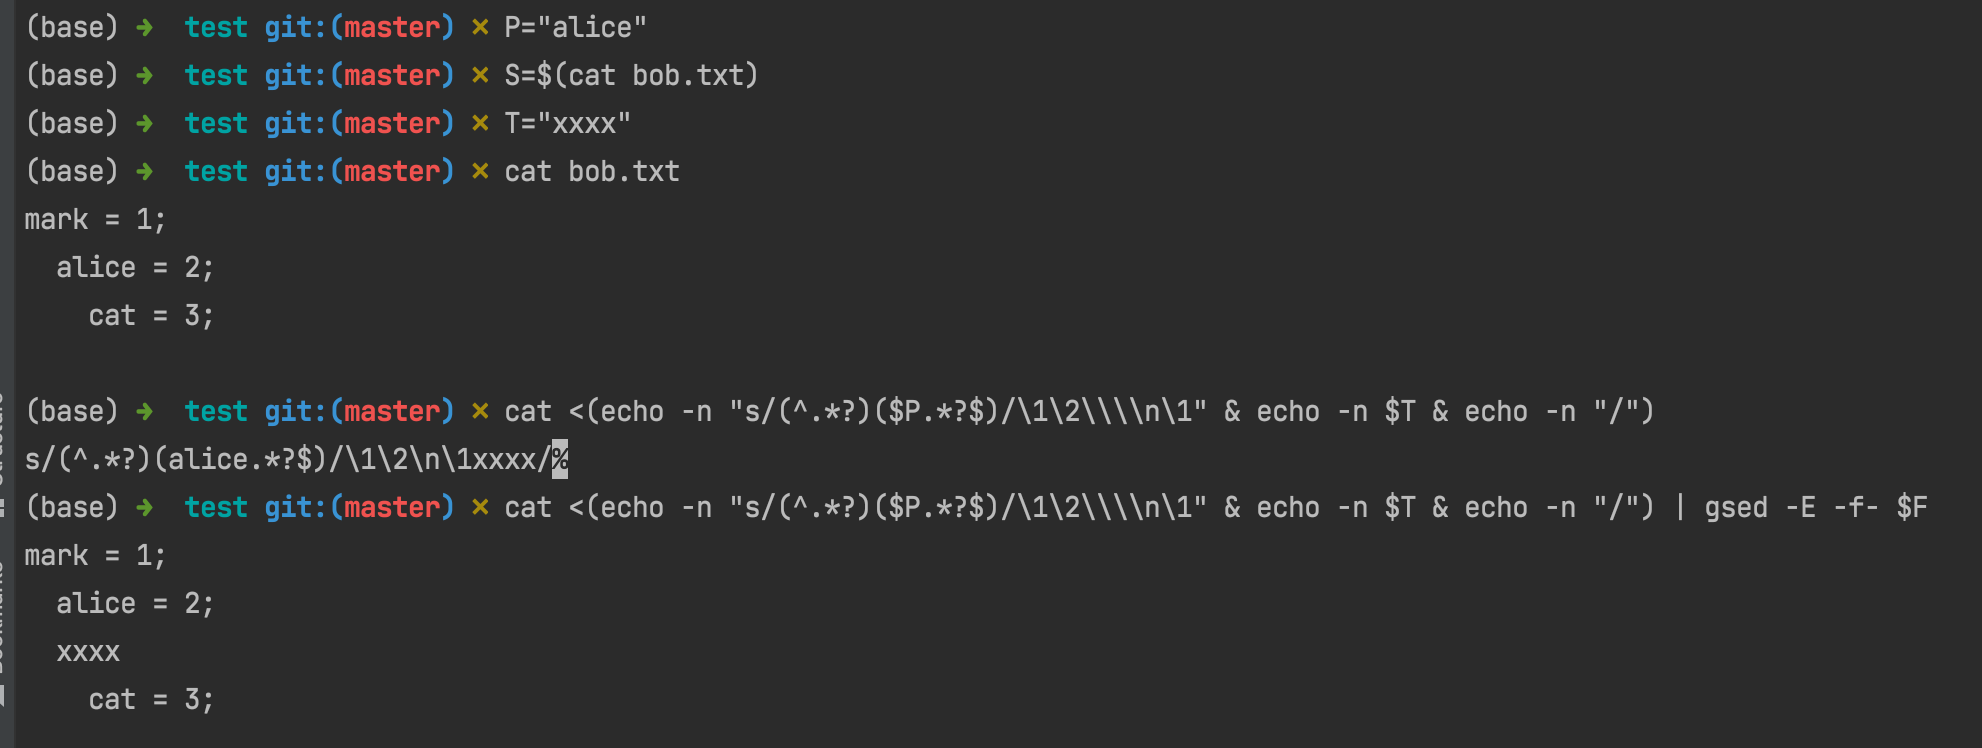
⚠️ 嵌套 sed 正则注意事项
- 输入的文本不能与分隔符相同,否则需要转义。比如本次为了在代码中加入注释
//,就不方便用/当分隔符 - 嵌套正则的时候,为了能分清一级与二级,可以应用不同的分隔符,比如本次更新用了
|作为一级,_作为二级
# 1. [sed s-command] leading space align with $P
# failed at 2022-01-25
# echo $T | gsed 's/^.*$/s\/(^.*?)($P.*$)\/\\1\\2\\n\0\//' | gsed -E -f- $F

# updated at 2022-01-25
echo $T | gsed 's|^.*$|s_^(.*?)('$P'.*)$_\\1\\2\\n\\1\0_|' | gsed -E -f- $F | grep --context=3 $T

# FIXME: (failed) 2. [sed s-command with named-pipe] [more straightforward]
cat <(echo -n "s/(^.*?)($P.*?$)/\1\2\\\\n\1" & echo -n $T & echo -n "/") | gsed -E -f- $F
ref: