how to migrate mac
- backup and reinstall mac
- install basic softwares
- install development relative tools
- TODO: final killer on MacOS
- mac experience
backup and reinstall mac
motivation / background
去年我的电脑因为某些原因重新刷机(或是升级),最后导致即使系统中只有一个 admin 的用户,但实际电脑还是被旧的系统的那个用户(虽然也是我)在控制(我与 Apple 客服的一致猜想,尽管事后我觉得怪怪的)。
并且因为(默认)启用了新版的FileVault(保险箱)导致开机体验很差,因为它会让我输入两次密码(第一次输入时会是一个黑屏界面+密码,看起来就像有 bug 的那种),其次在系统的文件保险箱那个界面显示我没有权限或者操作没有反应。
总之,虽然不影响正常程序运行,但是就总觉得电脑是处于亚健康状态,然后恰好这几天觉得算是有空,所以仔细研究了一下,尝试了各种方案,最后打电话给 Apple,交流下来推荐我备份系统重新刷机,我考虑到目前的文件占用很大,系统经过我两年的折腾也确实该清理一下,遂接受了。
于是有此篇,谨记录一下刷机的过程和安装新软件的步骤,考虑到其实还是安装软件的篇幅较大(更为复杂),对读者更有借鉴价值,遂取本篇名为Mac刷机/开机指南。
step 1. how to backup old machine
移动硬盘要求与选择
我选购的 mac 是 500G 磁盘,实际使用的个人文件夹在 200G 左右,所以备份至少需要 200-500G 的外接磁盘,因为我的刷机不单单是重新装一下系统,还要将整个磁盘复原(取消其保险箱)。
不过还好,因为我目前有两块 1T 的固态磁盘,和一块 4T 的机械磁盘,所以备份不成问题,大家可根据自己的实际情况酌情采取备份的磁盘策略。
备份内容要求与选择
磁盘部分问题不大,选什么都不影响备份的质量,也不用特别考虑易失和速度的问题。主要难点还是在选择哪些文件、文件夹去备份,以及要相应地做哪些修改的问题。
因为权限的存在,有些文件/文件夹你是没法直接拷贝出去,就算拷出去了也用不了。(尤其是我当时的那个用户不是超级用户的场景)
这种情况下,就需要首先检查与修改一些信息,第一个是关于文件与文件夹的权限信息,比如以下命令就会把个人文件夹下的所有内容都改成最宽松级别权限(任何人可读、可写、可执行),这个命令谨慎运行,因为首先比价耗时,其次侵入性大。
sudo chmod -R 777 ~
!!!tip chmod中ch是change的意思,mod就是mode,777中的7表示4(read, 2^2) + 2(write, 2^1) + 1(execute, 2^0)
第二个是关于文件/文件夹归属,比如我目前的用户名叫mark,但是可能因为临时原因,新建了一个mark2的用户名,最后我通过磁盘操作将mark2改成mark,但是文件/文件夹还是只认mark2,这个时候就要更换归属者(owner)。
sudo chown -R mark ~
当然了,如果是正常备份是不需要这么麻烦的,直接拷贝出去就行,我只是列一下可能需要动手脚的一些方案,理论上,只要平时不乱存文件,自己的工作、学习文档都放在~下,那么直接把~备份出去问题也不大。
但有一些问题是关于软件层面的,比如~/Application和~/Application Support这些文件夹下的东西,就很有可能拷贝丢失,即便拷贝出去重新复制回来也可能没法直接使用。
所以如果是个人的文档,随意拷贝;如果是涉及到应用相关的,尤其是安装级别的,一般就比较麻烦。这里提供四个参考办法。
第一个,对于google chrome、vscode这种大软件,提供用户系统的,一定要登录进去,同步所有的插件、记录等等,这样非常方便在不同操作系统之间同步,比如我就曾经在公司的 ubuntu 系统上同步我平常在 mac 的 vscode 里更新的文档内容,非常舒服。
第二个,对于alfred、clashx这种小软件,可能没有用户系统或者做的不够完善的,它们一般支持配置驱动,所以你直接把对应的配置文件保存好就行。但说这么说,其实也没那么容易,比如说clashx主要包含两个维度的配置信息,一个是系统的菜单哪些被勾选,这些可能在某个plist文件里,另一个是订阅的 ssr 链接生成的 config 文件,这个我确定是在~/.config/clash下。
关键是,我们以为的备份还原,应该是一键自动完成的,但实际上,我们对每个软件内部怎么设计存储与配置逻辑越了解,我们的还原工作就越复杂。比较容易接受的是提供一个导出配置选项,之后重新安装再导入即可,这个逻辑应该来说还比较直观容易令人接受。
注意一下,第二个相对于第一个方法的核心区别,第一种软件是自带云端服务的,基于用户系统同步,所以不用关心存储或者拷贝,只要同步工作做好,去任何地方重新安装即可。但第二个办法是基于本地文件系统的,要么有一个直接的导出操作,要么自己知道所有配置信息与文件的位置,然后有机整合。
第二个办法,如果没有提供一键导出导入的功能,势必就会很复杂,所以局限性比较大。由此引申出第三种办法,有没有可能在复制的时候能够保存所有关于该应用的信息,然后复原的时候能够完美还原呢?理论上应该是可行的,但实际可能一方面代价比较大,另一方面有可能不可行。
主要是现代的操作系统,一个程序的应用部分、数据部分等等可能是分散的,就像刚刚对clashx的分析一样。虽然确实有一个比较偷懒的做法,比如直接把整个文件系统拷贝过去(或者就是~,其实也已经包含了绝大多数或者就是全部的 user 级别的程序数据)
但总之,这个办法我不敢保证,对这方面比较了解的可以指正我。我目前只能说,比如某个~/.zsh_history文件里存储着 zsh 历史记录,这样我先拷贝出去,然在新的系统安装了 zsh 之前,拷贝回来这个文件就没用,但一旦安装了 zsh,这个文件就有了。所以问题就回到和应用程序自身相关。
举个极端的例子,假如这个程序是必须安装才可以运行,那么直接拷贝过来是否不太可行?但据我了解~/Application下面是直接把程序复制进去就当做安装了,所以如果我们所有过往的程序都一一拷贝到~/Application下,然后其他附属的配置信息保证文件结构相同,复制回来,兴许能够达到开箱即用的效果,但我因为之前权限问题与文件夹路径问题导致应用未能成功备份,最终这个方案我也没法测试了。
因此如果你也不知道第三种方案的确切答案,但你又想保证之前的所有程序在新的系统上也是要能正常运行的,那就要试试 mac 自带的时光机器系统或者备份系统了,基于磁盘级别的 mac 自带的,你一定值得信赖。

step 2. how to reinstall system
Do you need to erase all the raw file system?
如果像我一样,由于整个磁盘的加密机制导致文件系统不符合预期的运行,我就需要将整个磁盘擦除,变成一个无加密的磁盘(APFS)。
但一般情况下,是不需要将整个磁盘擦除的,这样数据就全丢了。
!!!tip 擦完系统一下从只剩 100G 到剩 400 多 G,这个感觉真得爽啊!
其实仔细想想,有时候擦盘重开也是很有必要的,因为你可能曾经因为要做某个项目然后装了很大的软件(比如Matlab),后续比如说转行基本用不到了,这个时候就可以考虑擦除一下重开了!
Do you want to install a specific OS version?
因为我只是想要一个干净的系统,所以对目标版本没有特别大的需求,因此我基于现有版本重装(默认)是很方便的(只需要一两个小时),如果你需要升级什么的,可能比较适合直接在开机后的系统中使用升级选项(而非接下来要讲得基于Recovery模式重装)。
it's quite easy to install the current os version
重启电脑,然后按住command + R键,直到出现一个弹窗选项,输入 apple 账号和密码后就进入Recovery模式了。
接着如果想重装当前你系统(保留磁盘目前的文件、文件夹等信息,尤指~文件夹下),选择重装选项即可。
如果要擦除磁盘再重装,则要先去磁盘选项里擦除再选择重装。
在重装之后,便可以重新安装(或使用之前的,如果没有擦除磁盘)软件了。
install basic softwares
vpn support: clash
visit(vpn unnecessary) Releases · yichengchen/clashX to download
clashx.copy the
mark.yamlinto~/.config/clash/, which is your custom ssr config file (config.yamlis the default, which may not work)

specify the config file, and ensure the config options.

- the
Proxy Mode (Rule)means visit domain websites directly(so not wasting vpn flows) and visit foreign websites via proxy - the
ProxyofIPLC ***is the proxy you specify, which you should manually does a test according to theBenchmarkoption
And the proxies are too many for you with some bad proxies (like me), feel free to exclude them in the config file like this:
Set as system proxy, otherwise the clashx won't work, and switch it if necessaryStart at loginfor convenience.Allow connect from Lan, useful for virtual machine to share with the net (not ensure).Config - mark, the config file choice
- the
after doing so, you may visit foreign websites like
google
web support: google chrome
- visit(vpn unnecessary) Google Chrome - Download the Fast, Secure Browser from Google to download chrome
- login(vpn necessary) and sync with your own account to initialize your passwords, bookmarks, plugins, themes, etc.
workflow support: alfred
visit(vpn unnecessary) Alfred Powerpack 4.6.3 (1282) 中文破解版 for Mac 本地搜索及应用快速启动 to download the hacked version of
Alfred 4in order to have the premium features likeworkflows.install it following the instruction
change the default shortcut of
command + spaceforspotlight searchto beshift + command + space, and set the shortcut foralfred searchto becommand + spacesince it uses more frequently.

enable the
clipboard history, and change the default history shortcut fromoption + command + ctoshift + command + v, sincecommand + vis more intuitive for a paste action instead of copy one andshiftis more suitable for gesture thanoption.
config some custom searches based on keywords (e.g. I use
gitfor searching ongithubandcsdnfor search oncsdn)github sample
check search pattern:

config search pattern:

test search result:

csdn sample
check search pattern:
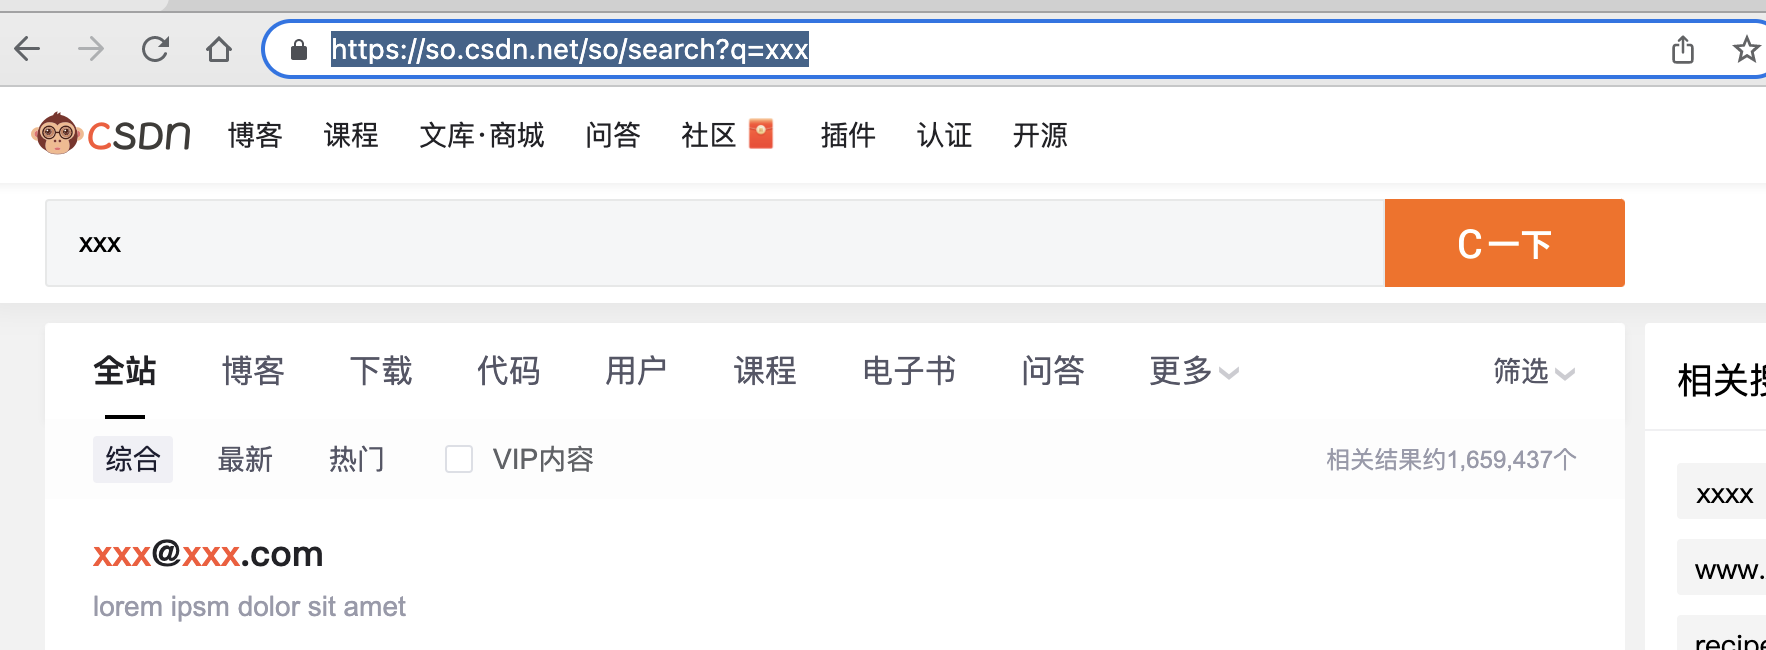
config search pattern:

test search result:

google translate sample
- check search pattern of Chinese to English (English to Chinese is close):

- test search result:


- check search pattern of Chinese to English (English to Chinese is close):
More sophisticated script need to be using the powerful workflows, e.g. the alfred workflow collection at zenorocha/alfred-workflows: A collection of Alfred 3 and 4 workflows that will rock your world and an alternative for WINDOWS: Wox-launcher/Wox: Launcher for Windows, an alternative to Alfred and Launchy.
input method support: sogou
!!! tip 为什么用搜狗输入法呢? 系统自带的中文拼音输入法我觉得主要有三个缺点。 第一个就是最直接的,切换中英文徐瑶用cap键而不是shift键这很不习惯; 第二个就是它毕竟没有国人的沉淀,所以候选都不是很智能; 第三个主要是我已经在搜狗输入法打了几百万字了,肯定搜狗更适合我。
- visit(vpn unnecessary) 搜狗输入法 for Mac - 支持全拼、双拼、模糊输入、苹果输入、云输入 to download 搜狗输入法
- delete the raw chinese input method, and add sogou input method


- change the default shortcut for switching input methods to
option + tabfor convenience (like windowsctrl + shift)
screenshot support: xnip
- install xnip in AppStore (iShot is also good but has more bugs)

- enable the auto-start when loin (system permission may be need)
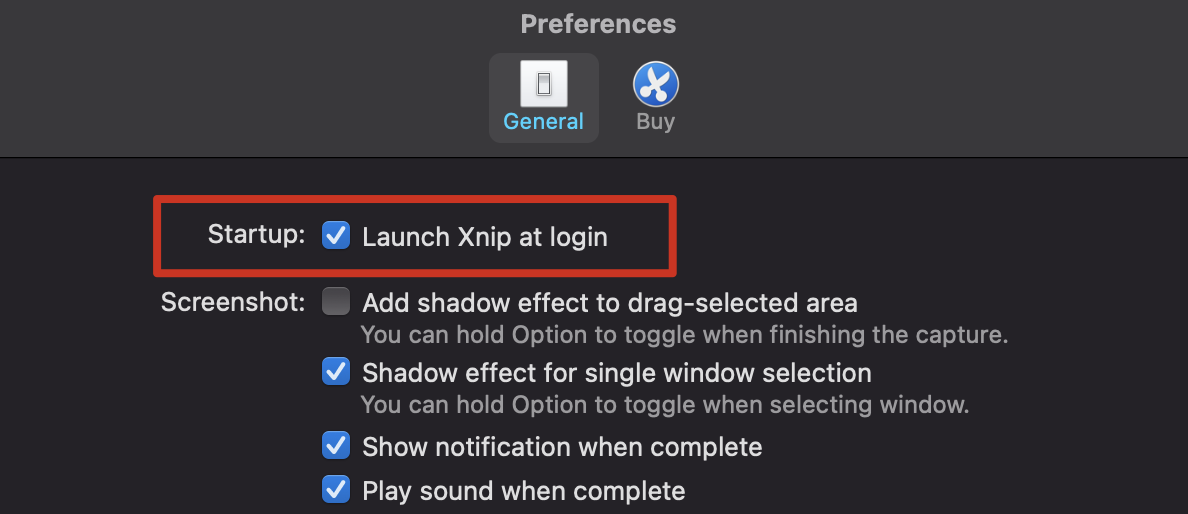

- then you can use
Command + shift + Xto have a fast screenshot which would automatically save the image into clipboard
other apps
these apps can be downloaded directly from AppStore:
- WPS Office
- 网易云音乐
other apps need be downloaded manually:
- 百度网盘: download at 百度网盘 客户端下载
- QQ: download at I'm QQ - 每一天,乐在沟通
install development relative tools
coding/note support: vscode
- visit(vpn unnecessary) Download Visual Studio Code - Mac, Linux, Windows to download vscode
- sync(vpn necessary since some plugins are in the foreign sites, and it may be very slow if your company vpn doesn't include them in your
pacfile, if it exists (I suffered from it once...)) your user account via google or github
- then the vscode can perform an awesome experience for you.
- recommended theme:
One Dark Pro Darker
- recommended markdown plugins:

- other recommended plugins for yourself to explore, such as
git,python, etc.
- recommended theme:
- Enjoy it, since I am a hard user on
vscode(I used to usetyporabut it's slow when file is large, and poor support for git, plugins, etc, and even in charge now!)
packages support: git and brew
正常安装(如果一切顺利地话)
As homebrew | 镜像站使用帮助 | 清华大学开源软件镜像站 | Tsinghua Open Source Mirror introduced:

We only need to run the following to install CTL for XCode on Mac:
xcode-select --install
And then config brew mirrors following Homebrew 有比较快的源(mirror)吗? - 知乎:
# 替换 Homebrew
git -C "$(brew --repo)" remote set-url origin https://mirrors.ustc.edu.cn/brew.git

# 替换 Homebrew Core
git -C "$(brew --repo homebrew/core)" remote set-url origin https://mirrors.ustc.edu.cn/homebrew-core.git

# 替换 Homebrew Cask
git -C "$(brew --repo homebrew/cask)" remote set-url origin https://mirrors.ustc.edu.cn/homebrew-cask.git

# 替换 Homebrew-bottles
# 对于 bash 用户:
echo 'export HOMEBREW_BOTTLE_DOMAIN=https://mirrors.ustc.edu.cn/homebrew-bottles' >> ~/.bash_profile
source ~/.bash_profile

# 对于 zsh 用户:
echo 'export HOMEBREW_BOTTLE_DOMAIN=https://mirrors.ustc.edu.cn/homebrew-bottles' >> ~/.zshrc
source ~/.zshrc
# 从本镜像下载安装脚本并安装 Homebrew / Linuxbrew
git clone --depth=1 https://mirrors.tuna.tsinghua.edu.cn/git/homebrew/install.git brew-install
/bin/bash brew-install/install.sh
rm -rf brew-install
关于 git 很慢
教程中brew update --force --quiet 这一步是更新brew的依赖,中间会用到git,继而会访问国外的一些仓库,如果是在国内,将会非常慢。
如果你和我一样用的是 clashx 的话,可以看一下clasxh的端口情况(Help > Ports > Http Port),默认应该是7890。所以可以在命令行中运行
git config --global http.proxy localhost:7890
git config --global https.proxy localhost:7890
这样,git 拉代码就会走自己的 vpn 代理,因为命令行(或保守点说,git 命令行中)中对外网的访问是不会走 clashx 设置的(一般用于网页访问)代理的。
其中--global参数是全局的,以后就都不用修改配置了, 它其实会作用于~/.gitconfig文件,如果后续你不知道怎么通过命令行修改配置,也可以直接基于文本编辑器修改该文件: 
关于 brew 很慢
因为 brew 镜像源是在国外,所以配置成国内将会显著加快拉取速度,可以参考清华镜像源方案 -homebrew | 镜像站使用帮助 | 清华大学开源软件镜像站 | Tsinghua Open Source Mirror 配置如下环境变量,也可以将其写入rc文件以供后续使用:
export HOMEBREW_BREW_GIT_REMOTE="https://mirrors.tuna.tsinghua.edu.cn/git/homebrew/brew.git"
export HOMEBREW_CORE_GIT_REMOTE="https://mirrors.tuna.tsinghua.edu.cn/git/homebrew/homebrew-core.git"
export HOMEBREW_BOTTLE_DOMAIN="https://mirrors.tuna.tsinghua.edu.cn/homebrew-bottles"
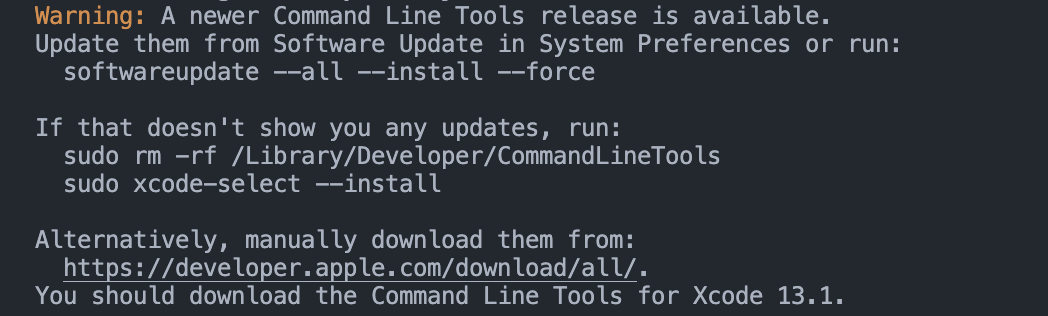
关于清华镜像源中提到的xcode clt问题 (clt: command line tool)
mac 开发都要配置这个,根据提示,可以直接使用以下命令去更新自己的xcode工具(这个过程可能会比较漫长):
softwareupdate --all --install --force
所以最快的流程是?
一般如果有环境变量可以先配环境变量,比如HOME_BREW的几个变量,还有git的两个 proxy 变量。
但其实先安装谁并不是那么重要,反正缺啥就装啥来着,这里不存在说先后顺序不对导致整个工程跑步起来(就像安卓编译一样),所以我也无意给大家理出一个所谓的“最佳实践”了。
实在要评个最佳实践,就按照清华镜像源给出地教程来:homebrew | 镜像站使用帮助 | 清华大学开源软件镜像站 | Tsinghua Open Source Mirror,或者如果他 Homebrew 有比较快的源(mirror)吗? - 知乎 说的没错的话就使用中科大的(目前我们文章中使用的就是中科大的):

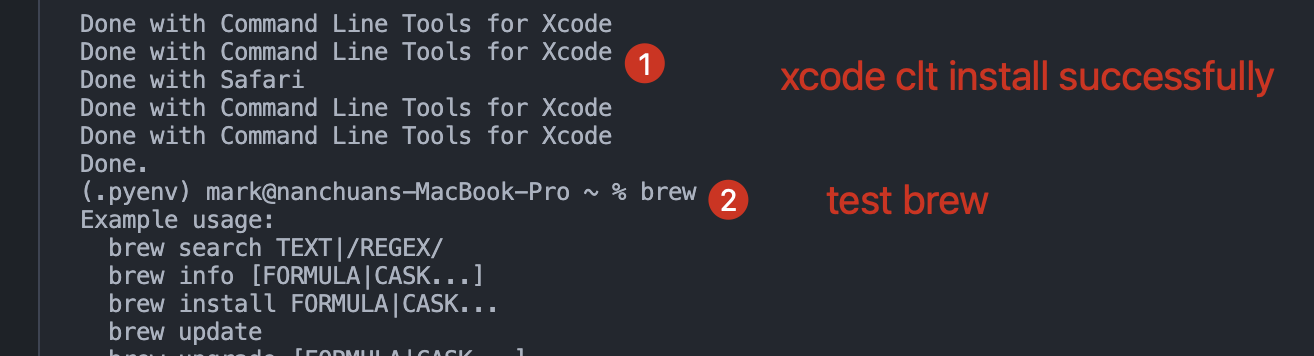
总之,网速慢就换镜像,缺工具就安装,目标就是把homebrew更新完成,以后就可以直接使用brew去安装各种好用的命令行工具了。
terminal support 1: iTerm
Visit iTerm2 - macOS Terminal Replacement to download and install the most welcome terminal on MacOS.
The comparison between mac built-in terminal and iTerm2:
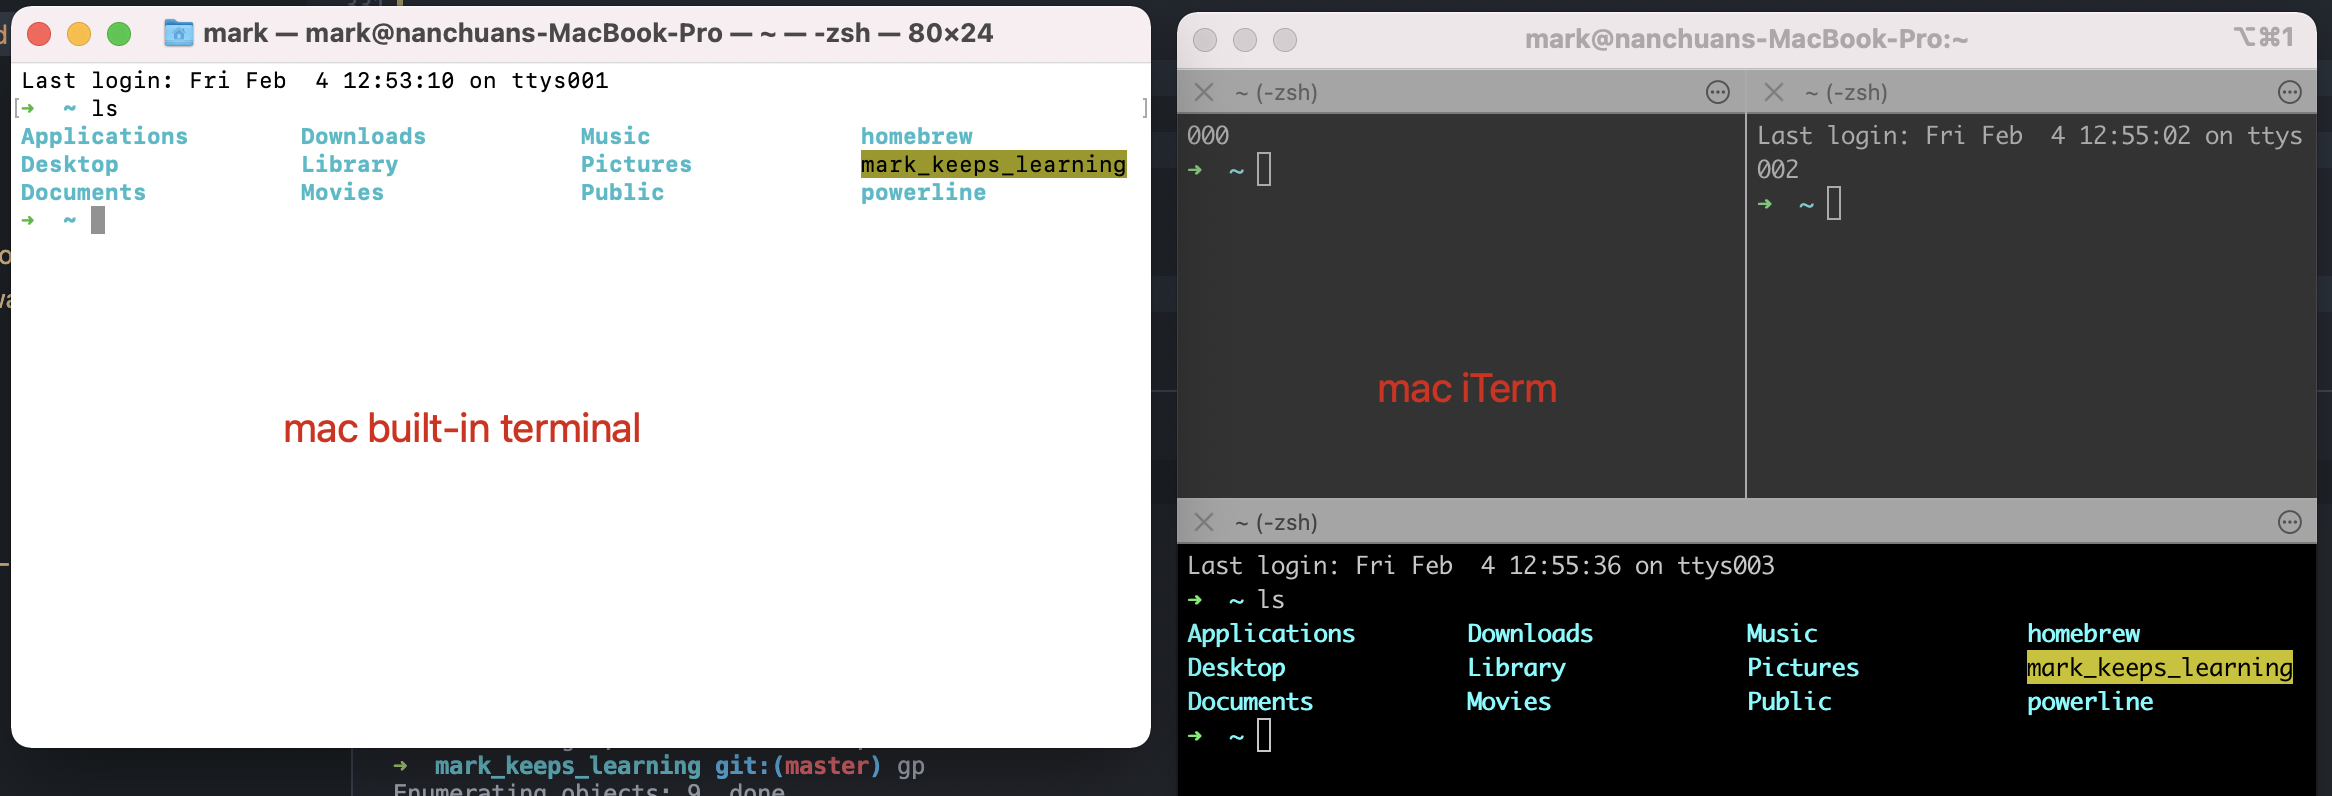
The favorite feature of iTerm2 to me is the detachable interface and custom preferences (e.g. re-define what shortcuts behave like).
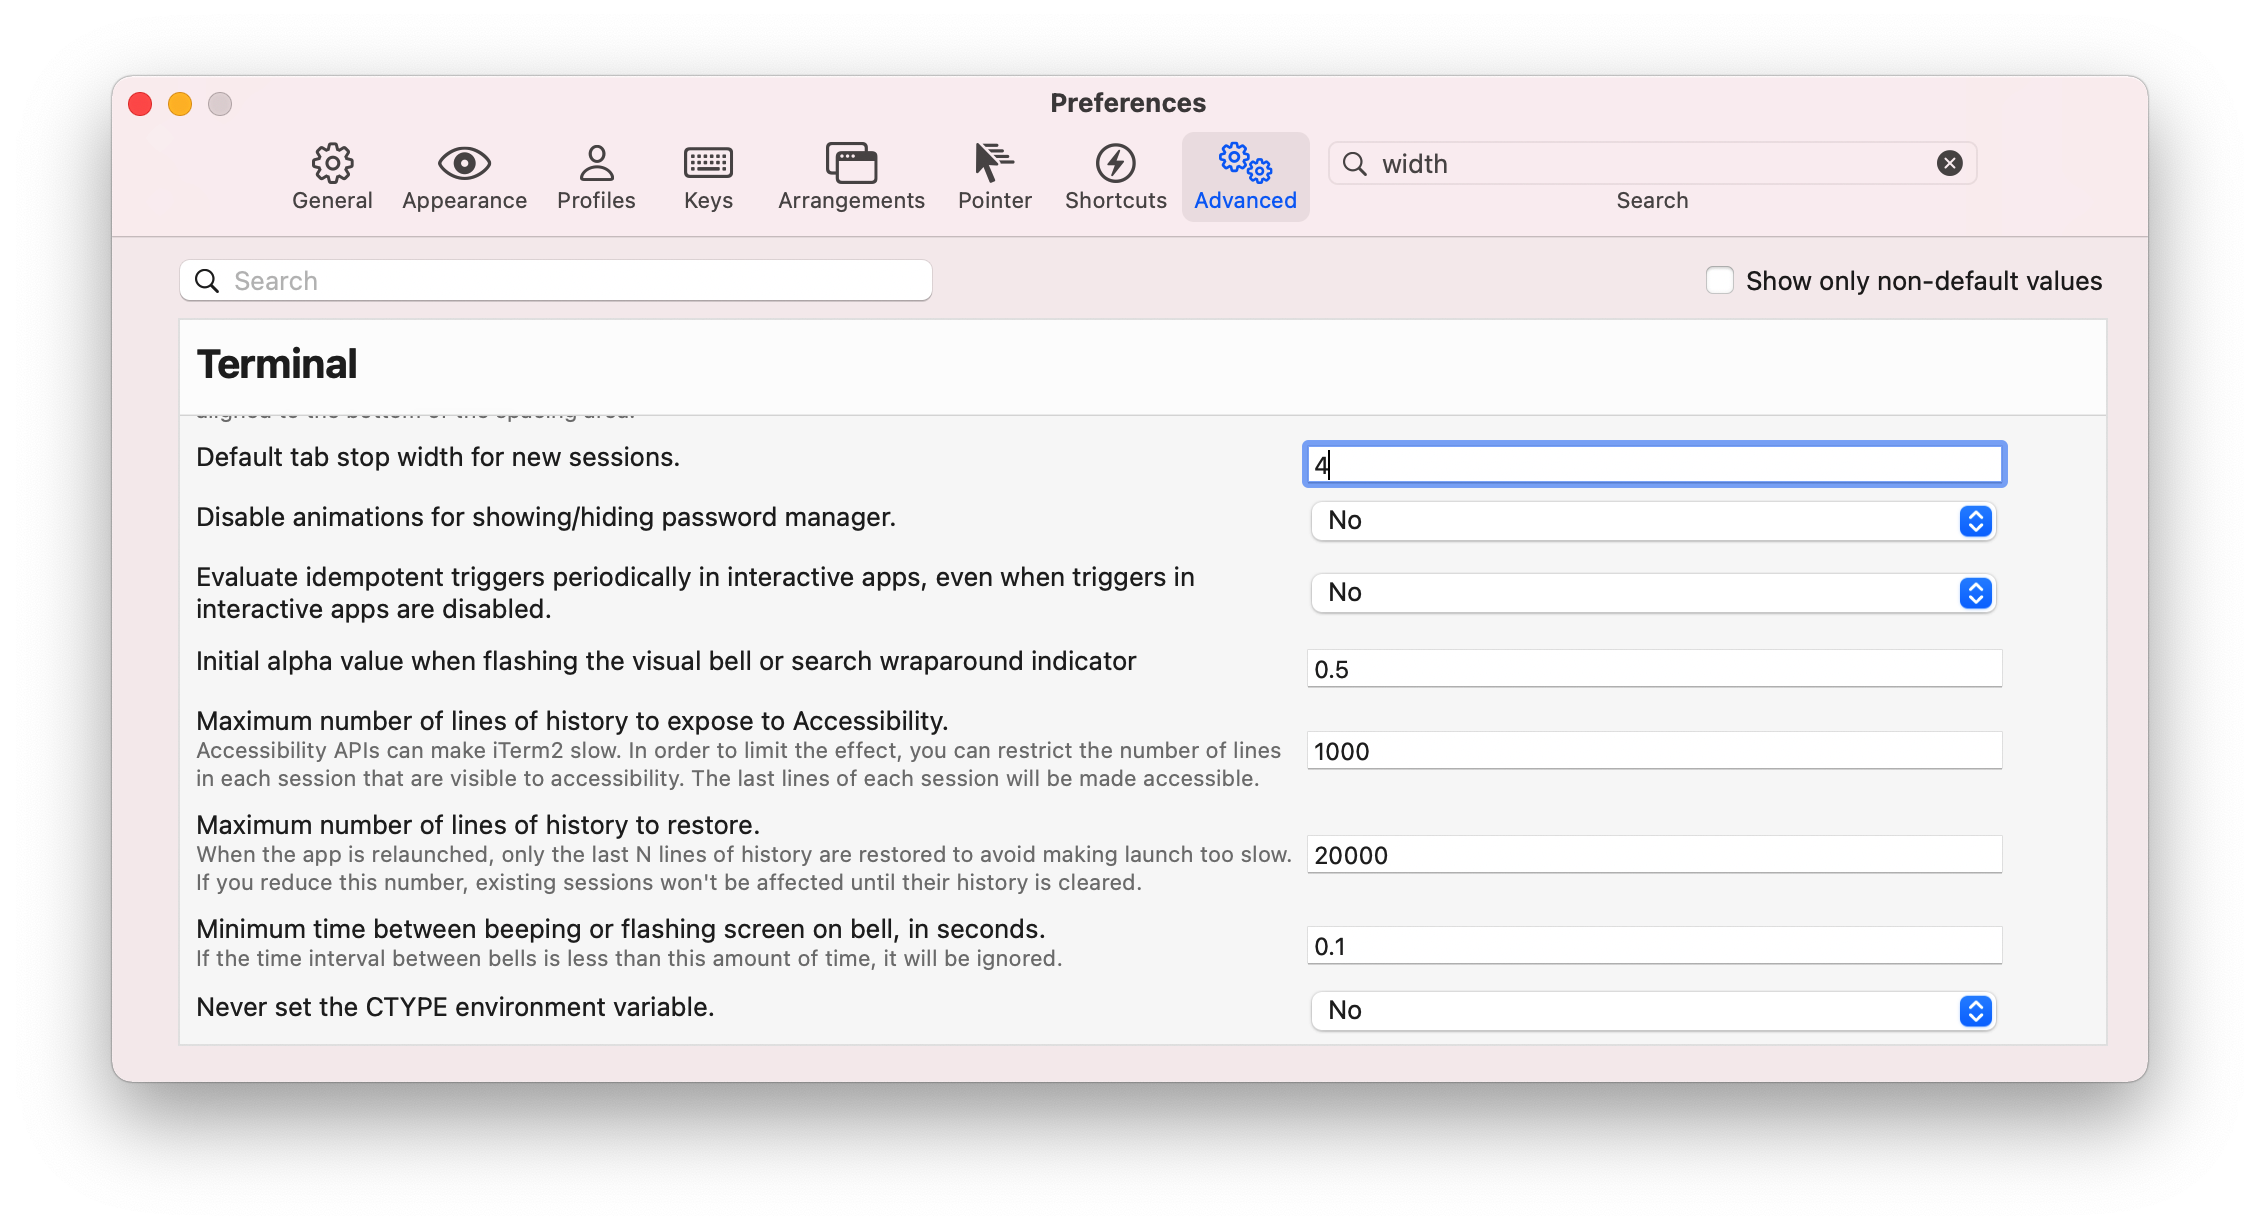
iterm config tab width to 4
how to open iTerm in Finder (click a folder and then using shortcut to trigger)
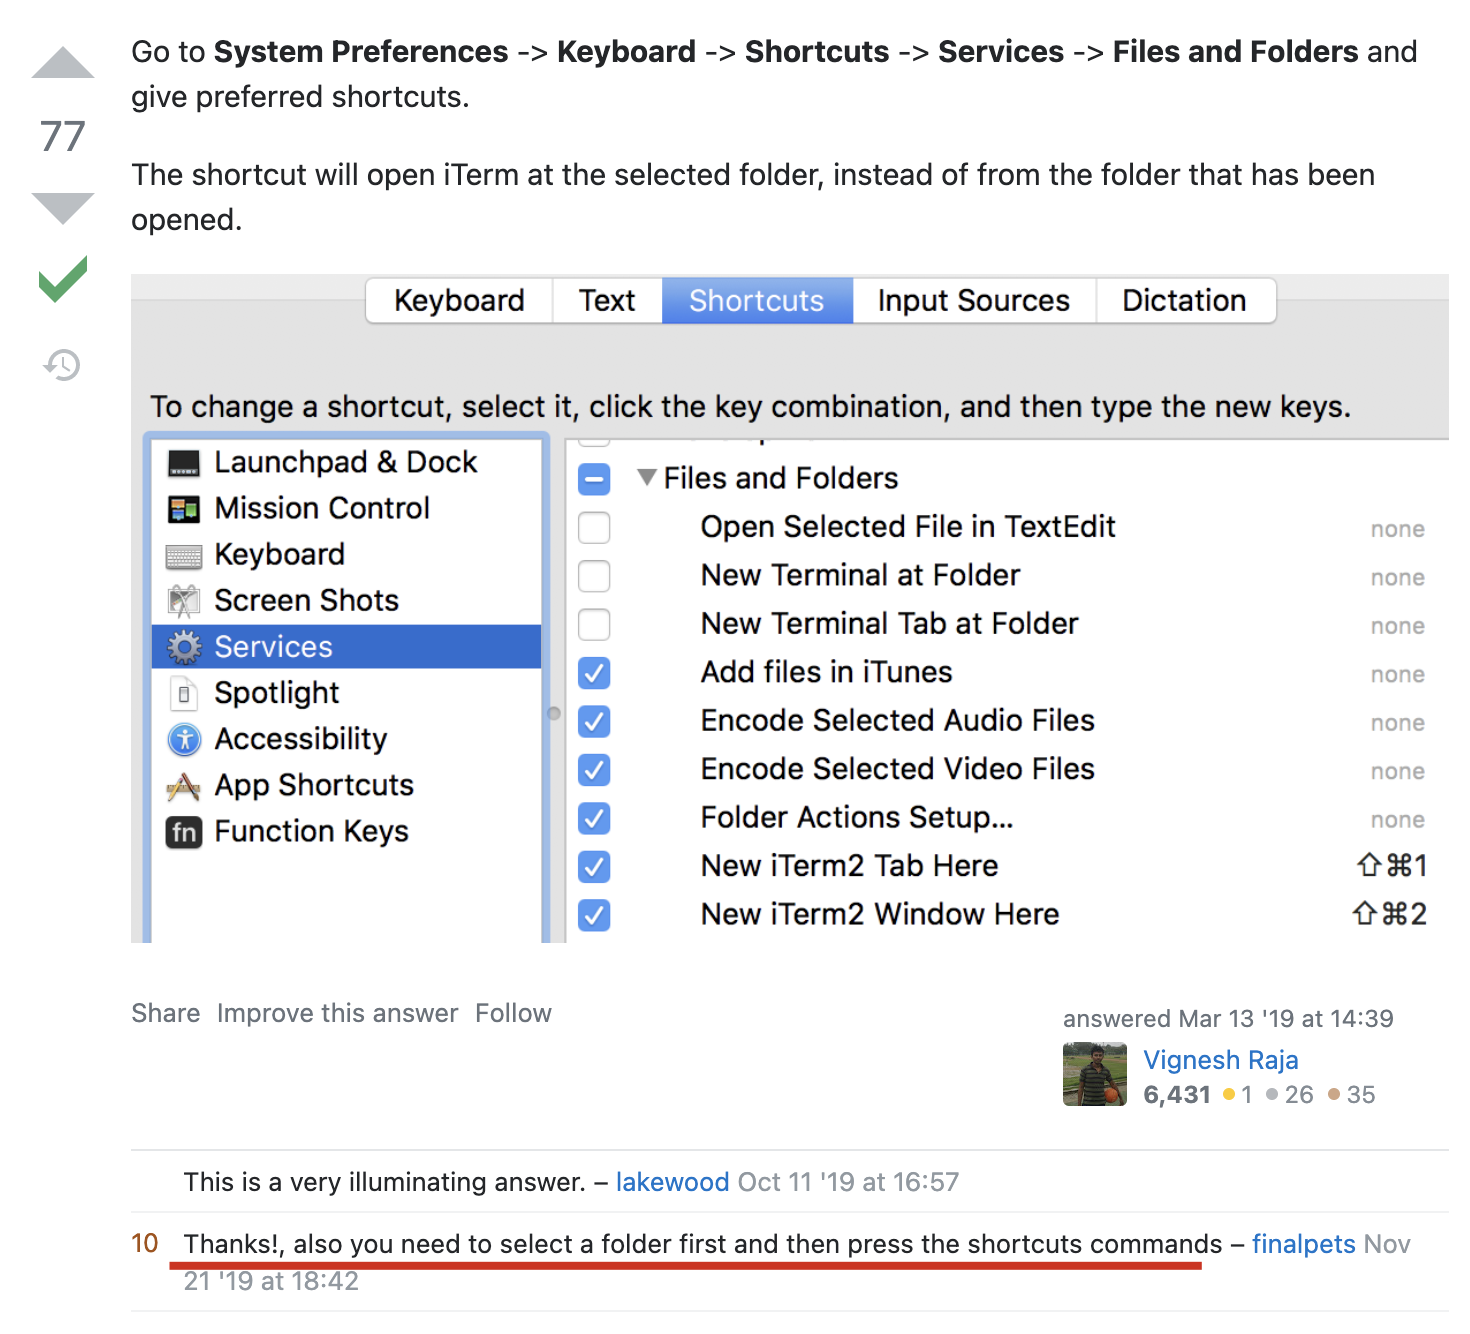
ref
TODO: open iTerm in Finder (not need to click a folder first)
terminal support 2: oh-my-zsh
Since the raw terminal is not so delightful, we can try zsh, and oh-my-zsh has done a good prebuilts on top of zsh, so I recommend here via only one line of command as supposed from Oh My Zsh - a delightful & open source framework for Zsh:
sh -c "$(curl -fsSL https://raw.github.com/ohmyzsh/ohmyzsh/master/tools/install.sh)"
The result may look like this:

However, if you occur the net problem like this: curl: (7) Failed to connect to raw.githubusercontent.com port 443: Connection refused, which means you are blocked, you have a few of choices.
The first one I used to is to test the best ip to connect to the raw.githubusercontent.com via 多个地点 Ping 服务器,网站测速 - 站长工具 and write the best ip to /etc/hosts.
But now, things come easier since I can directly set the HTTP(S)_PROXY in terminal as instructed by Failed to connect to raw.githubusercontent.com:443 - 知乎 via:
IP=localhost
PORT=7890
export https_proxy=http://$IP:$PORT http_proxy=http://$IP:$PORT all_proxy=socks5://$IP:$PORT
1. 关于 proxy
这个改 proxy 方法,比较适合有 vpn 的小伙伴,并且与上文安装homebrew时提到的修改 git 的 proxy 是异曲同工的,只不过改的目标对象不一样。
没有 vpn 的话就推荐在/etc/hosts中修改 DNS,方法也就是我说的测速(推荐),或者修改 DNS 为 8.8.8.8 之类的(根据以前经验,其实并不一定靠谱)
2. 关于使用 zsh 前后对比
在使用zsh之前和之后差异还是很明显的,比如这是使用之前的,命令行运行部分与所在路径部分都是“白纸黑字”,不太容易区分,也很不“酷”

换成 zsh 后,整个就清爽多了:

3. 关于 zsh 切换主题
如果你细心观察一些大佬的命令行界面,会发现还会有rainbow之类的彩色效果,类似这样: 
很简单只需要修改一下~/.zshrc中的ZSH_THEME关键字即可,用命令行可以如下:
# install gsed for sed like usage
brew install gsed

# change current zsh theme to `agnoster`
gsed -i -E 's|ZSH_THEME=".*"|ZSH_THEME="agnoster"|' ~/.zshrc

# re-start zsh to make new config work
exec zsh
具体可以参考: Themes · ohmyzsh/ohmyzsh Wiki,这里有很多主题可供你选择使用,当然你可能还需要安装对应的字体(基于 python)。 :::
TODO: terminal support 3: tmux
TODO: terminal support 4: vim
custom terminal shortcuts
Goal 1
⌥ + left--> back jump one word⌥ + right--> front jump one word⌥ + delete--> back delete one word⇧ + ⌥ + delete--> front delete one word
Goal 2
⌘ + left--> back jump to the beginning of one line⌘ + right--> front jump to the end of one line⌘ + delete--> back delete one line⇧ + ⌘ + delete--> front delete one line
Goal 3
⌘ + z--> undo⇧ + ⌘ + z--> redo
Realization of Goal 1
- open your
terminaloriTerm2 - open
Preference | Profiles | Keys - pick the choice of
Left Option keyasEsc+, so that⌥ + bequalsEsc + bperforming a back word pointer jump,⌥ + fequalsEsc + fperforming a front word pointer jump and⌥ + deleteequalsEsc + deleteperforming a word back delete. - To make point 3 work, you need to click the next panel of
Key Mappings, and add the above 2 operations of left and right jump(delete is the default, so no need to map) like the following:
- At the same time, add the map of {
⌘ + delete:0x15,⌘ + left:0x01,⌘ + right:0x05} in thesend the hex codechoice as the following:
ref
- Delete a word and a line in iTerm2 | Let's Meet Brian 🌴
- [Strongly Recommended] https://stackoverflow.com/a/29403520/9422455
TODO: 合并mac-howto
TODO: final killer on MacOS
result

ref
mac experience
mac 用熟的体现
- 应用切换、网页搜索
- 基于
Alfred,直接用⌘ + Space输入关键字,敲下回车立即打开预定义的搜索引擎(谷歌、必应或百度等),实现秒搜
- 基于
- 如何基于快捷键提升浏览器使用效率
- 关于关闭多个选项卡
- 背景
- 一直以来,当我为了解决 K 个问题而打开 N 个浏览器标签页后,我也许会在 1. 为解决第 i 个问题欲打开第 N+1 个标签页, 2. 已经解决完其中的 j 个问题 这两种情况下觉得目前标签页太多太乱以至于想全部关掉,然后完事或者重新启动。
- 问题
- 这里面的问题在于已经打开的 N 个标签页,尽管有很多不是那么有价值,也有很多当时过了但自己目前可能已经忘了,还有一些是当时搁置欲打算回头再看的,因此事实上不能一刀切,直接 ⌘ + Q 。。。
- 比较好的做法重新回顾这些标签页,然后一个个关掉,听起来很烦很慢很不能接受,那是因为需要一点小技巧,那就是使用 ⌘ + W 快速关闭页面,而非用鼠标去找 close 的叉叉。即使是将鼠标放在关闭标签页的叉叉处(一定概率下可以连续关闭好多个标签页),也存在接下来最重要的一个问题。
- 背景
- 新的感悟与挑战
- 目前我已经全面进入个人文档化新时期,将记录所有学习、工作、生活的问题、解决方案与感悟,因此对于 N 个浏览器里的信息,即使是在回收(关闭)之时,也要榨尽它们的最后一丝价值。所以在关闭浏览器的同时,我还开着 VSCode 进行信息整理,因此当我用 ⌘ + Tab 进行 VSCode 与浏览器的切换之时,全程都是用的键盘,如果此时为了关闭浏览器标签页而去用鼠标(触摸板),这就会产生额外的“进程开销”!
- 因此,最好的做法就是,继续使用快捷键的 ⌘ + W 用于关闭浏览器的标签页(然后就自动展示下一个标签页的内容,并且可以继续使用 ⌘ + W,而不会像用鼠标那样,有可能位置会有偏移),you see,当你完全使用快捷键时,你有种“人在驾驭机器”的感觉,而非像用鼠标一样视图驱动,所谓视图驱动,也就是“机器驾驭人“的高级说法而已。
- 这才是本质,也是提升效率和满足感的细节之处。
- 关于关闭多个选项卡